| “This site contains affiliate links for which OEMDTC may be compensated” |
NHTSA Campaign Number: 16V559
Component(s): STEERING
Potential Number of Units Affected: 64
Manufacturer: Chrysler (FCA US LLC)
SUMMARY:
Chrysler (FCA US LLC) is recalling certain model year 2015 RAM
 2500 trucks, and RAM
 3500 trucks and cab chassis.
The affected vehicles may have inadequate welds securing the front track bar frame brackets, possibly resulting in the bracket components separating from the frame.
CONSEQUENCE:
If the bracket components separate from the frame, the vehicle may have a reduced response to steering input, increasing the risk of a crash.
REMEDY:
Chrysler will notify owners, and dealers will weld on a new track bar frame bracket or replace the frame of the vehicle, free of charge.
The recall began on September 14, 2016.
Owners may contact Chrysler customer service at 1-800-853-1403.
Chrysler ’s number for this recall is S58.
NOTES:
Owners may also contact the National Highway Traffic Safety Administration Vehicle Safety Hotline at 1-888-327-4236 (TTY 1-800-424-9153), or go to www.safercar.gov.
Check if your Vehicle has a Recall
September 2016
Dealer Service Instructions for:
Safety Recall S58 / NHTSA 16V-559 Front Suspension Track Bar Frame Bracket
Models
| 2015 | (D2) | RAM Truck (3500 series) (3500 series) |
| (DD) | RAM Cab Chassis (3500 series) Cab Chassis (3500 series) | |
| (DJ) | RAM Truck (2500 series, excluding Power Wagon models) (2500 series, excluding Power Wagon models) |
NOTE: This recall applies only to the above vehicles built from May 24, 2014 through July 03, 2014 (MDH 052415 through 070304).
| IMPORTANT: Some of the involved vehicles may be in dealer new vehicle inventory. Federal law requires you to complete this recall service on these vehicles before retail delivery. Dealers should also consider this requirement to apply to used vehicle inventory and should perform this recall on vehicles in for service. Involved vehicles can be determined by using the VIP inquiry process. |
Subject
The front suspension track bar frame bracket on about 60 of the above vehicles may have been improperly welded to the frame rail during the manufacturing process. The front suspension track bar frame bracket welds may break and allow the front suspension track bar frame bracket to separate from the frame rail. A separated front suspension track bar frame bracket will cause diminished steering response and could cause a crash without warning.
Repair
The front suspension track bar frame brackets must be replaced on all involved vehicles.
Parts Information
No parts are required to perform this service procedure.
Parts Return
No parts return required for this campaign.
Special Tools
The following special tool is required to perform this repair:
| Puller, Drag Link |
Service Procedure
A. Schedule a Weld Team
The front axle must be removed on all involved vehicles to gain access to the front suspension track bar frame bracket. Use the following procedure to schedule a weld team.
- Have the vehicle information available (VIN / Mileage / Owner Information)
- Enter the DealerCONNECT system to initiate a Service Technical Assistance Resource (STAR) case.
- Select the “Service” tab.
- Select “TechCONNECT” in the “Repair Information” box.
- Enter the Vehicle Identification Number (VIN) and click the blue “Submit” button.
- Click the “Request Technical Assistance” box.
- Follow the screen prompts to start a STAR case.
- FCA will schedule a weld team to repair the welds at your dealership.
CAUTION: Do not remove the front axle assembly until a weld team has been scheduled to perform the repair. Continue with Section B. Remove Front Axle for Welding Access just prior to the scheduled date and time the weld team is to arrive at your dealership.
B. Remove Front Axle for Welding Access
NOTE: The front axle must be removed on all involved vehicles to gain access to the front suspension track bar frame bracket. The front axle should be removed just prior to the scheduled welding appointment made with the Service Technical Assistance Resource (STAR) center.
- Position the truck on an appropriate hoist.
- Place the vehicle in neutral.
- Disconnect and isolate the negative battery cable(s) from the battery post(s).
- Remove and save the front wheel/tire assemblies.
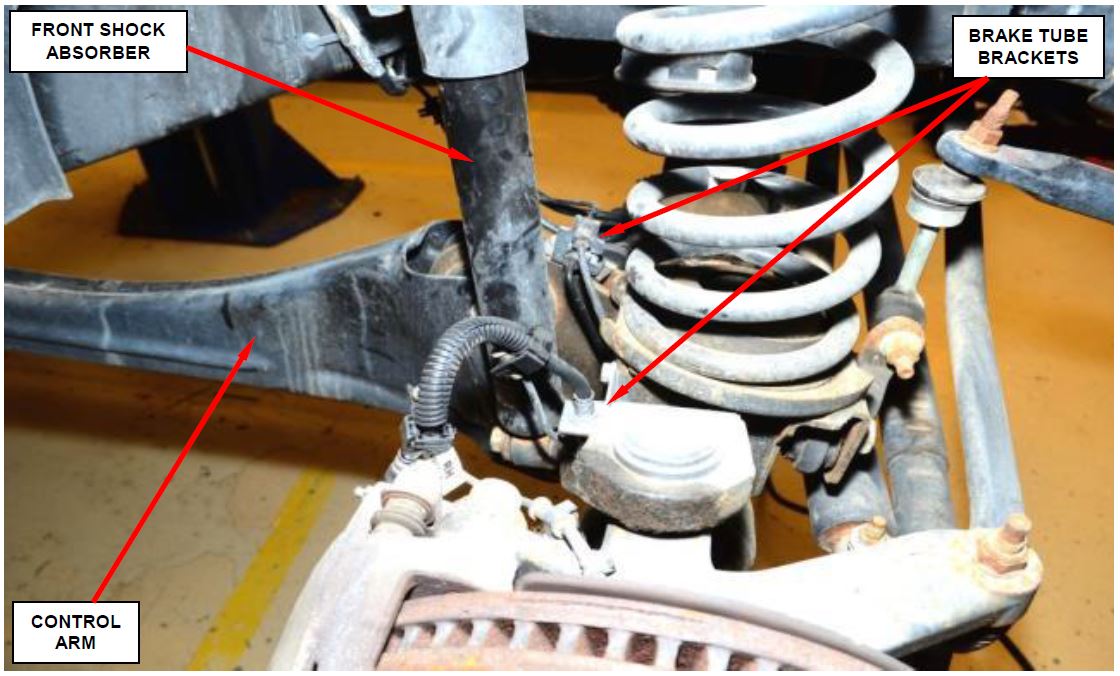
- Remove and save the brake tube bracket bolt from the right and left control arm brackets (Figure 1).
- Remove and save the brake tube bracket bolt from the right and left coil spring lower bracket (Figure 1).
Figure 1 – Brake Tube Brackets
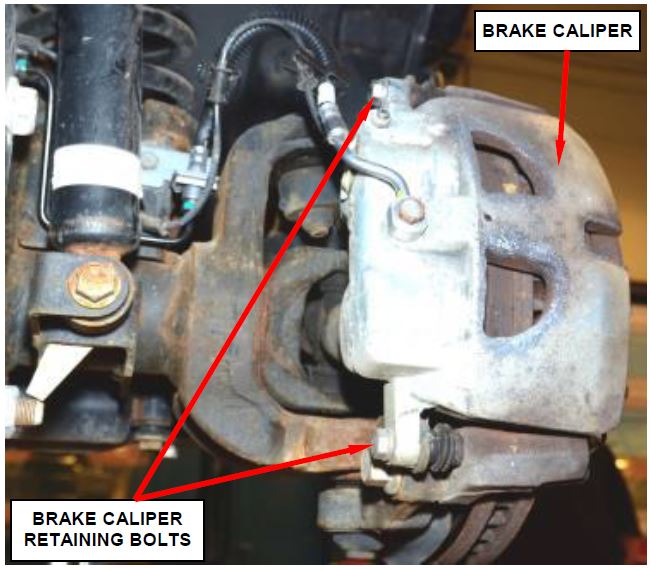
- Remove the front brake caliper retaining bolts and support the calipers using bungee cords or equivalent (Figure 2).
CAUTION: Do not allow the brake caliper to hang from brake caliper flex hoses.
NOTE: Do not disconnect the brake caliper flex hoses from the brake caliper.
Figure 2 – Brake Caliper Retaining Bolts
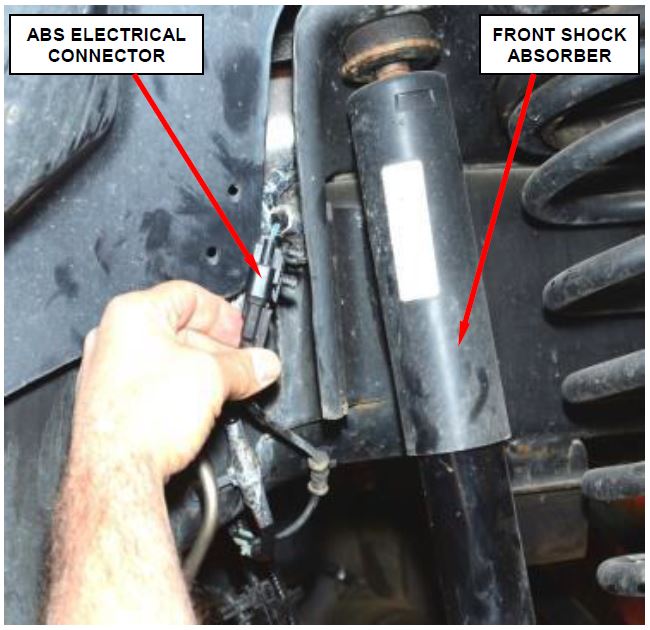
- Disconnect the Anti-Lock Brake System (ABS) wheel speed sensor electrical connector and unclip the ABS wire from brake hose (Figure 3).
Figure 3 – ABS Wheel Speed Sensor Electrical Connector
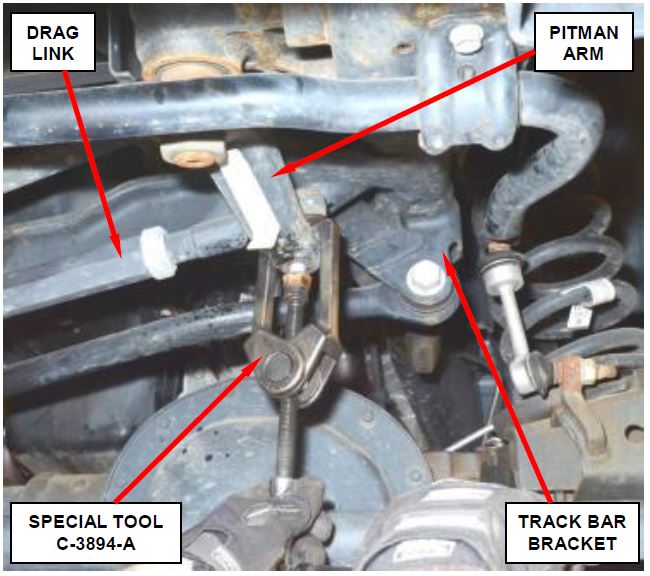
- Using special tool C-3894-A, disconnect the drag link from the pitman arm (Figure 4).
- Disconnect the front axle vent hose at the front axle housing.
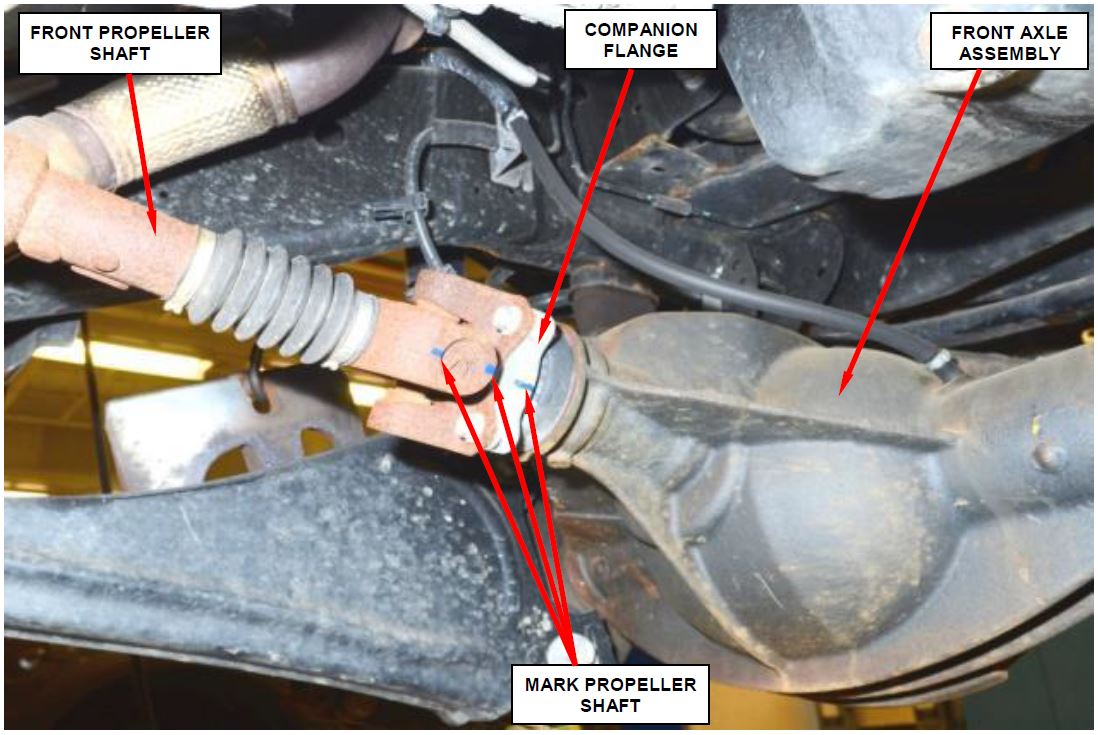
- For vehicles with four wheel drive, mark and then disconnect the front propeller shaft from the front axle companion flange (Figure 5).
CAUTION: Do not allow the front propeller shaft to hang. Use a bungee cord to support the front propeller shaft.
Figure 4 – Disconnect Drag Link from Pitman Arm
Figure 5 – Mark Front Propeller Shaft
- For vehicles with four wheel drive, disconnect the four wheel drive actuator electrical connector (Figure 6).
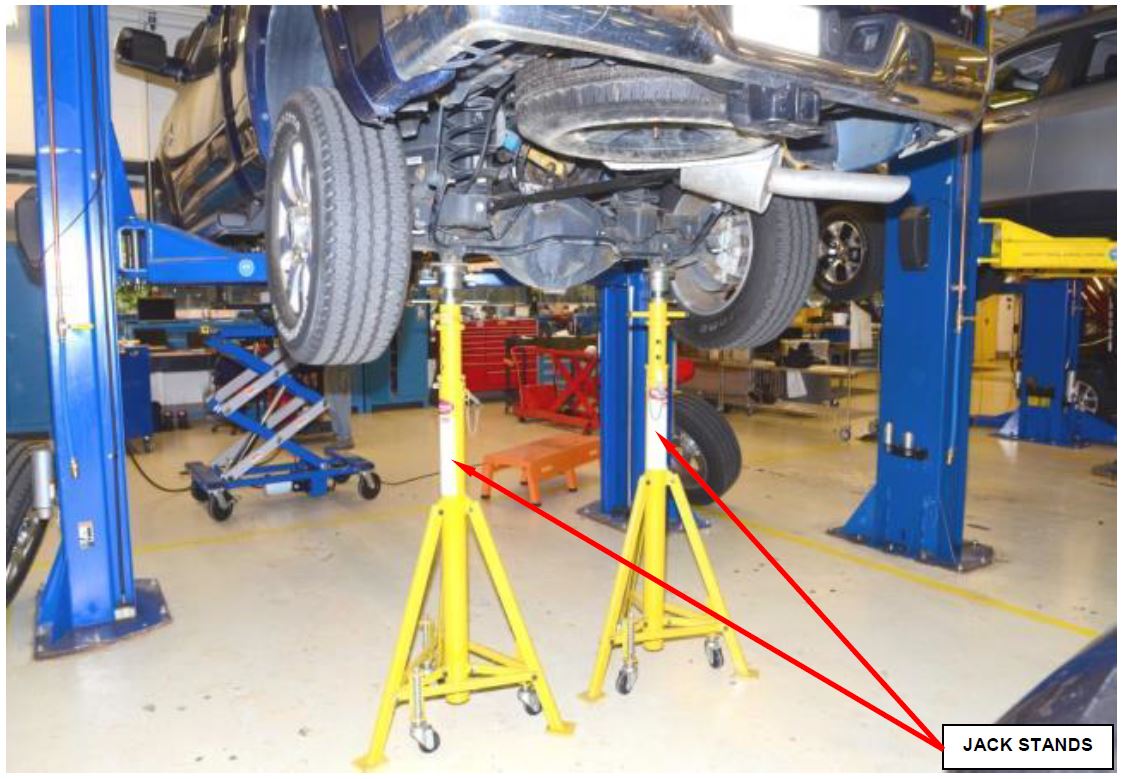
- Place two jack stands under the rear of the vehicle to stabilize the vehicle on the hoist when the front axle is removed (Figure 7).
WARNING: Failure to place jack stands at the rear of the vehicle could allow the vehicle to flip off the hoist when the weight of the front axle is removed.
Figure 7 – Secure Vehicle on Hoist with Jack Stands
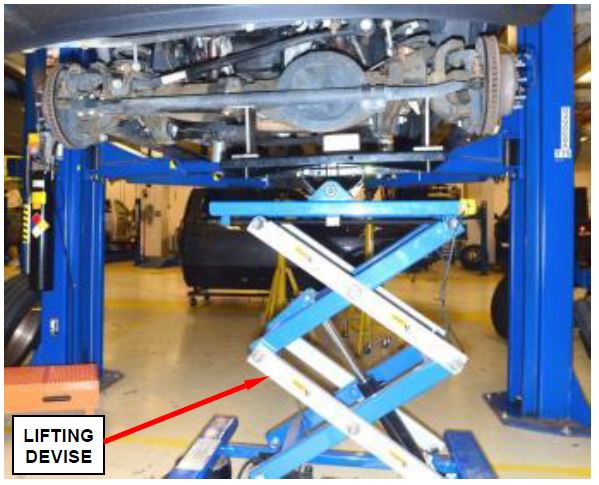
- Secure the front axle to a lifting devise (Figure 8).
WARNING: Be sure to chain and/or strap the axle to the lifting devise to prevent the axle from falling off the lifting devise.
- Remove and save the track bar bolt from the frame bracket.
- Remove and save the lower shock absorbers bolts from the axle brackets.
Figure 8 – Secure Axle to Lifting Devise
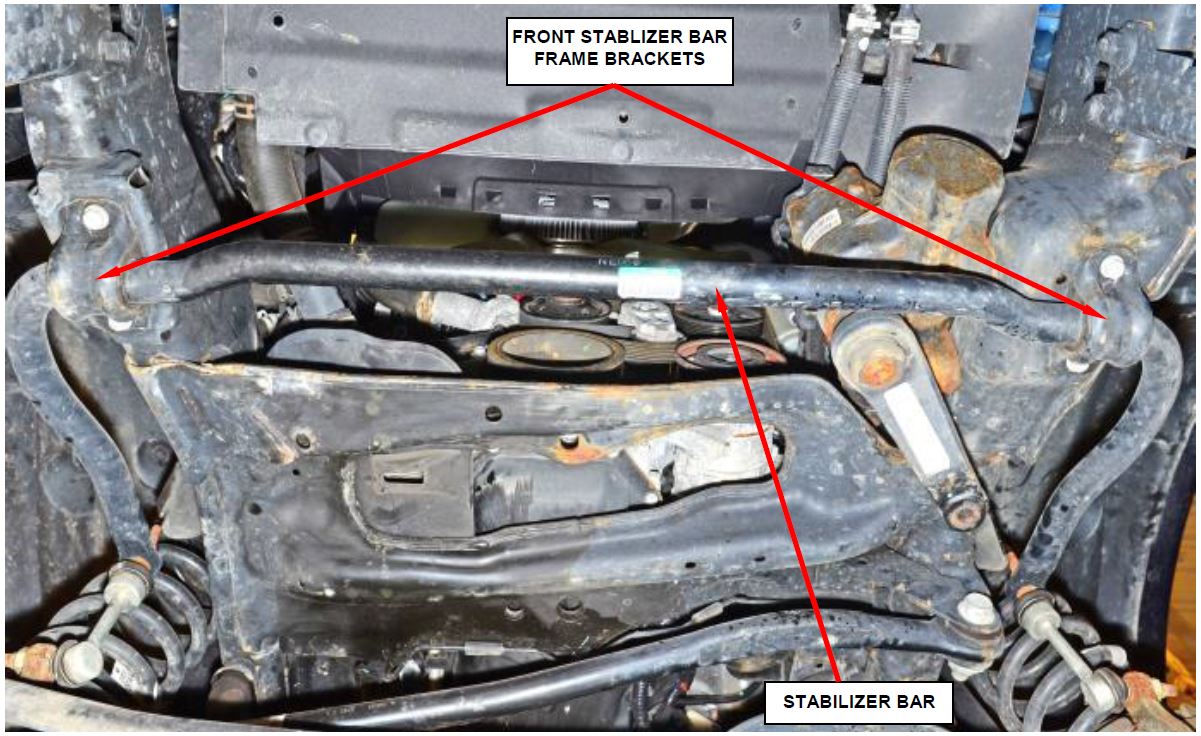
- Disconnect the front suspension stabilizer bar at the frame brackets (Figure 9).
Figure 9 – Front Stabilizer Bar
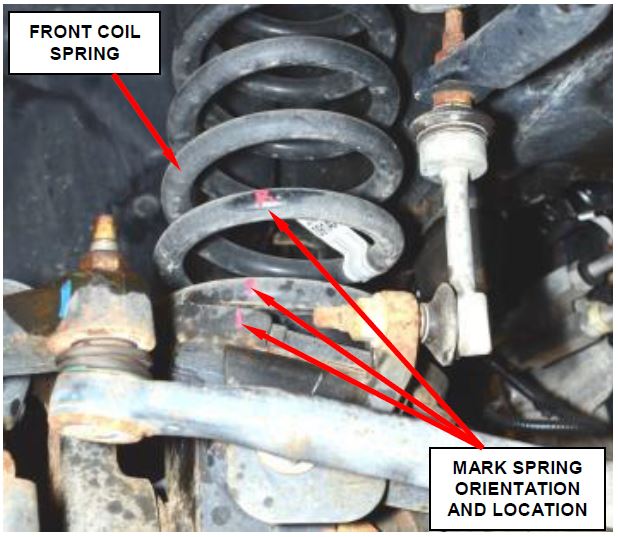
- Using a paint pen or equivalent, mark the right and left front coil spring orientation and location (Figure 10).
- Partially lower the front axle enough to remove the front coil springs.
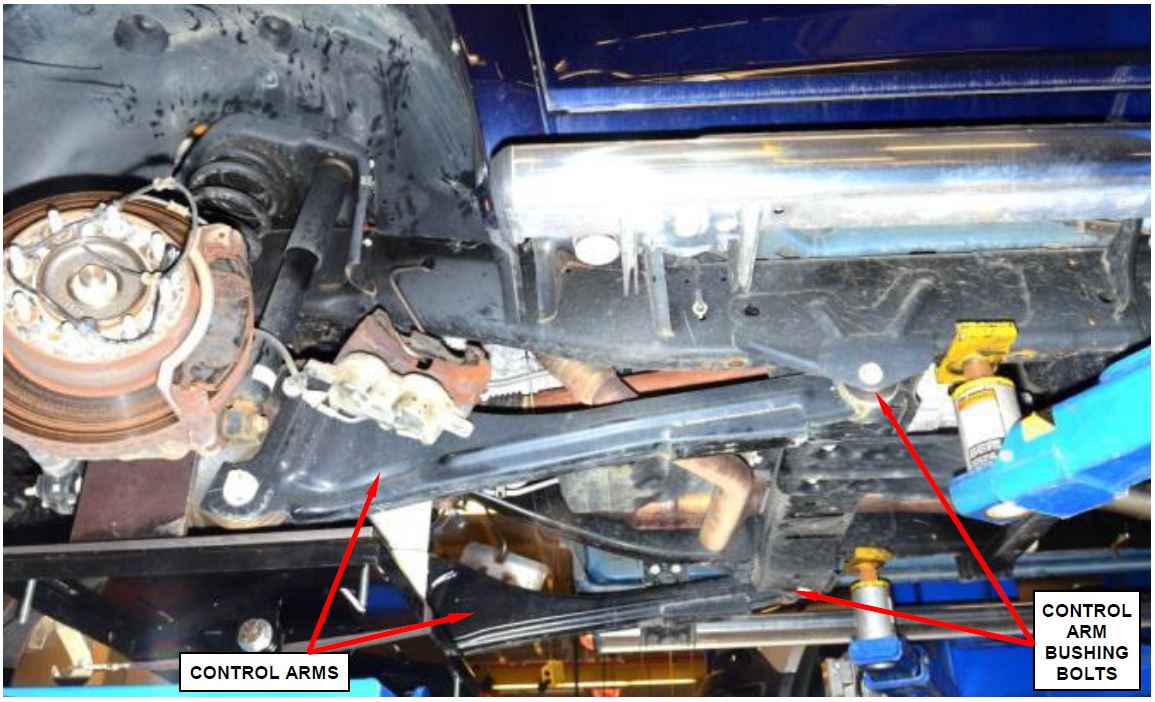
- Remove and save the control arm rear bushing bolts (Figure 11).
Figure 10 – Mark Front Coil Spring Orientation and Location
Figure 11 – Control Arm Bushing Bolts
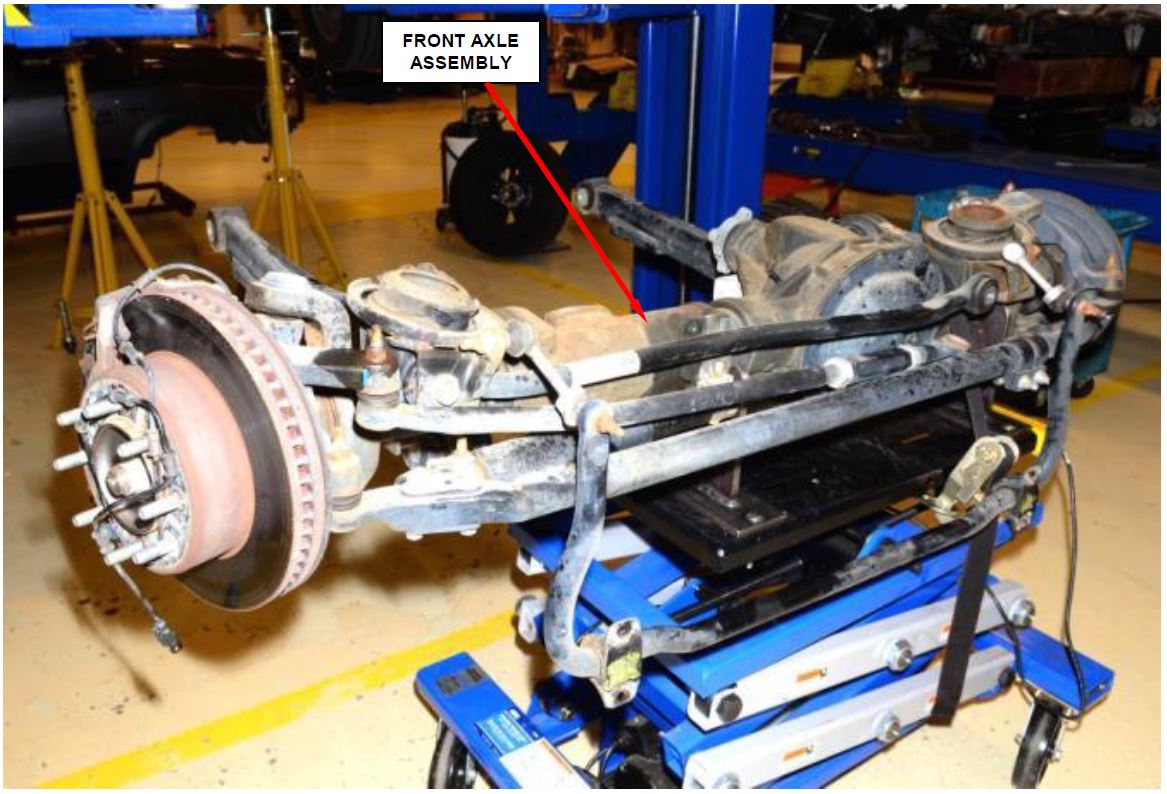
- With the help of an assistant, carefully lower the front axle assembly (Figure 12).
- Move the front axle assembly to a safe location.
- Clear the work area of any flammable liquids and/or debris.
- Install welding curtains around the front of the vehicle.
- After welding process is complete, continue with Section B. Install Front Axle.
Figure 12 – Lower Axle Assembly and Store in Safe Location
B. Install Front Axle
- With the help of an assistant, carefully raise the front axle assembly into position.
- Install the control arm rear bushing bolts. Do not tighten at this time.
- Lower the axle enough to install the front coil springs.
- Raise the front axle into position.
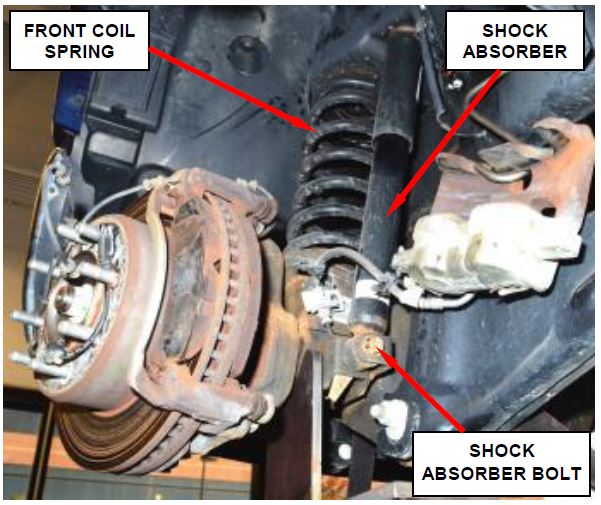
- Install the lower shock absorber bolts and tighten to 100 ft. lbs. (136 N·m) (Figure 13).
Figure 13 – Shock Absorber Bolt
- Remove the lifting devise from the front axle.
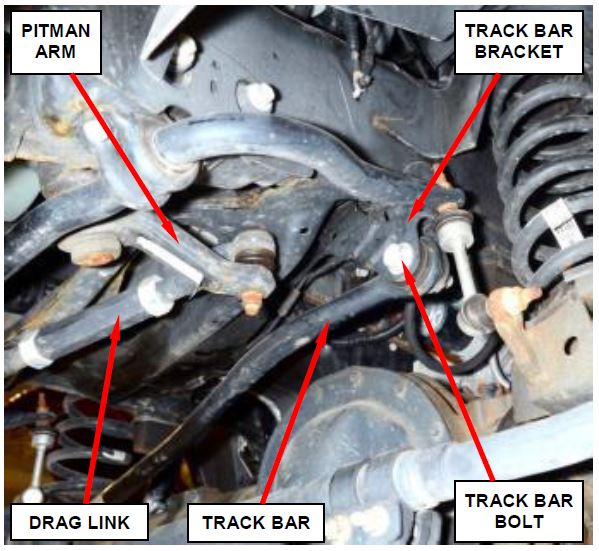
- Connect the drag link to the pitman arm. Tighten the nut to 27 ft. lbs. (37 N·m). Then tighten the nut an additional ½ turn (Figure 14).
- Place the track bar into position and install the track bar bolt at the frame bracket. Do not tighten at this time (Figure 14).
- Connect the front suspension stabilizer bar at the frame. Tighten the fasteners to 43 ft. lbs. (58 N·m).
- For vehicles with four wheel drive, connect the four wheel drive actuator electrical connector (Figure 6).
Figure 14 – Pitman Arm Nut and Track Bar Bolt
- For vehicles with four wheel drive, connect the front propeller shaft to the front axle companion flange. Tighten the four fasteners to 55 ft. lbs. (75 N·m).
- For vehicles with four wheel drive, connect the front axle vent hose to the front axle housing.
- Remove the jack stands and partially lower the vehicle.
- Install the brake tube bolt to the coil spring lower bracket.
- Install the brake tube bracket bolt to the control arm brackets.
- Route the ABS speed sensor wire along the brake tube and then connect the Anti-Lock Brake System (ABS) wheel speed sensor electrical connector.
- Install the front brake calipers. Tighten the brake caliper retaining bolts to 55 ft. lbs. (75 N·m).
- Install the front wheel assemblies. Tighten the lug nuts to 130 ft. lbs. (176 N·m).
- With the full weight of the vehicle on the suspension, tighten the control arm rear bushing bolts on the left and right side. Tighten the bolts to 133 ft. lbs. (180 N·m). Then tighten the control arm bolts an additional ¼ turn.
- With the full weight of the vehicle on the suspension, tighten track bar bolt to 285 ft. lbs. (386 N·m).
- Pump the brakes several times to move front brake pads against the brake rotor.
- Connect the negative battery cable(s) to the negative battery post(s).
- Place the truck on an alignment rack and perform a complete front end alignment.
NOTE: Follow the alignment rack manufacturer’s instructions to complete the alignment.
- Road test the vehicle to verify alignment results.
- Return the vehicle to the customer.
Completion Reporting and Reimbursement
Claims for vehicles that have been serviced must be submitted on the DealerCONNECT Claim Entry Screen located on the Service tab. Claims submitted will be used by FCA to record recall service completions and provide dealer payments.
Use the following labor operation numbers and time allowances:
| Labor Operation Number | Time Allowance | |
|---|---|---|
| Remove/install front axle for welding access | 13-S5-81-82 | 2.9 hours |
| Related Operation | ||
| Weld Repair Hoist Time | 13-S5-81-50 | 4.0 hours |
| Optional Equipment | ||
| Four Wheel Drive | 13-S5-81-60 | 0.3 hours |
Add the cost of the recall parts package plus applicable dealer allowance to your claim.
NOTE: See the Warranty Administration Manual, Recall Claim Processing Section, for complete recall claim processing instructions.
Dealer Notification
To view this notification on DealerCONNECT, select “Global Recall System” on the Service tab, then click on the description of this notification.
Owner Notification and Service Scheduling
All involved vehicle owners known to FCA are being notified of the service requirement by first class mail. They are requested to schedule appointments for this service with their dealers. A generic copy of the owner letter is attached.
Enclosed with each owner letter is an Owner Notification postcard to allow owners to update our records if applicable.
Vehicle Lists, Global Recall System, VIP and Dealer Follow Up
All involved vehicles have been entered into the DealerCONNECT Global Recall System (GRS) and Vehicle Information Plus (VIP) for dealer inquiry as needed.
GRS provides involved dealers with an updated VIN list of their incomplete vehicles. The owner’s name, address and phone number are listed if known. Completed vehicles are removed from GRS within several days of repair claim submission.
To use this system, click on the “Service” tab and then click on “Global Recall System.” Your dealer’s VIN list for each recall displayed can be sorted by: those vehicles that were unsold at recall launch, those with a phone number, city, zip code, or VIN sequence.
Dealers must perform this repair on all unsold vehicles before retail delivery. Dealers should also use the VIN list to follow up with all owners to schedule appointments for this repair.
Recall VIN lists may contain confidential, restricted owner name and address information that was obtained from the Department of Motor Vehicles of various states. Use of this information is permitted for this recall only and is strictly prohibited from all other use.
Additional Information
If you have any questions or need assistance in completing this action, please contact your Service and Parts District Manager.
Customer Services / Field Operations
FCA US LLC
FRONT SUSPENSION TRACK BAR
FRAME BRACKET
IMPORTANT SAFETY RECALL
S58 / NHTSA 16V-559
This notice applies to your vehicle (VIN: xxxxxxxxxxxxxxxxx).
This notification letter is sent to you in accordance with the National Traffic and Motor Vehicle Safety Act.
Dear: (Name)
FCA US LLC has decided that a defect, which relates to motor vehicle safety, exists in certain 2015 model year 2500/3500 series RAM trucks and 3500 series RAM
 cab chassis trucks.
| The problem is… | Some of the above vehicles may have a front suspension track bar frame bracket that was improperly welded during the manufacturing process. The front suspension track bar frame bracket welds may break and allow the front suspension track bar frame bracket to separate from the frame rail. A separated front suspension track bar frame bracket will cause diminished steering response and could cause a crash without warning. |
| What your dealer will do… | FCA will repair your vehicle free of charge. To do this, your dealer will replace the track bar bracket. The track bar bracket replacement process could take 5 to 7 days. However, additional time may be necessary depending on service schedules. |
| What you must do to ensure your safety… | Simply contact your Chrysler , Jeep , Jeep , Dodge , Dodge or RAM or RAM dealer right away to schedule a service appointment. Please bring this letter with you to your dealer. dealer right away to schedule a service appointment. Please bring this letter with you to your dealer. |
| If you need help… | If you have questions or concerns which your dealer is unable to resolve, please contact the |
FCA Recall Assistance Center at 1-800-853-1403.
Please help us update our records by filling out the attached prepaid postcard if any of the conditions listed on the card apply to you or your vehicle. If you have further questions go to recalls.mopar.com.
If you have already experienced this specific condition and have paid to have it repaired, you may visit www.fcarecallreimbursement.com to submit your reimbursement request online or you can mail your original receipts and proof of payment to the following address for reimbursement consideration: FCA Customer Assistance, P.O. Box 21-8004, Auburn Hills, MI 48321-8007, Attention: Recall Reimbursement. Once we receive and verify the required documents, reimbursement will be sent to you within 60 days. If you’ve had previous repairs and/or reimbursement you may still need to have the recall repair performed on your vehicle.
If your dealer fails or is unable to remedy this defect without charge and within a reasonable time, you may submit a written complaint to the Administrator, National Highway Traffic Safety Administration, 1200 New Jersey Ave., S.E., Washington, DC 20590, or you can call the toll-free Vehicle Safety Hotline at 1-888-327-4236 (TTY 1-800-424-9153), or go to safercar.gov.
We’re sorry for any inconvenience, but we are sincerely concerned about your safety. Thank you for your attention to this important matter.
Customer Services / Field Operations
FCA US LLC
Note to lessors receiving this recall: Federal regulation requires that you forward this recall notice to the lessee within 10 days.
 Loading...
 Loading...
