| “This site contains affiliate links for which OEMDTC may be compensated” |
NUMBER: 23-005-15
GROUP: Body
DATE: February 06, 2015
THIS SERVICE BULLETIN IS ALSO BEING RELEASED AS RAPID RESPONSE TRANSMITTAL (RRT) 15-018. ALL APPLICABLE SOLD AND UN-SOLD RRT VIN’s HAVE BEEN LOADED. TO VERIFY THAT THIS RRT SERVICE ACTION IS
APPLICABLE TO THE VEHICLE, USE VIP OR PERFORM A VIN SEARCH IN TECHCONNECT. ALL REPAIRS ARE REIMBURSABLE WITHIN THE PROVISIONS OF WARRANTY.
SUBJECT:
Decklid Contacts The Body Side Aperture Above The Stop Lamp
OVERVIEW:
This bulletin involves adjusting the decklid and touching up paint as required.
MODELS:
| 2015 | (LD) | Dodge Charger Charger |
NOTE: This bulletin applies to vehicles built on or after November 7, 2014 (MDH 1107XX) and on or before November 22, 2014 (MDH 1122XX).
SYMPTOM/CONDITION:
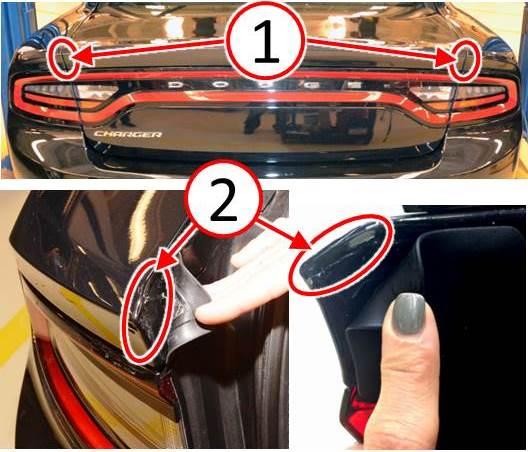
The customer may describe contact between the decklid and body side aperture (1) and/or chipped paint (2) on left or right side above the stop lamp (Fig. 1).
Fig. 1 Contact Areas And Chipped Paint
1 – Decklid To Body Side Aperture Contact
2 – Chipped Paint
DIAGNOSIS:
If a customer’s VIN is listed in VIP or your RRT VIN list, perform the repair. For all other customers that describe the symptom/condition, perform the Repair Procedure.
PARTS REQUIRED:
| Qty. | Description | Part No. |
|---|---|---|
| 1 (AR) | PX8 Pitch Black | 04342250AB |
| 1 (AR) | PW7 Bright White Clear Coat | 04889598AB |
| 1 (AR) | PAU Granite Crystal Met. Clear Coat | 68183829AA |
| 1 (AR) | PBX Jazz Blue Pearl Coat | 68183807AA |
| 1 (AR) | PSC Billet Silver Metallic Clear Coat | 05163738AA |
| 1 (AR) | PR3 TorRed | 05163108AA |
| 1 (AR) | PXT Phantom Black Tri-Coat Pearl | 68183821AA |
| 1 (AR) | PRY Redline Red Tri-Coat Pearl | 05163750AA |
| 1 (AR) | PWD Ivory Tri-Coat Pearl | 05163838AA |
NOTE: Each bottle of touch-up paint will service several vehicles (shop supply).
SPECIAL TOOLS/EQUIPMENT REQUIRED:
| 2022300230 | Gauge, Non-Metallic, Clearance Measurement or equivalent non-metallic clearance gauge. |
NOTE: The Non-Metallic Clearance Gauge is a non-reimbursable shop tool.
REPAIR PROCEDURE:
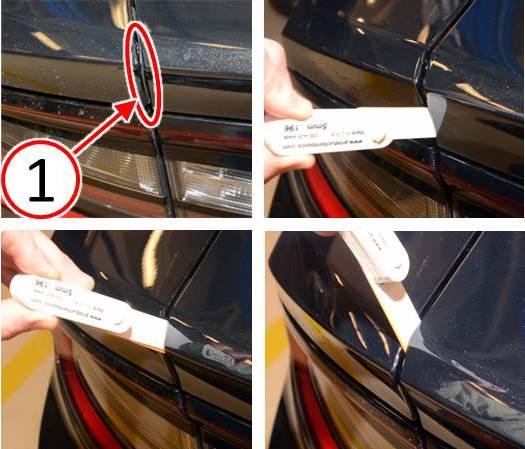
- Use a 1.75 mm plastic feeler guage or equivalent to measure the gap (1) between the decklid and body side aperture at the points identified in (Fig. 2). The 1.75 mm feeler gauge should slide freely between the decklid and body side aperture without binding or being unable to pass.
Fig. 2 Measure Decklid To Body Side Aperture Gap
1 – Gap Between Gauge And Fender
- Did the 1.75 mm feeler gauge pass freely between the decklid and body side aperture without binding, indicating the gap is at least 1.75 mm or greater?
- YES>>> This bulletin has been completed, use LOP (23-00-05-91) to close the active RRT.
- NO>>> Continue with Step #3.
- Open the decklid.
- Open the load floor.
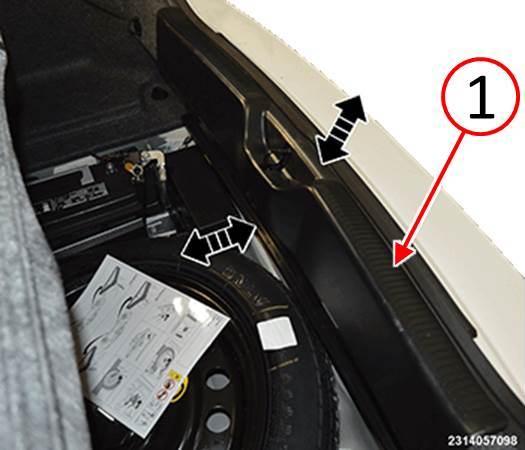
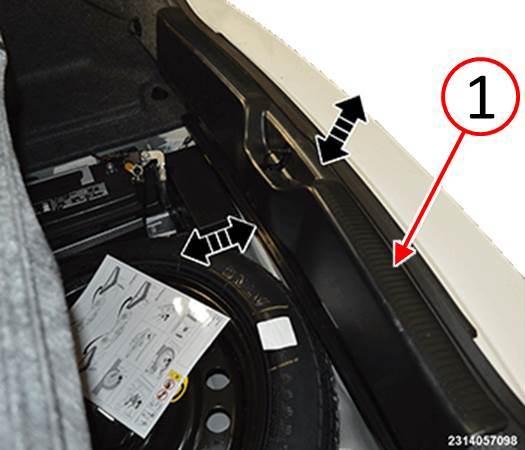
- Pull forward at the bottom of the trunk trim panel (1) to release the lower retaining clips (Fig. 3).
- Lift the trunk trim panel (1) up to release the upper retaining clips and remove the panel (Fig. 3).
Fig. 3 Remove Trunk Trim Panel
1 – Trunk Trim Panel
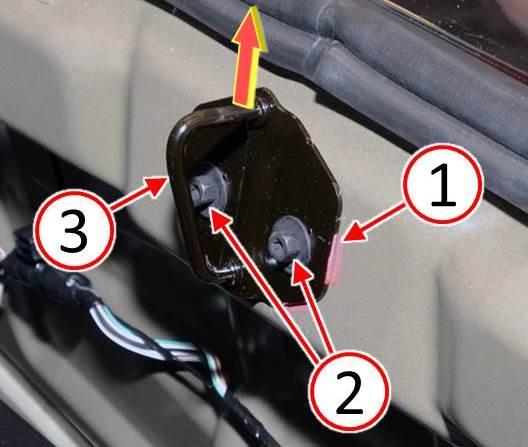
- Using a marking pen or equivalent, mark the decklid striker current position (1) (Fig. 4).
- Loosen the two striker fasteners (2) (Fig. 4).
- Position the striker (3) approximately 1 mm higher then tighten the fasteners (2) to 8 N·m (52 in. lbs.) (Fig. 4).
1 – Mark Striker Current Position
2 – Striker Fasteners
3 – Decklid Striker
- After adjusting the striker, ensure the striker does not rub on the decklid latch. Reposition the striker if necessary.
- Check the decklid to body side aperture gaps/flushness measurements and closing effort. Decklid to body side aperture gap should be 1.75 mm or greater as measured in Step #1 and decklid should be no more than 1 mm over flush in relation to the body side aperture.
- Did adjusting the decklid striker increase the decklid to body side aperture gap to 1.75 mm or greater without exceeding 1 mm overflush of decklid in relation to body side aperture?
- YES>>> Proceed to Step #22.
- NO>>> Continue with Step #13.
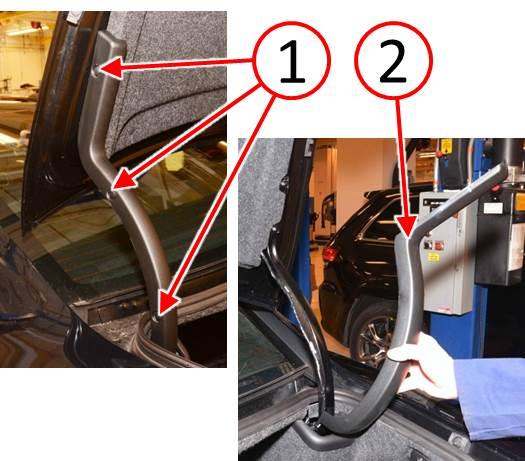
- Remove the push fasteners (1) and the decklid hinge cover (2) ( 5).
Fig. 5 Remove Hinge Covers
1 – Push Fasteners
2 – Hinge Cover
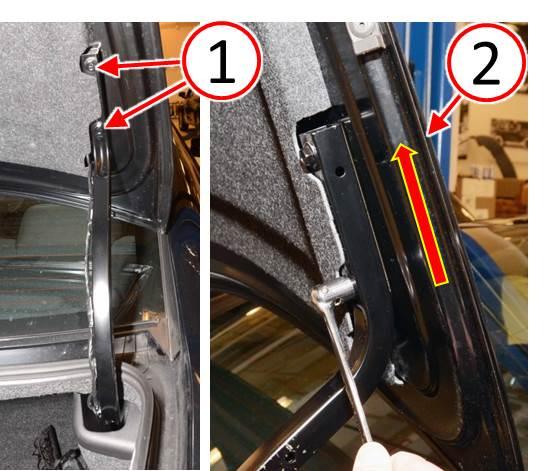
- Loosen the two hinge bolts (1) (Fig. 6).
- Grasp the decklid with both hands and firmly push up (2) (decklid moves rearward) (Fig. 6).
- Tighten the two hinge bolts (1) to 14 N·m (10 ft. lbs.) (Fig. 6).
Fig. 6 Adjust Decklid
1 – Hinge Bolts
2 – Move Decklid
- Check that the decklid to body side aperture gap is 1.75 mm or greater as measured in Step #1 and is no more than 1 mm over flush in relation to the body side aperture. Readjust decklid and striker as necessary to achieve the desired fit and spacing between the decklid and body side aperture.
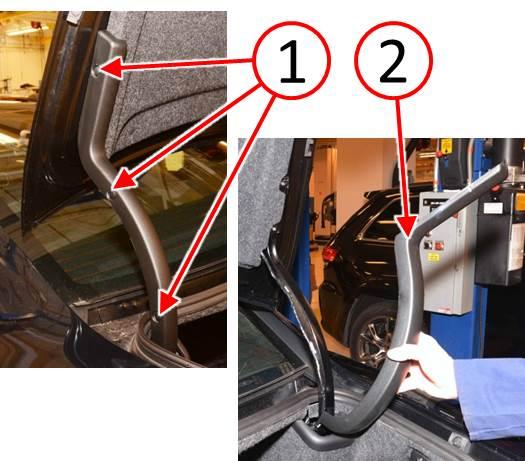
- Install the decklid hinge cover (2) and push fasteners (1) (Fig. 7).
Fig. 7 Install Hinge Covers
1 – Push Fasteners
2 – Hinge Cover
- Position the top of the trunk trim panel (1) and push down to engage the top retaining clips (Fig. 8).
- Hand tap the lower edge of the trunk trim panel (1) to engage the lower retaining clips (Fig. 8).
- Close the load floor cover.
Fig. 8 Install Trunk Trim Panel
1 – Trunk Trim Panel
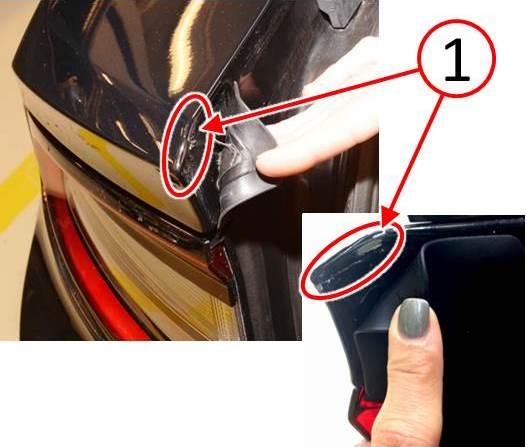
- If paint was chipped due to contact between the decklid and body side aperture, touch up the paint as required.
Fig. 9 Touch Up Paint Chips
1 – Paint Chips
POLICY:
Reimbursable within the provisions of the warranty.
TIME ALLOWANCE:
| Labor Operation No: | Description | Skill Category | Amount |
|---|---|---|---|
| 23-00-05-91 | Inspect Decklid To Body Side Aperture Gap (0 – Introductory) | 6 – Electrical and Body Systems | 0.2 Hrs. |
| 23-00-05-92 | Inspect And Adjust Decklid To Body Side Aperture Gap And Touch Up Paint (0 – Introductory) | 6 – Electrical and Body Systems | 0.3 Hrs. |
FAILURE CODE:
| ZZ | Service Action |
NUMBER: 23-005-15
GROUP: Body
DATE: February 06, 2015
 Loading...
- Bright White
- Paint Code PW7
- Genuine Mopar Paint - 4342250AC
- Highly durable
- Designed to meet original part specifications
- Exact fitment and original replacement
- Genuine OEM Mo par Parts
- Part number: 68183829AB
- Fit type: Vehicle Specific
- Included components: 68183829AB
- CAR PAINT SCRATCH REPAIR – Dupli-Color Scratch Fix Automotive Paint is the all-in-1 tool for all your touch-up repairs. Featuring an abrasive tip to remove loose paint/rust and a clear coat to seal, protect, and ensure a perfect factory-matched finish.
- EXACT COLOR MATCH - Dupli-Color car color matching paint codes are tied directly to the color codes on your car ID tag/sticker. For Chrysler
 vehicles, you can typically find it on the driver’s door jamb.
 - EASY TO USE – The convenient, ergonomically designed Scratch Fix All-in-1 is the first touch-up car paint repair tool of its kind to combine both paint and clear protective top coat in a single package.
- IDEAL USES – Ideal for use on all OEM paint surfaces, this Dupli-Color car paint pen tool helps you fix it easy and fix it right…in your garage! The pen tip is perfect for fine scratches and the brush end works for larger chips.
- DUPLI-COLOR PAINT – Since 1938, Dupli-Color has been the trusted brand leader in providing easy-to-use, innovative, products to restore, restyle and protect vehicle appearance.
- Genuine OEM Mopar Parts
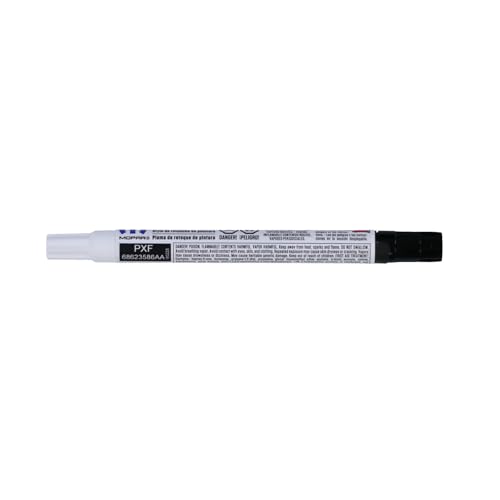
- Mopar Touch-Up Paint Pen
- Packaging may be different than image
- For 1997-2017 Jeep
 Wrangler Hard Top
- Precise Color Match: This Mopar PW7 touch up paint pen provides an exact factory color match for your vehicle's original paint job.
- Easy Application: The precision brush tip allows for seamless and controlled application on scratches, chips, and other minor paint imperfections.
- Compact and Portable: The pen's compact size makes it convenient to store in your vehicle's glove compartment or center console for touch-ups on the go.
- OEM Quality: As an official Mopar product, you can trust this touch up paint pen to provide genuine, high-quality results.
Last update on 2025-05-08 / Affiliate links / Images from Amazon Product Advertising API
This product presentation was made with AAWP plugin.
