NUMBER: 23-017-15
GROUP: Body
DATE: May 16, 2015
THIS SERVICE BULLETIN IS ALSO BEING RELEASED AS RAPID RESPONSE TRANSMITTAL (RRT) 15-052. ALL APPLICABLE SOLD AND UN-SOLD RRT VIN’s HAVE BEEN LOADED. TO VERIFY THAT THIS RRT SERVICE ACTION IS APPLICABLE TO THE VEHICLE, USE VIP OR PERFORM A VIN SEARCH IN TECHCONNECT. ALL REPAIRS ARE REIMBURSABLE WITHIN THE PROVISIONS OF WARRANTY.
SUBJECT:
Key Codes Recorded Incorrectly
OVERVIEW:
This bulletin involves replacing the lock cylinders.
MODELS:
| 2015 | (UF) | Chrysler 200 |
NOTE: This bulletin applies to vehicles built on or after November 02, 2013 (MDH 1102XX) and on or before June 06, 2014 (MDH 0606XX).
SYMPTOM/CONDITION:
The dealer is unable to obtain the proper key code for the vehicle.
DIAGNOSIS:
If a customer’s VIN is listed in VIP or your RRT VIN list, perform the repair.
PARTS REQUIRED:
| Qty. | Part No.Description | |
|---|---|---|
| 1 | 68289910AA
No products found. | Lock Set – Closure |
| 1 (AR) | 1UY481L2AC | Door, Glove Box [-X2] Black/Linen |
| 1 (AR) | 1UY48DX9AC
Chrysler Genuine 1UY48DX9AC Glove Box Door
| Door, Glove Box [-X8] Black/Deep Mocha [-X9] Black [-XB] Black/Ambassador Blue |
REPAIR PROCEDURE:
- Insert the vehicle key into the glove box lock cylinder and attempt to rotate the lock cylinder between lock and unlock positions (Fig. 1).
NOTE: If the glove box door lock cylinder cannot be rotated with a key, the lock cylinder cannot be removed from the glove box door. If the key is missing or will not rotate the lock, the glove box door must be replaced.
- Does the vehicle key operate/rotate the glove box lock cylinder?
- YES>>> Continue with Step #3.
- NO>>> Remove and discard the old glove box door with inoperable lock cylinder then replace with a NEW glove box door. Refer to the detailed service procedures available in DealerCONNECT> TechCONNECT under: Service Info> 23 – Body> Instrument Panel> GLOVE BOX, Instrument Panel> Removal/Installation. After replacing the glove box door, proceed to Step #6.
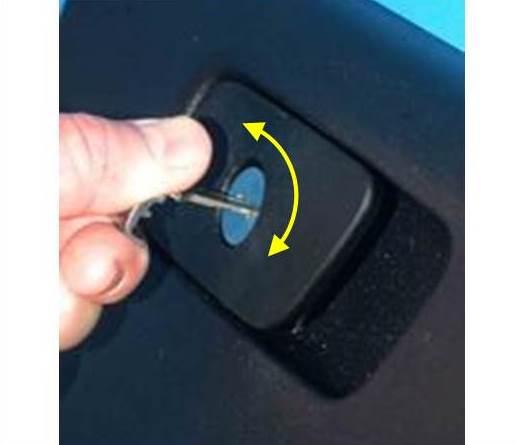
Fig. 1 Test Key In Glove Box Lock Cylinder
- With the key (1) inserted into the glove box lock cylinder, lift the handle paddle (2) (Fig. 2).
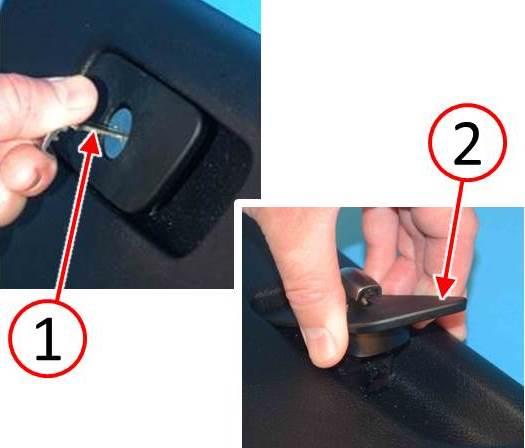
Fig. 2 Lift Glove Box Latch
1 – Key
2 – Handle Paddle
- Insert an appropriate tool into the retainer tumbler slot. The image to the right shows the spring loaded retainer tumbler (1) which needs be depressed for removal (Fig. 3).
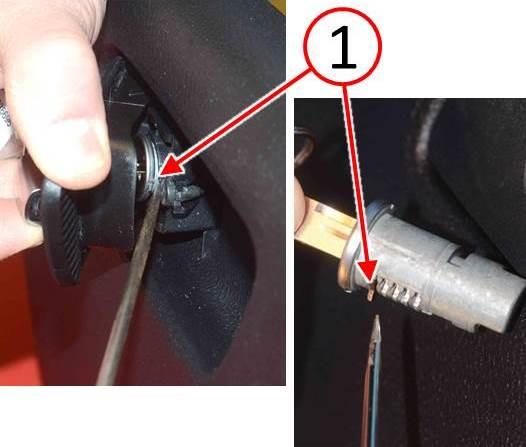
Fig. 3 Release Lock Cylinder
1 – Spring Loaded Retainer Tumbler
- With the tool depressing the lock cylinder spring loaded retainer tumbler, rotate the key (1) clockwise 90 degrees, then remove the glove box lock cylinder (2) with the key (Fig. 4). Discard the lock cylinder and the key.
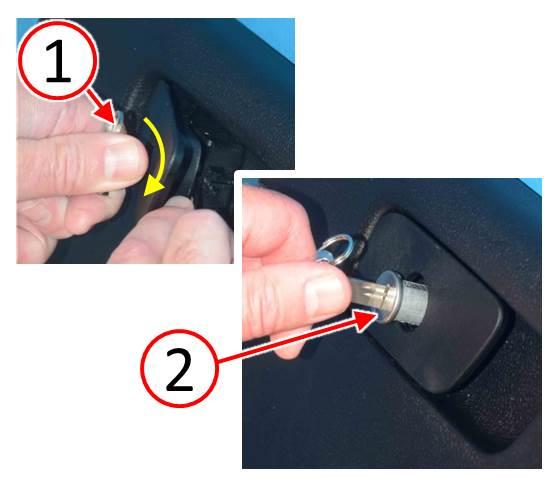
Fig. 4 Remove Lock Cylinder
1 – Key
2 – Lock Cylinder
- Obtain the NEW lock cylinder kit components (Fig. 5).
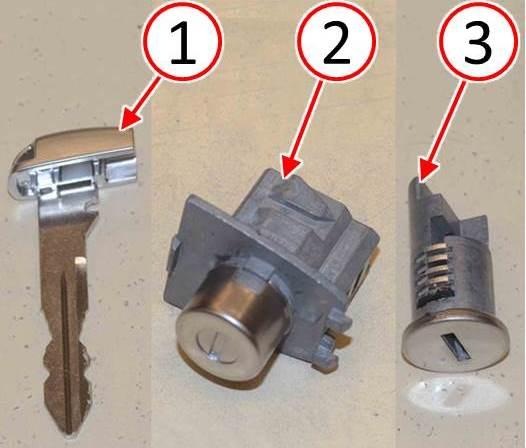
Fig. 5 Lock Cylinder Kit
1 – Key (Qty. 2)
2 – Driver Door Lock Cylinder
3 – Glove Box Door Lock Cylinder
- Insert the NEW key into the NEW glove box lock cylinder. With the retainer tumbler (1) pointing down, insert the lock cylinder (2) into the glove box lock opening (Fig. 6).
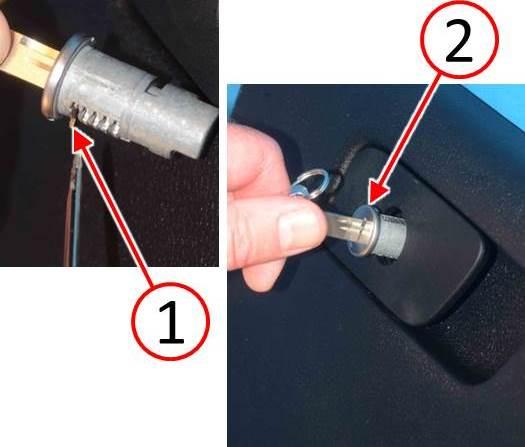
Fig. 6 Install Lock Cylinder
1 – Spring Loaded Retainer Tumbler
2 – Lock Cylinder
- Once the lock cylinder is installed completely, rotate the key 90 degrees counterclockwise (Fig. 7).
- Check the glove box latch and key cylinder for proper operation.
- Remove the key (1) from the lock cylinder and insert the key into one of the transmitter Frequency Operated Button (FOB)s (Fig. 7).
NOTE: Be sure to also replace the key in the second transmitter FOB with the second NEW key contained in the lock cylinder kit and discard the old key.
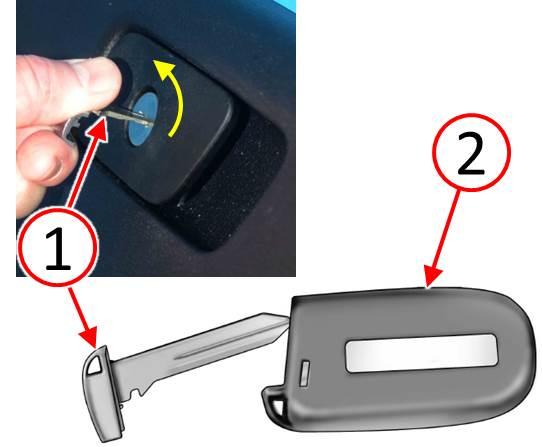
Fig. 7 Insert Key Into Transmitter FOB
1 – Key
2 – Transmitter FOB
- Remove the outside door handle access plug (1) from the door jamb (Fig. 8).
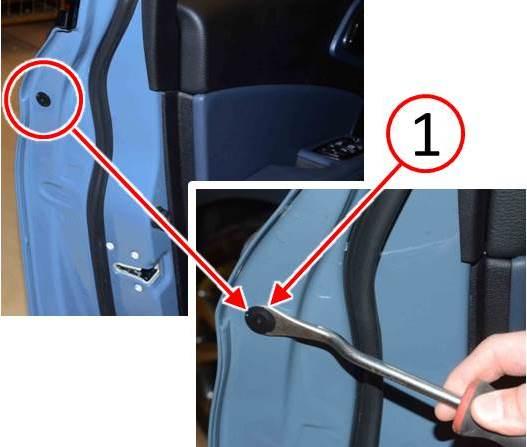
Fig. 8 Remove Door Plug
1 – Door Handle Access Plug
CAUTION: Do not use power tools when loosening the door handle cap screw. Only loosen the screw enough so the door handle cap can be removed. The threads will be damaged if the door handle cap screw is turned beyond the stop point.
- Using a T25 star screwdriver, carefully turn the screw (1) counter-clockwise to releasethe door handle cap (Fig. 9).
- Remove the door handle cap and lock cylinder (2) (Fig. 9).
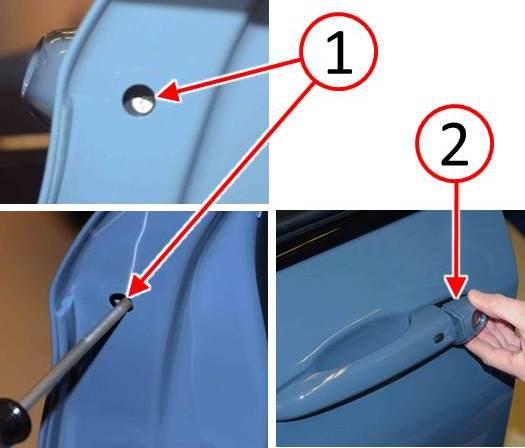
Fig. 9 Remove Door Lock Cylinder
1 – Door Handle Cap Screw
- Using an appropriate flat blade tool (1), release the door handle cap (2) from the lock cylinder (3) and discard the lock cylinder (Fig. 10).
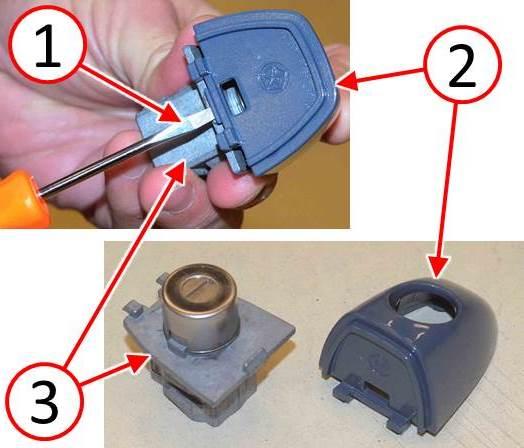
Fig. 10 Disassemble Door Lock Cylinder
1 – Flat Blade Tool
2 – Door Handle Cap
3 – Lock Cylinder
- Install the door handle cap (2) onto the NEW lock cylinder (1) (Fig. 11).
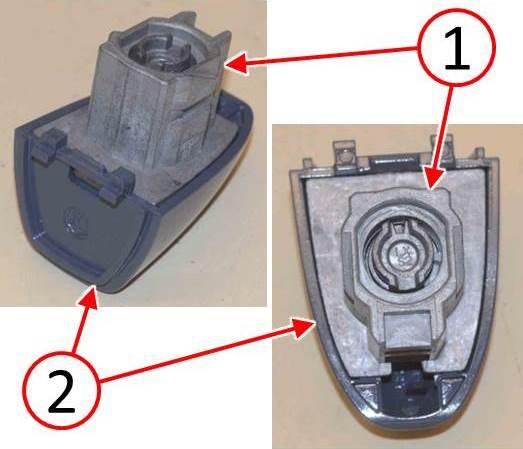
Fig. 11 Assemble Door Lock Cylinder
1 – Lock Cylinder
2 – Door Handle Cap
- Install the door handle cap (1) making sure it is fully seated.
CAUTION: Do not use power tools when tightening the screw (2). Do not tighten the screw more than 2 N·m (18 in. lbs.). The threads can be damaged if tightened beyond specification.
- Insert a T25 star screwdriver into the access hole and carefully turn the screw (2) clockwise to secure the door handle cap. The screw threads may be damaged if the screw is tightened more than 2 N·m (18 in. lbs.).
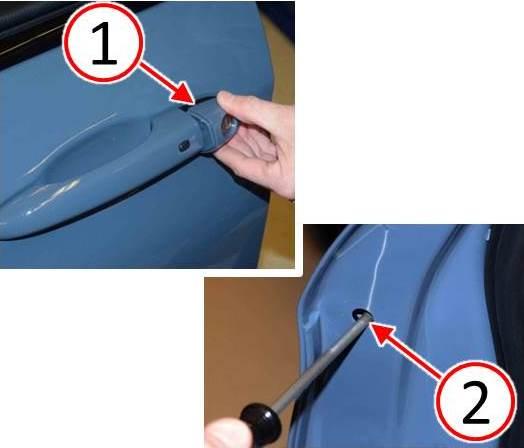
Fig. 12 Install Door Lock Cylinder
1 – Door Handle Cap
2 – Door Handle Cap Screw
- Ensure the door handle cap (1) is properly seated flush with the door surface.
- Install the plug (2) into the door handle access hole.
- Check the door handle and key lock cylinder for proper operation.
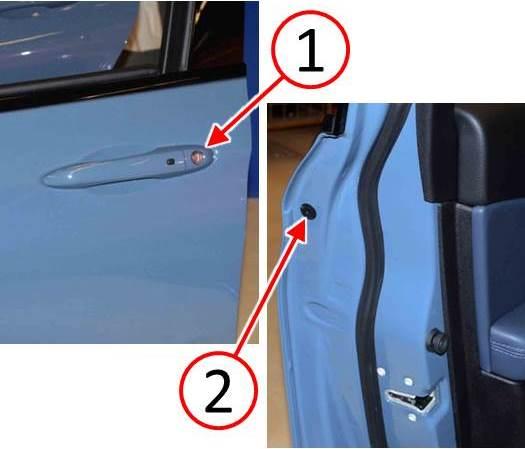
Fig. 13 Install Door Plug
1 – Door Handle Cap
2 – Door Handle Access Plug
POLICY:
Reimbursable within the provisions of the warranty.
TIME ALLOWANCE:
| Labor Operation No:Description | Skill Category | Amount | |
|---|---|---|---|
| 23-41-05-91 | Lock Cylinder – Replace All (Includes Glove Box Door If Necessary) (1 – Semi- Skilled) | 6 – Electrical and Body Systems | 0.2 Hrs. |
FAILURE CODE:
| ZZ | Service Action |

- 【Read Carefully Before Ordering】Batteries Not Included. This is a blank key that must be pr0grammed before use. It works with Thinkcar scan tools like THINKSCAN 689, THINKSCAN 689BT. 【Warm Tips】Dear friend, if you have any issues with product(functions not work, not sure about the compatibility), or just a simple question, please don't hesitate to con.tact us via Amazon Message or directly reach to us via support@ mythinkcar. com. We are committed to ensuring your experience is seamless.
- 【One Solutions Meet All Your Needs】The TKey101 is equipped with four standard anti-the.ft types, supports anti-the.ft data for over 8000 vehicle models, and it's configured with super chips covering more anti-the.ft chips of different car models.
- 【High Sensitivity 3 Buttons】Crafted from premium engineering materials for enhanced durability and drop resistance, this key fob delivers the same performance as the factory original. It features five responsive buttons: L.ock, Unl.ock, and Panic (to locate your car). Do it yourself, it serves as a quick and easy replacement for your lost or broken remote fob. Kindly note: Please ensure that your original remote has the exact same number and layout of buttons before purchasing.
- 【Pr0grammable with Thinkcar Thinkscan Tools】Thinkcar blank key can be pr0grammed for supported vehicles using Thinkscan Tools, including THINKSCAN 689BT, THINKSCAN 689, THINKTOOL series, etc. Please note the compatibility varies by car models, we recommend that you check compatibility with us before purchase.
- 【Package Included】1 * Tkey101 K.ey Progra.mmer, 6 * Universal Remote, 1 * Super Chip, 1 * USB3.0 to TypeC Cable, 1 * Remote Generation Cable, 1 * User Manual.


- 💝【Warm Notice】Starting Q3 2026, Autel KM100(KM100X KM100E) will gradually integrate NASTF SDRM to meet evolving industry standards. Certain vehicle functions may require a VSP credential ($435 for a Primary account, valid for 2 years). This autel obd2 scanner CAN’T work for Benz, for BMW, for Toyota, for Lexus, for GM, for Chrysler, for Ford and for Nissan. Please email you 17 digits VIN to 💌 autelcare @ outlook . com to check compatibility before purchase!
- 🔧 【Lite Version of IM508S & IM608 II – Easy Professional Use】Autel OBD2 Scanner KM100E delivers core functions from higher-end IM508S and IM608 Pro 2 in a more compact and user-friendly design. With intuitive UI and simple navigation, users can quickly complete full operations without complex learning. The handheld experience is smooth and efficient, making advanced functions accessible for both beginners and professionals. Designed to balance performance and usability, it simplifies complex workflows into clear step-by-step operation.
- 🚗 【Wide Compatibility – Broad Makes & Models Coverage】Supports a wide range of makes and models across global markets, covering most mainstream brands and systems. Whether working on common daily-use platforms or advanced systems, KM100E provides stable compatibility and reliable performance. It is designed to reduce tool switching and increase workshop efficiency by handling multiple brands within one device, making diagnostics more convenient and consistent.
- 🔄 【Lifetime Free Updates – Long-Term Value】Professional mechanic scanner KM100E includes lifetime free software updates, ensuring continuous access to the latest system improvements, expanded coverage, and enhanced functions. Users benefit from ongoing optimization without additional subscription costs. This helps maintain long-term usability and keeps the device aligned with evolving vehicle technologies, making it a cost-effective investment for both workshops and individual users.
- ⚙️ 【2.0 VCI200 – Stable Connection & Faster Performance】Equipped with advanced 2.0 VCI200 communication technology, KM100E ensures faster data transmission, stronger stability, and lower latency during operations. It improves communication between the device and vehicle systems, reducing delays and increasing reliability in tasks. This helps solve common issues like unstable connection or slow response, improving overall workflow efficiency in real working environments.

- Vehicle-specific replacement or spare - this keyless entry transmitter looks and functions like the original fob on certain vehicle years, makes, models and configurations
- Do-it-yourself solution - includes a patented programmer that plugs into your OBD II port to setup your new fob in minutes, without expensive dealership programming
- Matches features - this 4-button remote control features lock, unlock, remote start and panic functions
- Important notes - you must have at least one of your original keys or fobs for programming process; only for use on vehicles that came originally equipped with keyless entry
- Ensure fit - Input your vehicle into the garage tool and check Confirmed Fit bar at the top of the page. If there is an “i” in a blue circle, additional verification is needed. Please hover over the "i" to verify fitment notes match your vehicle.
- Compatibility——This device supports for Honda Selected Vehicle, suitable for Smart Key with FCC: KR5V2X/KR5V1X/KR5T44 / KR5V44/ACJ932HK1310A. If you are unsure if your car model is compatible, please contact customer service
- DO IT YOURSELF——You can program your remote by yourself. Just download the APP and the steps are simple, safe and time-saving. Powerful, professional technical support enables programming keys at home and no need to make any appointment
- High Quality——Each device undergoes strict testing before shipment to ensure proper functioning, and the advanced technology used makes the product compact and easy to carry. And the chip has undergone strict technical testing and will not cause harm to the car and keys, making it very safe and secure
- Note——One can set up to 8 keys if your car system has no limit for single car use only. We have a self-made video programming tutorial with a printed instruction manual. Maximizing worry free programming
- Package——This is just a device only that does not include a key. If you need a new key, you will need to purchase it separately
This product presentation was made with AAWP plugin.