| “This site contains affiliate links for which OEMDTC may be compensated” |
NUMBER: 23-021-15
GROUP: Body
DATE: May 28, 2015
SUBJECT:
Squeak Noise Coming From The Rear Seat
OVERVIEW:
This bulletin involves applying tape to the rear seat track J-rail.
MODELS:
| 2014 – 2015 | (KL) | Jeep Cherokee Cherokee |
NOTE: This bulletin applies to vehicles built on or before April 23, 2015 (MDH 0423XX).
SYMPTOM/CONDITION:
The customer may describe a squeak noise coming from the rear seat, typically when the seat is unoccupied.
The noise may be caused by metal to metal contact of the rear seat track J-rail.
DIAGNOSIS:
If the customer describes the symptom/condition listed above, perform the Repair Procedure.
PARTS REQUIRED:
| Qty. | Part No. | Description |
| 1 | 05019054AA | TAPE |
NOTE: Each package of tape will service 24 vehicles.
REPAIR PROCEDURE:
NOTE: Do NOT move the rear seat position prior to diagnosis or symptom/condition may disappear.
- Verify the squeak noise by striking the middle of the seat back with the palm of a hand.
- Is a squeak noise coming from the rear seat?
- YES>>> Continue to Step #3.
- NO>>> This Bulletin does not apply. Normal diagnosis should be performed.
- If the squeak noise was heard, move the 60 percent side rear seat track forward 1 or 2 positions and reverify the squeak noise by striking the middle of the seat back with the palm of a hand.
- Was the squeak noise eliminated by moving the seat forward?
- YES>>> Continue with the Repair Procedure Step #5.
- NO>>> This Bulletin does not apply. Normal diagnosis should be performed.
WARNING:To avoid serious or fatal injury on vehicles equipped with airbags, disable the Supplemental Restraint System (SRS) before attempting any steering wheel, steering column, airbag, Occupant Classification System (OCS), seat belt tensioner, impact sensor or instrument panel component diagnosis or service. Disconnect and isolate the battery negative (ground) cable, then wait two minutes for the system capacitor to discharge before performing further diagnosis or service. This is the only sure way to disable the SRS. Failure to follow these instructions may result in accidental airbag deployment.
- Disconnect and isolate the negative battery cable. If equipped with an Intelligent Battery Sensor (IBS), disconnect the IBS connector first before disconnecting the negative battery cable.
- Disconnect the rear seat electrical connectors and remove the fasteners attaching the rear seat to the vehicle. DO NOT REMOVE THE SEAT FROM THE VEHICLE. Refer to the detailed service procedures available in DealerCONNECT> TechCONNECT under: Service Info> 23 – Body> Seats, Rear> SEAT, Rear> Removal.
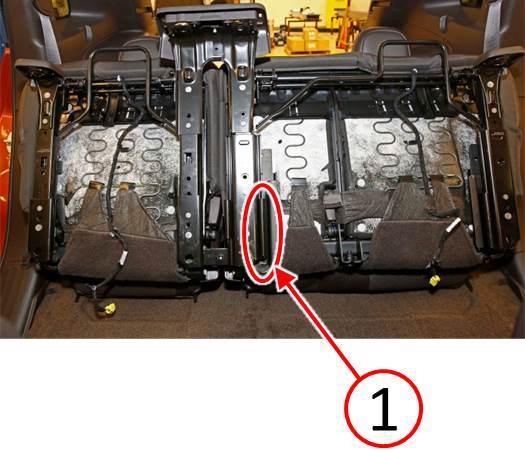
- With the seat back folded down and seat track in the full rearward position, lift the seat off the rear studs and flip 90 degrees so that the bottom of the seat is exposed (Fig. 1).
Fig. 1 Rear Seat Unbolted And Repositioned In Vehicle
1 – Area Of Concern On 60 Percent Side
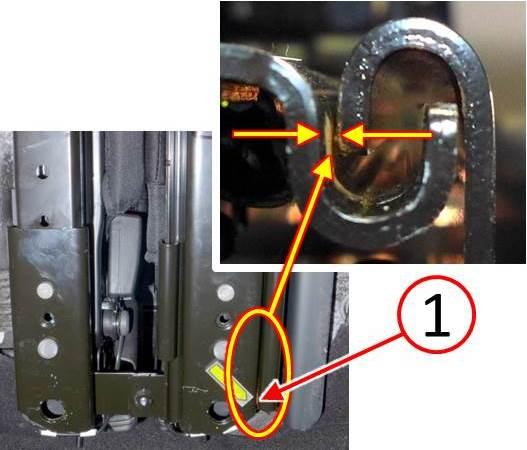
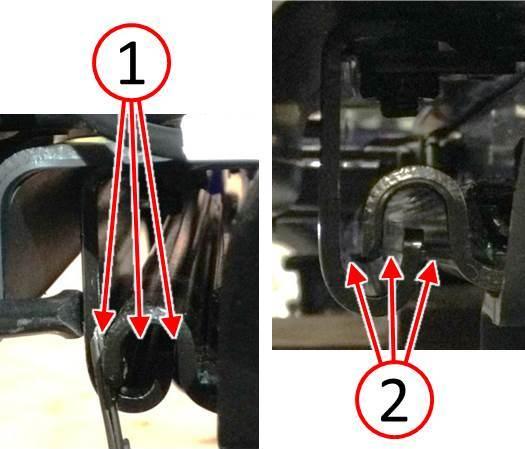
- Examine the rearward portion of the 60 percent side inner seat track for a “V” shaped gap with a touch condition at the rear lower edge of the seat track (Fig. 2).
Fig. 2 Inspect Gap At The 60 Percent Inboard Side
1 – Touch Condition At Rear Lower Edge
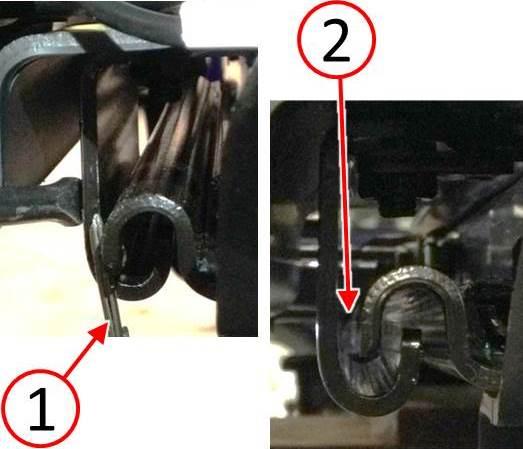
- If the seat track J-rail rear lower edge is touching, use a suitable tool (1) to reposition the seat track so that a 1.5 mm (0.06 in.) gap (2) is present between the J-rails (Fig. 3).
Fig. 3 Adjust 60 Percent J-Rail For Clearance
1 – Suitable Tool
2 – J-Rail Clearance
- Move the seat track position so that the rear portion of the J-rail is visible.
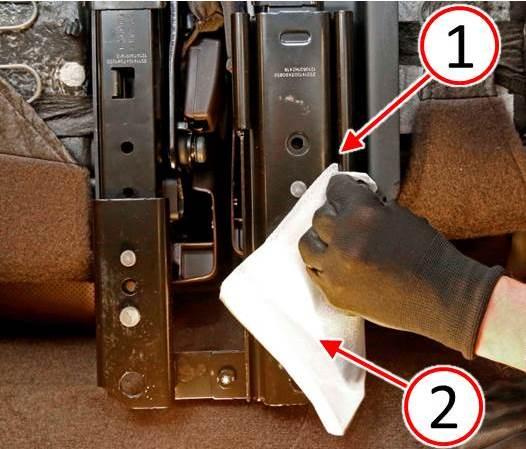
- Clean the J-rail (1) with isopropyl alcohol or equivalent (2), to remove any oil or grease residue from the area of the seat track to which the tape will be applied (Fig. 4).
Fig. 4 Clean J-Rail
1 – Seat Track J-Rail
2 – Clean With Isopropyl Alcohol
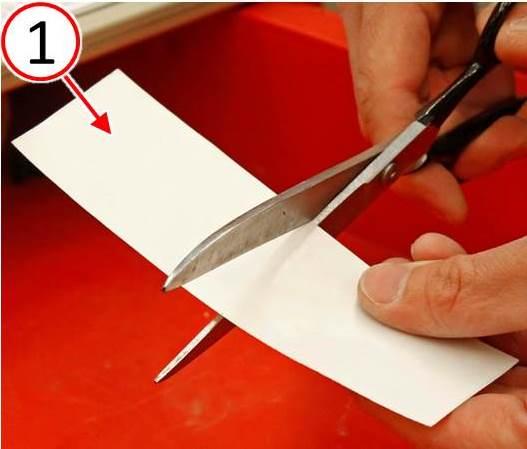
- Cut the tape (1) in half (Fig. 5).
Fig. 5 Cut Tape In Half
1 – Tape
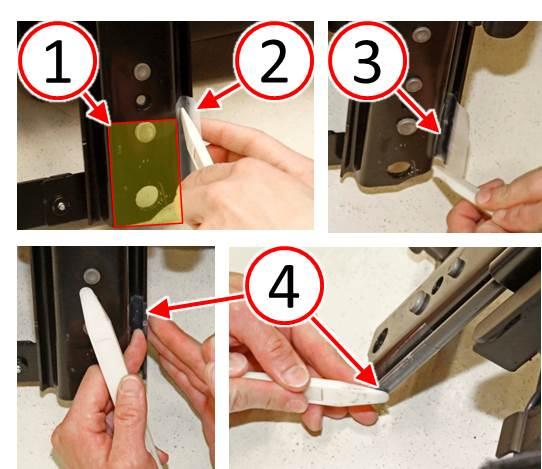
- Apply the tape (2) to the lower inner J-rail, taking care not to apply the tape to the underside of the seat track area (1) where it will contact the body mount (Fig. 6).
- Using fingers and a trim stick or equivalent, firmly press on the tape to ensure complete contact of tape to J-rail surface (3) without air gaps (Fig. 6).
- Wrap the tape (4) over the J-rail and ensure the tape is fully adhered to the outer surface of the J-rail without air gaps (Fig. 6).
Fig. 6 Apply Tape To Inner J-Rail Rear Edge
1 – No Tape Zone On Underside Of Seat Track
2 – Apply Tape To Rear Edge Of Inner J-Rail
3 – Ensure Tape Is Fully Adhered In J-Rail Channel
4 – Wrap Tape over J-Rail And Adhere To J-Rail Side
- Cycle the seat track a few times to ensure that the J-rail does not peel the tape away.
- Did the tape peel away?
- If further adjustment of the seat track is necessary, remove the rear seat from thevehicle.
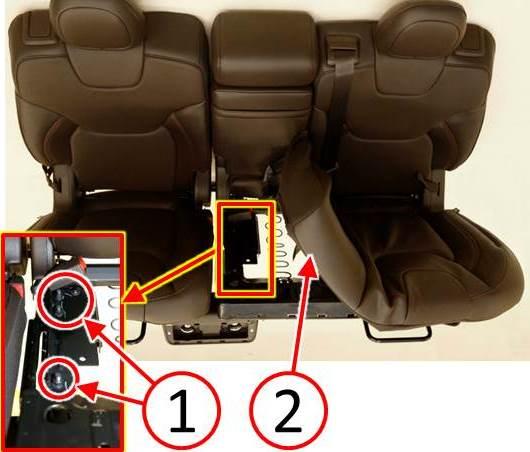
- Remove the 60 percent side lower seat cushion (2) enough to expose the inboard sideseat track fasteners (1) (Fig. 7). Refer to the detailed service procedures available in DealerCONNECT> TechCONNECT under: Service Info> 23 – Body> Seats, Rear> COVER, Seat Cushion> Removal.
Fig. 7 Access Seat Track Fasteners Under Seat Cushion
1 – Seat Track Fasteners
2 – 60 Percent Side Lower Seat Cushion
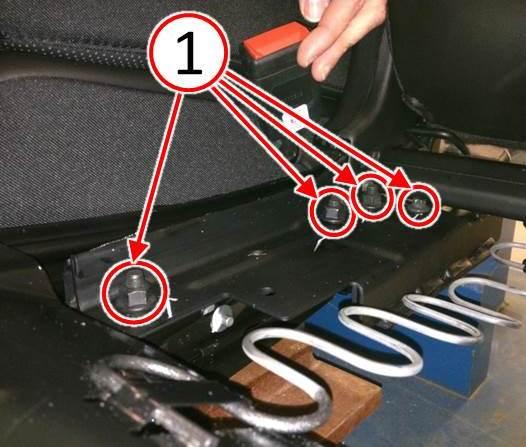
- Loosen the 60 percent side inboard seat track fasteners (1) (Fig. 8).
Fig. 8 Remove Seat Cushion To Access Seat Rail Fasteners
1 – Seat Track Fasteners
- Adjust the seat track alignment (1) to ensure a minimum of 1.5 mm (0.06 in.) gap between the J-rails (2) at the rear of the seat track (Fig. 9).
Fig. 9 Position 60 Percent Rail To Achieve Even Spacing
1 – J-Rail Gap Uneven
2 – J-Rail Gap Even
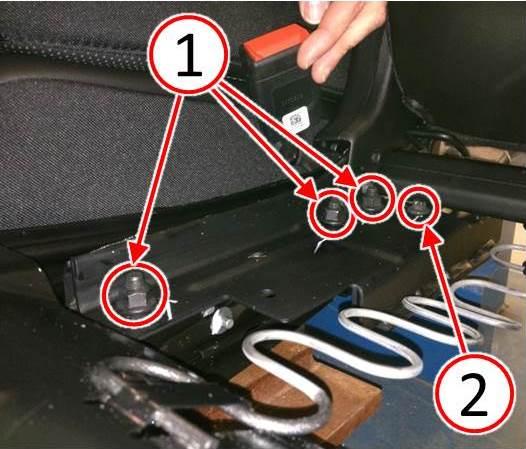
- Tighten the three M10 nuts (1) to 50 N·m (37 ft. lbs.) and the one M8 bolt (2) to 25 N·m (18 ft. lbs.) (Fig. 10).
Fig. 10 Tighten Seat Rail Fasteners
1 – M10 Nuts
2 – M8 Bolt
- Repeat Step #10 through Step #16.
- Install the seat 60 percent side lower seat cushion. Refer to the detailed serviceprocedures available in DealerCONNECT> TechCONNECT under: Service Info> 23 Body> Seats, Rear> COVER, Seat Cushion> Installation.
- Install the rear seat to the vehicle following the detailed procedure in DealerCONNECT> TechCONNECT under: Service Info> 23 – Body> Seats, Rear> SEAT, Rear> Installation.
- Connect the negative battery cable. If equipped with an Intelligent Battery Sensor(IBS), connect the IBS connector to the negative battery cable.
POLICY:
Reimbursable within the provisions of the warranty.
TIME ALLOWANCE:
| Labor Operation No: | Description | Skill Category | Amount |
| 23-13-35-94 | Install Tape On Track (1 – Semi- Skilled) | 6 – Electrical and Body Systems | 0.5 Hrs. |
| 23-13-35-95 | Remove Seat Cushion To Adjust Track And Install Tape On Track (1 – Semi- Skilled) | 6 – Electrical and Body Systems | 1.0 Hrs. |
FAILURE CODE:
| ZZ | Service Action |
PART REIMBURSEMENT DETAIL:
| Part No: | Description |
| NPN | 1/24 Of Tape Package |
NOTE: This part number is for reimbursement only and will need to be claimed for 1/24 of Dealer Net of Part No. 05019054AA or it will be rejected.
 Loading...
- Heating pad for back is made of a softer material with a flannel exterior, which is softer, skin-friendly and warmer,embracing different parts of the body, such as the neck, shoulders, back, abdomen, arms and legs, etc
- We heating pad have different sizes for you to choose from, including 12”x24”, 20”x24 ”and 17”x33”,you can find a heating pad size that is more suitable for you here,say goodbye to a single color tone, our heating pads come in a variety of colors for you to choose from.With 75 inch power cord,you can comfortably lounge on the couch or relax in bed
- Heating pad has 6 temperature settings,you can control the temperature of this electric heating pad via the controller,it heats up quickly in a short period of time so that you can enjoy the warmth faster
- Our electric heat pad is easy maintenance,machine wash-safe to make clean-up a breeze. Simply unplug and toss right in for a thorough cleansing before next use,you need to make sure it is completely dry before reassembling the unit
- The heating pad with overheat protection and 2 hours auto shut-off ensures your peace of mind after each use.And it’s also a great gift for your Mothers Day Gifts, Fathers Day Gifts, Birthday Gifts, Thanksgiving Day Gifts, Christmas Gifts,friend or family
- Ultra-Large Heating Area Coverage: Heated stadium seats for bleachers increases the heating area by 30%, fully covering the contact area with the buttocks.
- Up to 15H Battery Life:Heated seat cushion Up to 15 hours of running time with a 20,000mAh power bank. (Power Bank Not Included)
- USB Plug & Smart Switch: Heating seat pad widely compatible with any brand of power bank (at least 5V/2.1A output).
- Highly Portable:heated camping chair pad Built-in strap allows for easy rolling up; weighs only 0.3 lb.
- Water-Resistant & Insulation Material: Heating chair pad water-resistant with an additional 50% thicker insulation layer for an excellent seating and heating experience.
- which can create warming effect within 1-460 minutes. It is a good life companion, if you drive during cold season, even a rescuer, if one is in traffic jam. Without waiting for the air conditioning long, one can feel warm with the seat heating faster. Time and money saving! Practically! Features: Brand new and high quality.
- Vibration Massage: This massage seat cushion features 6 vibration motors, providing a soothing experience.(Note: This is a vibrating massage, not a shiatsu massage with rolling balls.)
- Gentle Heat: The back massager includes an auto shut-off function and targets the full back and seat with gentle warmth, enhancing relaxation. It also comes with an overheating protection system and an auto shut-off timer for added safety during use.
- Custom Setting - The massage chair pad allows you choose massaging area on Upper back, Lower back,Hips or Thighs, combining all these areas in a simultaneous, all-inclusive 5 programme modes and 4 variable vibration intensities brings you a customizable best massage as desired.
- Non-Slip Bottom & Straps - This chair massager be designed with non-slip rubber bottom and adjustable dual straps to secure it to home or office chair and keep it in place. Perfect Christmas Gift for your loved ones.
- Perfect Gifts: This massage chair seat is a perfect fathers day gift for Dad, for man,friend, wife or husband and any your loved ones for birthday, party or Christmas gift.
- Note: This is only a VIBRATION massager, not a Shiatsu Kneading massager. Do not buy this massage cushion if you are looking for a shiatsu massager with rolling balls.
- Recise Spot Vibration Massage - This massage cushion with 6 powerful vibrating massage motors target upper back, mid back, lower back, and thighs to help relax muscle tension, stress.You can even select all 4 zones at once or individually to your liking. 5 programme modes and 4 variable vibration intensities brings you a customizable best massage as desired.
- Soothing Heat - Seat warmer with auto shut off target full back and seat, to radiating gentle warmth, to relax soreness muscles and improve body circulation. The seat massager is equipped with Overheating protection system and Auto shut off timer, dual-insurance for safe use.
- Soft Plush Fabric - This massage chair pad cover is made of 100% ultra cozy plush, incomparably soft polyester that offers a comfortable and great feeling for body touch. Non-Slip rubber bottom, STAYS IN PLACE: Dual adjustable strap goes around back chair seat to keep cushion stable and secure.
- Home adapter included, it is easy for you to use the cushion at home, in the office ! This seat massager will be nice Christmas gifts for woman,man
- COZY WARMTH - The MAXCOM heated seat cushion is the perfect match for you if you suffer from back pain, arthritis, sore shoulders, or other discomforts caused by long hours of sedentary work. Once the heated pad is turned on, you can quickly feel the warmth and soothe the pain nicely.
- EASY TO STORE - The heated mat can be folded into a block and stored in drawer, or box with very little space. Easy to carry or store in the summer.
- FIT UNIVERSALLY - No restrictions on the choice of seats. By securing the buckles on the seat back, you can apply the heated cushion to almost all types of office chairs, home chairs, gaming chairs.With home adapter.
- WASHABLE - The trouble of cleaning the fabric will no longer bother you - the cushion is hand-washable and washing machine friendly. Feel free to throw it into the washing machine and your cushion will be good for reuse.
- ANTI-SLIP PROTECTION - While the buckles provide a firm fix, the bottom of the cushion is covered with anti-slip particles that increase friction and help the cushion stay in place.Wrap it into a thoughtful and warm gift for your loved ones!
- [Vibration Massage] CILI massage chair pad features 10 vibration motors, with 8 located in the back and 2 in the buttocks area. These motors work together to deliver soothing and powerful massages to your back and thighs. This massage chair pad only provides vibration massage, not kneading and shiatsu massage.
- [Intelligent and Safe Heating Function] CILI back massager with heat is equipped with 3 heat elements. With 2 adjustable heating levels, CILI chair massager provides a comforting warm massage experience. The heating function can be used independently, and the back massager includes overheat protection as well as a convenient automatic shutdown function with 30, 60, and 90-minute options. The massage pad provides greater time selectivity compared to other products.
- [Soft and Foldable] CILI massage pad is crafted with super soft suede fabric,offering you an exceptional tactile experience. This versatile massage cushion can be conveniently used on sofas, office chairs, and recliners. Its foldable design allows for easy portability, enabling you to enjoy a comfortable massage anytime and anywhere you desire. Experience the ultimate convenience and relaxation with this flexible and travel-friendly massage cushion.
- [Customized Massage Settings] CILI chair massager pad offers 5 massage modes, allowing you to select the full-body massage or target specific areas such as the upper back, lower back, hips or thighs according to your preferences. The chair massager for recliner provides four-speed massage intensities to cater to your individual needs. Enjoy the flexibility of personalized settings for a truly customized massage experience.
- [Large size and Quiet Operation] With its generous size of 18.5*18.5*23.5 inches, the back massager for chair is suitable for customers of all sizes. Compared with other products, CILI massage chair allowing you to enjoy a peaceful massage session without any disturbance. The chair massager for office chair serves as the perfect Valentine's Day, Father's Day, Mother's Day, Thanksgiving Day, and Christmas Day. fathers day gifts for men dad mom women.
- 【Replaces OE Number】:15193975,641106,641105,88940288,88940289
- 【Fitment】:Compatible with 2003-2007 Chevy GMC Driver/Passenger Bottom & Top Heater
- 【Packge Include】 :Comes with everything needed for installation on one seat, including Heating Pad,Hog ring Pliers,Hog Rings
- 【Note】:Our Seat Heat Pad can be installed on the driver's or passenger's side. If installed on the driver's side, the back glue needs to be glued to the Seat Foam Cushion. If installed on the passenger's side, the back glue needs to be glued to the Seat cover. it be ested every parts before shipping
- WARM UP QUICKLY - Our MAXCOM heating chair pad heats up immediately when plugged in. You can feel the warmth within a few minutes. Perfect for providing warmth to your hips and thighs during cold days.
- TEMPERATURE CONTROL - The touch switch comes in 3 levels. Tap the switch to set between different levels - high/ medium/ low and off.
- EASY TO CARRY - The fabric is soft and comfy, so the pad can be folded into a cube. Suitable for carrying along.
- UNIVERSAL FIT - The dimension of the heated seat cushion is 17*17*0.4 inches. Works on nearly all kinds of chairs, wooden benches, or hassocks. The pad can be placed in any direction so that the wires can be exported from the left/right/front/back side to connect to the power supply.
- USB PLUG - Equipped with a USB plug, the product can draw power from various sources - power bank, computer host, wall, etc. The cord length is 1.5 m/59 inch.
- EFFECTIVE, NO PAINKILLER RELIEF: Heating pad can deliver heat that penetrates deep into the affected area, and help relieve back pain, period cramps, neck/shoulder pain, arthritis, joint aches, sciatica, and aches due to age
- SAFETY PROMISE: Using PTC heating wire offers the safety promise of overheating protection. Also, our electric heating pad complies with CE standards. Please read the instructions before use, to extend the last
- 6 HEAT SETTINGS AND 4 TIMER SETTINGS: Heating pads for cramps heats up fast with 6 heat settings from 104℉-149℉, you can control the temp accurately. Also have 4 auto shut off options, 1, 2, 4, and 6 hours, a great safety feature
- LUXURIOUS SOFT FLANNEL: The heating pad for neck and shoulder is made of soft, plush fabric. It is flexible to wrap around any part of the body. Provide incredibly soothing, calming, and comforting
- KEEPING FAMILIES HEALTHY: Heat pad is great to use after a workout, household work, or just relaxing at the end of a long day working. And also is great for warmth when it's cold, saving on the heating bill. Heating pad xl is the best gift for Christmas, Thanksgiving, Anniversaries, Mother's Day, Father's Day, or Valentine's Day
Last update on 2025-05-08 / Affiliate links / Images from Amazon Product Advertising API
This product presentation was made with AAWP plugin.

