| “This site contains affiliate links for which OEMDTC may be compensated” |
NUMBER: 23-022-15
GROUP: Body
DATE: June 04, 2015
SUBJECT:
Door Glass Run Seal Weatherstrip Separated At Corner
OVERVIEW:
This bulletin involves inspecting and if necessary, replacing the door glass run seal.
MODELS:
NOTE: This bulletin applies to vehicles built on or after December 06, 2014 (MDH 1206XX) and on or before February 13, 2015 (MDH 0213XX).
SYMPTOM/CONDITION:
The customer may describe what appears to be a tear or cut in the corner of the glass run seal.
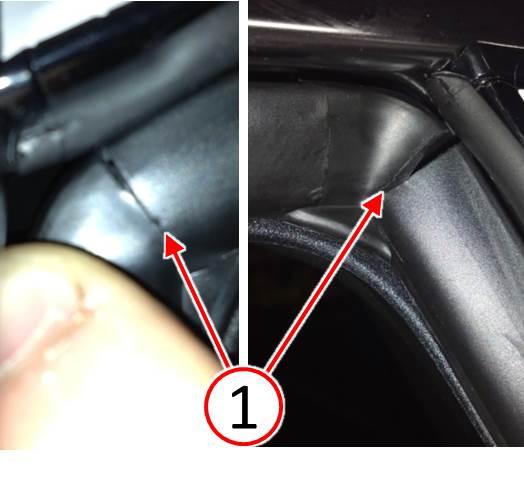
Glass run seal may separate at bonded corners due to insufficient seal bond strength as shown in (Fig. 1).
Fig. 1 Door Glass Run Seal Seam Separation
1 – Seam Separation
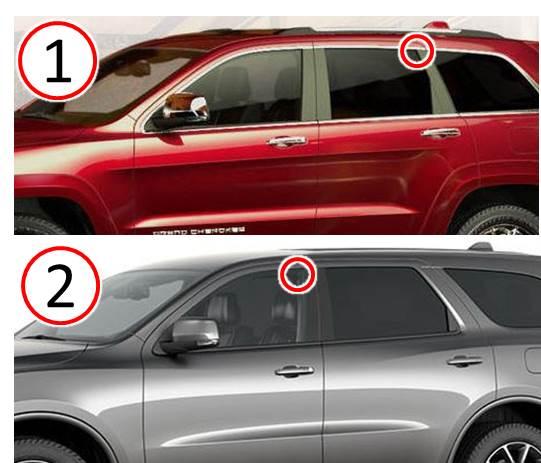
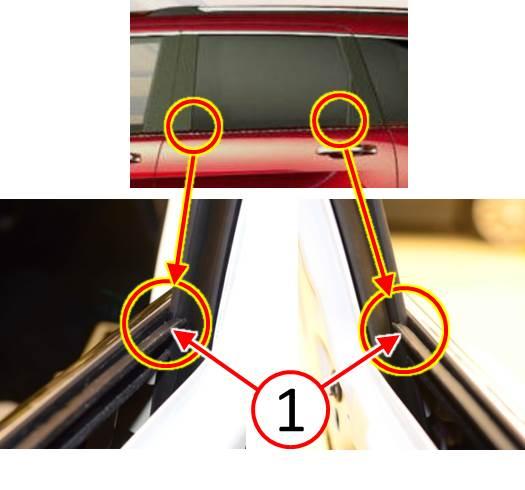
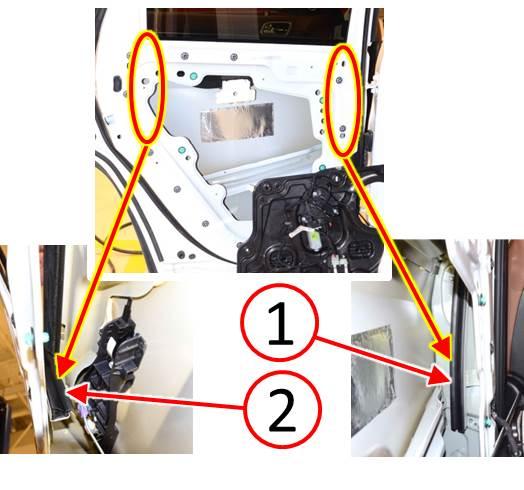
This bulletin applies ONLY to the area identified in (Fig. 2) on left side of the vehicle.
- (WK) Jeep
 Grand Cherokee: Left rear door C-pillar corner.
 - (WD) Dodge
 Durango: front door B-pillar corner.
Fig. 2 Door Glass Run Seal Inspection Area
1 – (WK) Jeep Grand Cherokee
2 – (WD) Dodge Durango
DIAGNOSIS:
If the customer describes the symptom, perform the Repair Procedure.
PARTS REQUIRED:
| Qty. | Part No. | Description |
|---|---|---|
| 1 (AR) | 55399189AG | (WK) Left rear glass run seal |
| 1 (AR) | 55399169AG | (WD) Left front glass run seal |
REPAIR PROCEDURE:
- If seam separation is visible at the bonded corner as shown in Symptom/Condition (Fig. 1), the window run seal will need to be replaced.
- Was any seam separation found at the door glass run seal bonded corner?
- YES>>> Replace the door glass run seal if it showed signs of seam separation. Refer to the applicable Glass Run Seal Replacement Procedure(s):
- (WD) ONLY – LEFT FRONT DOOR – GLASS RUN SEAL REPLACEMENT PROCEDURE: Proceed to Step #1.
- (WK) ONLY – LEFT REAR DOOR – GLASS RUN SEAL REPLACEMENT PROCEDURE: Proceed to Step #1.
- NO>>> Seam separation was not found. This bulletin does not apply.
- YES>>> Replace the door glass run seal if it showed signs of seam separation. Refer to the applicable Glass Run Seal Replacement Procedure(s):
(WD) ONLY – LEFT FRONT DOOR – GLASS RUN SEAL REPLACEMENT PROCEDURE:
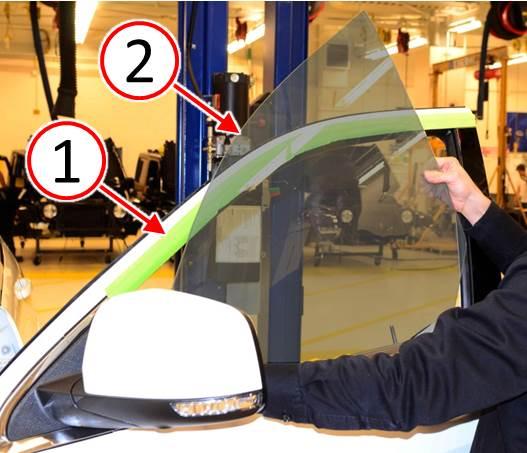
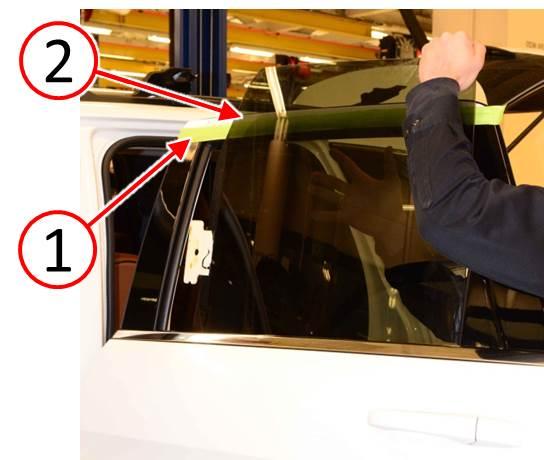
- Apply protective tape (1) over the front door window frame trim to prevent scratching the trim while removing the front door glass (Fig. 3).
- Remove the front door glass (2) (Fig. 3). Refer to the detailed service procedures available in DealerCONNECT> TechCONNECT under: Service Info> 23 – Body> Door – Front> GLASS, Door> Removal.
Fig. 3 Remove Front Door Glass
1 – Protective Tape
2 – Front Door Glass
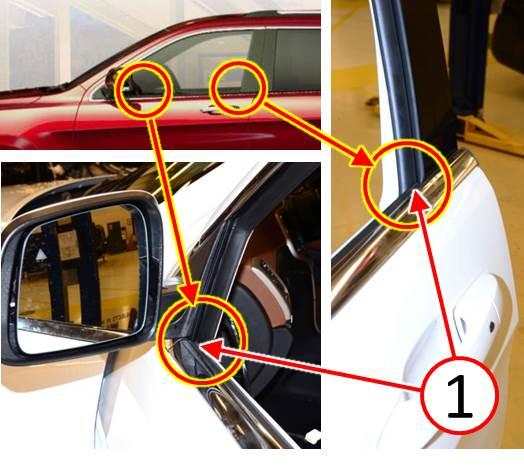
CAUTION: Be careful to not damage the outer belt molding weatherstrip ends (1) while removing and installing the door glass run seal (Fig. 4).
Fig. 4 Do Not Damage Belt Molding Weatherstrip Ends
1 – Belt Molding Weatherstrip Ends
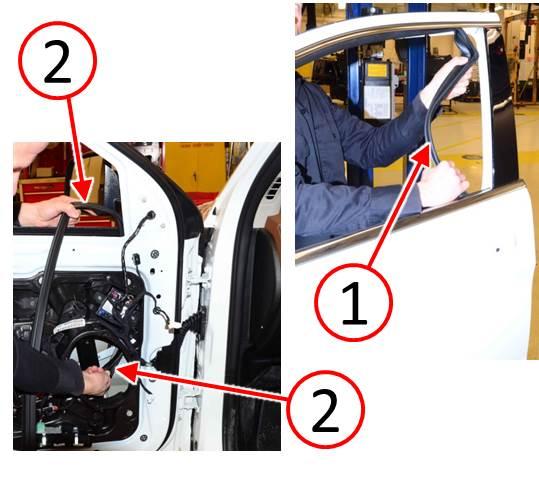
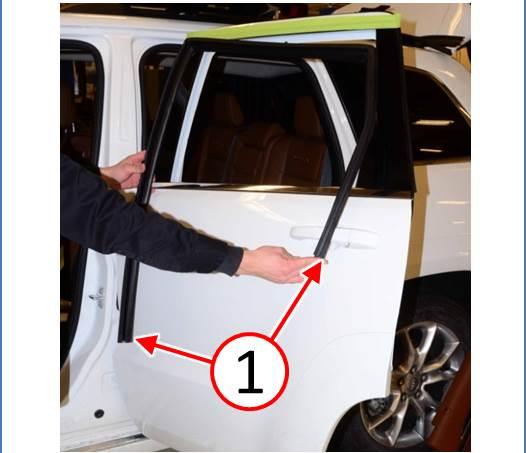
- Remove the door glass run seal beginning with the rear leg of the seal (1) and working toward the front leg of the seal (2) (Fig. 5).
Fig. 5 Remove Door Glass Run Seal
1 – Rear Leg Door Glass Run Seal
2 – Front Leg Door Glass Run Seal
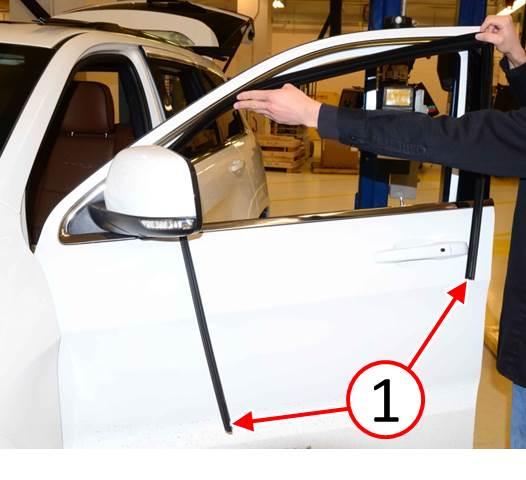
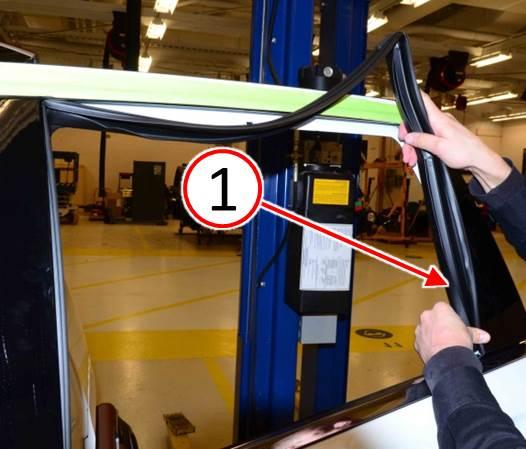
- Inspect that the correct NEW door glass run seal (1) has been selected for the door. The front leg of the seal (1) will be longer than the rear leg (Fig. 6).
Fig. 6 NEW Door Glass Run Seal
1 – Door Glass Run Seal
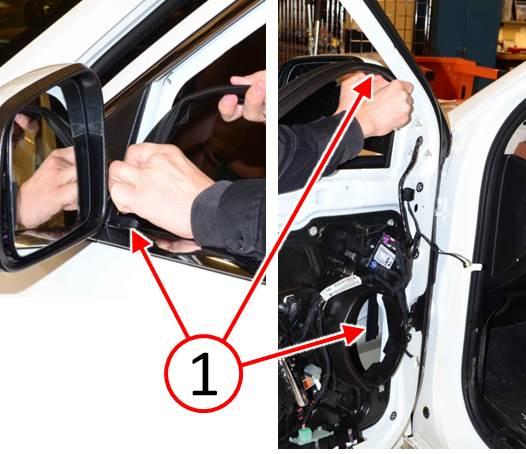
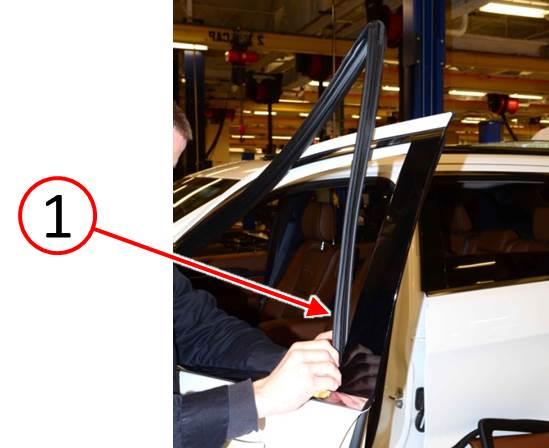
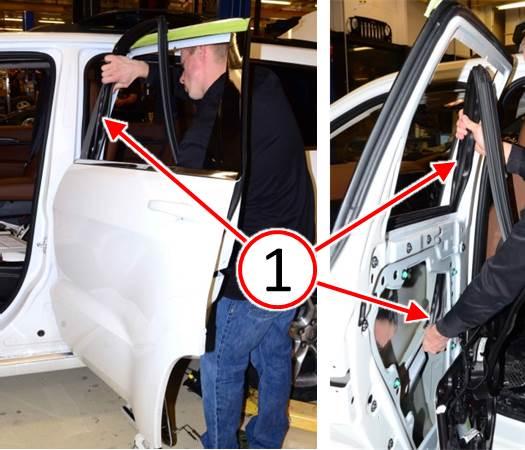
- Begin the NEW door glass run seal installation by inserting the seal front leg (1) onto the forward door glass run channel (Fig. 7).
Fig. 7 Install Front Leg Of Door Glass Run Seal
1 – Door Glass Run Seal
- Continue with the NEW door glass run seal (1) installation by inserting the seal rear leg (1) into the rearward door glass run channel (Fig. 8).
Fig. 8 Install Rear Leg Of Door Glass Run Seal
1 – Door Glass Run Seal
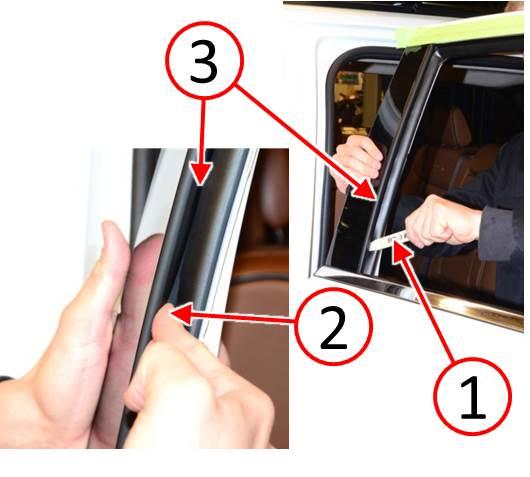
NOTE: It may be necessary to push the glass run seal vertical legs up toward the door corners to ensure the seal is fully seated into the door glass run channel corners.
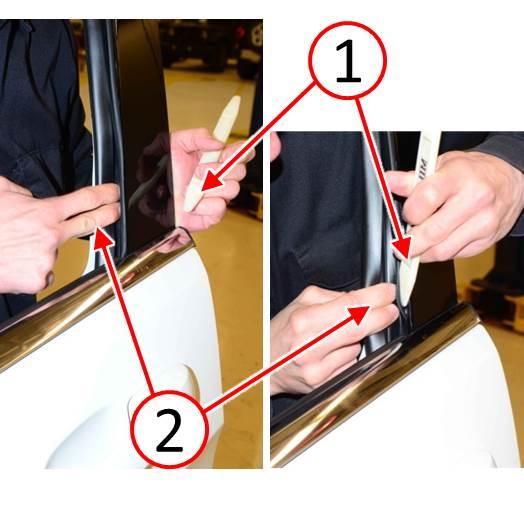
NOTE: Pressing fingers (2) into the glass run seal groove allows for feel of when the seal is fully seated into the glass run channel (Fig. 9).
- Use a fiber trim stick (1) and fingers (2) in order to fully seat the door glass run seal into the door glass run channel (Fig. 9).
Fig. 9 Seat Door Glass Run Seal Into Channel
1 – Fiber Trim Stick
2 – Fingers
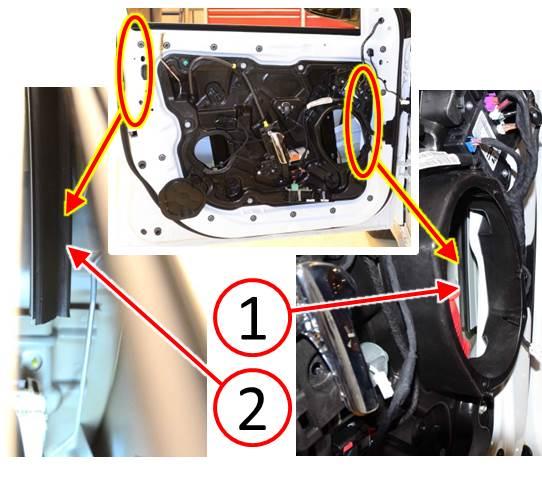
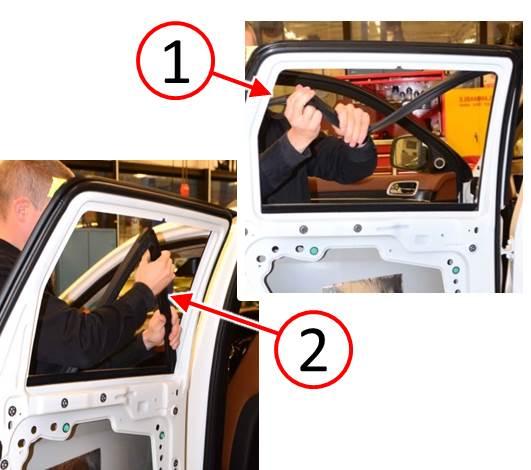
- Ensure the door glass run seal front leg (1) and rear leg (2) inside the door are fully seated into the door glass run channel (Fig. 10).
Fig. 10 Ensure Door Glass Run Seal Is Seated In Channel
1 – Front Leg – Door Glass Run Seal
2 – Rear Leg – Door Glass Run Seal
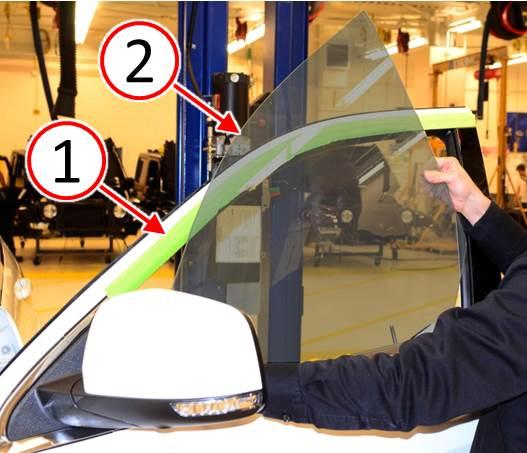
- Install the front door glass (2) (Fig. 11). Refer to the detailed service procedures available in DealerCONNECT> TechCONNECT under: Service Info> 23 – Body> Door – Front> GLASS, Door> Installation.
- Remove the protective tape (1) from the front door window frame (Fig. 11).
Fig. 11 Install Front Door Glass
1 – Protective Tape
2 – Front Door Glass
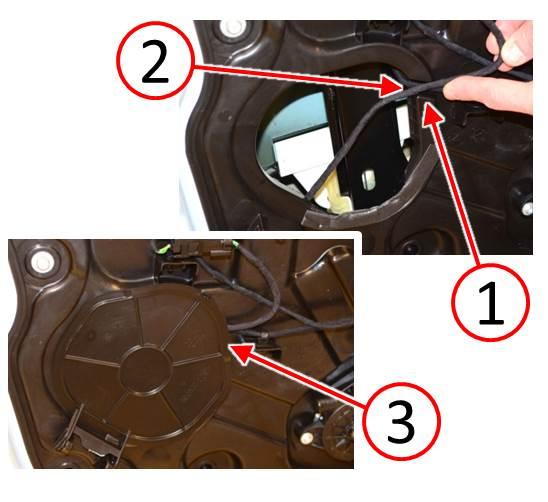
- Ensure the wire harnesses (2) are properly routed in the carrier plate channel (1) before closing the access door (3) (Fig. 12).
Fig. 12 Ensure Wires Are Properly Routed
1 – Carrier Plate Channel
2 – Wire Harnesses
3 – Access Door
- Install the front door interior trim panel. Refer to the detailed service procedures available in DealerCONNECT> TechCONNECT under: Service Info> 23 – Body> Door – Front> PANEL, Door Trim> Installation.
- Test the window for proper function and inspect for even glass contact to the glass runseal.
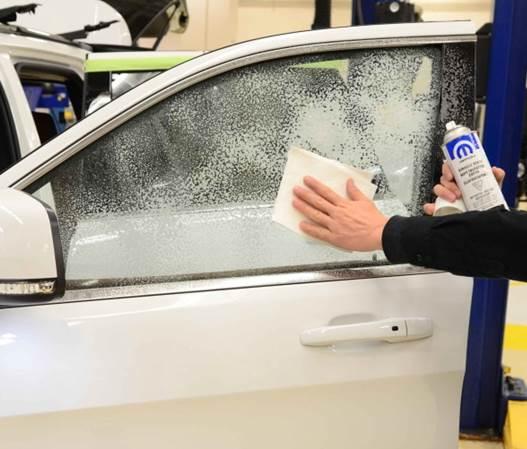
- Clean the glass and door surfaces to remove any marks and/or finger prints before returning the vehicle to the customer (Fig. 13).
Fig. 13 Clean Front Door
(WK) ONLY – LEFT REAR DOOR – GLASS RUN SEAL REPLACEMENT PROCEDURE:
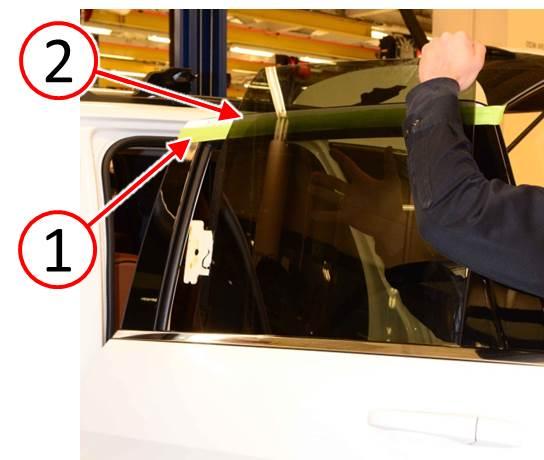
- Apply protective tape (1) over the rear door window frame trim to prevent scratching the trim while removing the rear door glass (Fig. 14).
- Remove the rear door glass (2) (Fig. 14). Refer to the detailed service procedures available in DealerCONNECT> TechCONNECT under: Service Info> 23 – Body> Door – Rear> GLASS, Door> Removal.
Fig. 14 Remove Rear Door Glass
1 – Protective Tape
2 – Rear Door Glass
CAUTION: Be careful to not damage the outer belt molding weatherstrip ends (1) while removing and installing the door glass run seal (Fig. 15).
Fig. 15 Do Not Damage Belt Molding Weatherstrip Ends
1 – Belt Molding Weatherstrip Ends
- Remove the door glass run seal beginning with the rear leg of the seal (1) and working toward the front leg of the seal (2) (Fig. 16).
Fig. 16 Remove Door Glass Run Seal
1 – Rear Leg Door Glass Run Seal
2 – Front Leg Door Glass Run Seal
- Inspect that the correct NEW door glass run seal (1) has been selected for the door. The front leg of the seal (1) will be longer than the rear leg (Fig. 17).
Fig. 17 NEW Door Glass Run Seal
1 – Door Glass Run Seal
- Begin the NEW door glass run seal installation by inserting the seal front leg (1) onto the forward door glass run channel (Fig. 18).
Fig. 18 Install Front Leg Of Door Glass Run Seal
1 – Door Glass Run Seal
- Continue with the NEW door glass run seal (1) installation by inserting the seal rear leg (1) into the rearward door glass run channel (Fig. 19).
Fig. 19 Install Rear Leg Of Door Glass Run Seal
1 – Door Glass Run Seal
NOTE: It may be necessary to push the glass run seal vertical legs up toward the door corners to ensure the seal is fully seated into the door glass run channel corners.
NOTE: Pressing fingers (2) into the glass run seal groove allows for feel of when the seal is fully seated into the glass run channel (Fig. 20).
- Use a fiber trim stick (1) and fingers (2) in order to fully seat the door glass run seal into the door glass run channel (Fig. 20).
Fig. 20 Seat Door Glass Run Seal Into Channel
1 – Fiber Trim Stick
2 – Fingers
3 – Door Glass Run Seal
- Ensure the door glass run seal front leg (1) and rear leg (2) inside the door are fully seated into the door glass run channel (Fig. 21).
Fig. 21 Ensure Door Glass Run Seal Is Seated In Channel
1 – Front Leg – Door Glass Run Seal
2 – Rear Leg – Door Glass Run Seal
- Install the rear door glass (2) (Fig. 22). Refer to the detailed service procedures available in DealerCONNECT> TechCONNECT under: Service Info> 23 – Body> Door – Rear> GLASS, Door> Installation.
- Remove the protective tape (1) from the rear door window frame (Fig. 22).
Fig. 22 Install Rear Door Glass
1 – Protective Tape
2 – Rear Door Glass
- Test the window for proper function and inspect for even glass contact to the glass runseal.
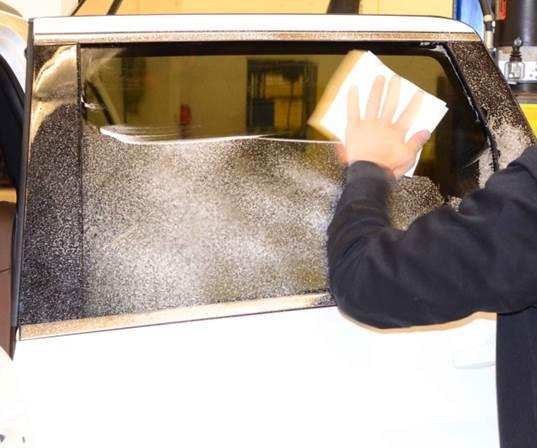
- Clean the glass and door surfaces to remove any marks and/or finger prints before returning the vehicle to the customer (Fig. 23).
Fig. 23 Clean Rear Door
POLICY:
Reimbursable within the provisions of the warranty.
TIME ALLOWANCE:
| Labor Operation No: | Description | Skill Category | Amount |
|---|---|---|---|
| 23-33-20-9L | Seal, Door Glass Run – Inspect and Replace (1 – Semi-Skilled) | 6 – Electrical and Body Systems | 0.8 Hrs. |
FAILURE CODE:
| ZZ | Service Action |
 Loading...

