| “This site contains affiliate links for which OEMDTC may be compensated” |
NUMBER: 23-032-15
GROUP: Body
DATE: August 21, 2015
THIS SERVICE BULLETIN IS ALSO BEING RELEASED AS RAPID RESPONSE TRANSMITTAL (RRT) 15-087. ALL APPLICABLE SOLD AND UN-SOLD RRT VIN’s HAVE BEEN LOADED. TO VERIFY THAT THIS RRT SERVICE ACTION IS APPLICABLE TO THE VEHICLE, USE VIP OR PERFORM A VIN SEARCH IN TECHCONNECT. ALL REPAIRS ARE REIMBURSABLE WITHIN THE PROVISIONS OF WARRANTY.
SUBJECT:
Front Door Latch Striker Dragging And/Or High Door Closing Effort
OVERVIEW:
This bulletin involves adjusting the front door latch striker.
MODELS:
NOTE: This bulletin applies to vehicles within the following markets/countries:
NAFTA, LATAM, EMEA, APAC
NOTE: This bulletin applies to vehicles built on or after September 30, 2014 (MDH 0930XX) and on or before February 01, 2015 (MDH 0201XX).
SYMPTOM/CONDITION:
The customer may describe one or both front door latches dragging on the door strikers and/or higher than expected door closing effort.
DIAGNOSIS:
If a customer’s VIN is listed in VIP or your RRT VIN list, perform the repair. For all other customers that describe the symptom/condition listed above or if the technician finds the condition during Pre Delivery Inspection (PDI), perform the Repair Procedure.
REPAIR PROCEDURE:
- Open and close both right and left front doors while feeling for the door latch dragging on the door striker.
- Is the door latch dragging on the door striker?
- YES>>> Continue with the Repair Procedure Step #3.
- NO>>> This bulletin has been completed, use LOP (23-41-04-97) to close the active RRT.
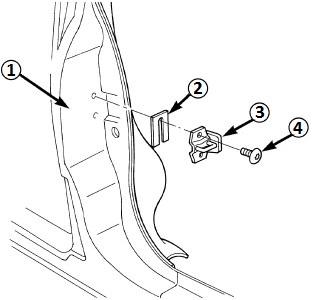
- Using a grease pencil or equivalent, mark the installed position of the door latch striker (3) in relationship to the B-pillar (1) (Fig. 1).
- Loosen the two screws (4) that secure the latch striker (3) to the B-pillar (1) (Fig. 1).
NOTE: The striker is a deformable attachment design, a dead blow hammer may be required for striker position adjustment.
- Adjust the latch striker (3) to the center of the latch. Tighten the screws (4) to 28 N·m (21 ft. lbs.) (Fig. 1).
- Verify proper door fit and operation. Refer to the gap and flush specifications available in DealerCONNECT> TechCONNECT under: Service Info> 23 – Body> Body Structure> Gap and Flush> Specifications.
Fig. 1 Front Door Latch Striker
1 – B-Pillar
2 – Shims
3 – Striker
4 – Screws
POLICY:
Reimbursable within the provisions of the warranty.
TIME ALLOWANCE:
| Labor Operation No: | Description | Skill Category | Amount |
|---|---|---|---|
| 23-41-04-97 | Inspect Left and Right Front Door Closing Effort (0 – Introduction) | 6 – Electrical and Body Systems | 0.0 Hrs. |
| 23-41-04-98 | Inspect and Adjust One Front Door Striker and Verify Gap Flushness (0 – Introduction) | 6 – Electrical and Body Systems | 0.2 Hrs. |
| 23-41-04-99 | Inspect and Adjust Both Front Door Strikers and Verify Gap Flushness (0 – Introduction) | 6 – Electrical and Body Systems | 0.3 Hrs. |
FAILURE CODE:
| ZZ | Service Action |
 Loading...

 Town And Country

