| “This site contains affiliate links for which OEMDTC may be compensated” |
NUMBER: 25-003-15
GROUP: Emissions Control
DATE: October 06, 2015
THIS SERVICE BULLETIN IS ALSO BEING RELEASED AS RAPID RESPONSE TRANSMITTAL (RRT) 15-096. ALL APPLICABLE SOLD AND UN-SOLD RRT VIN’s HAVE BEEN LOADED. TO VERIFY THAT THIS RRT SERVICE ACTION IS APPLICABLE TO THE VEHICLE, USE VIP OR PERFORM A VIN SEARCH IN TECHCONNECT. ALL REPAIRS ARE REIMBURSABLE WITHIN THE PROVISIONS OF WARRANTY.
THE wiTECH SOFTWARE IS REQUIRED TO BE AT THE LATEST RELEASE BEFORE PERFORMING THIS PROCEDURE.
SUBJECT:
Diesel Exhaust Fluid (DEF) Contamination
OVERVIEW:
This bulletin involves replacing the Diesel Exhaust Fluid (DEF) system components.
MODELS:
| 2015 | (WK) | Jeep Grand Cherokee Grand Cherokee |
NOTE: This bulletin applies to vehicles built on or after July 10, 2015 (MDH 0710XX) and on or before July 11, 2015 (MDH 0711XX) and vehicles built on or after August 24, 2015 (MDH 0824XX) and on and before August 25, 2015 (MDH 0825XX) equipped with a 3.0L Diesel Engine (Sales Code EXF).
SYMPTOM/CONDITION:
A small number of DEF systems may have been accidently contaminated during manufacturing. With this contamination there may be a Malfunction Indicator Lamp (MIL) illuminated. Upon further investigation, a technician may find one or more of the following Diagnostic Trouble Codes (DTCs).
- P20EE – SCR NOX Catalyst Efficiency Below Threshold Bank 1.
- P2BA9 – NOX Exceedence – Insufficient Reductant Quality.
- P20E8 – Reductant Pressure Too Low.
- P20E9 – Reductant Pressure Too High.
DIAGNOSIS:
Using a Scan Tool (wiTECH) with the appropriate Diagnostic Procedures available in TechCONNECT, verify all vehicle systems are functioning as designed. If DTCs or symptom conditions, other than the ones listed above are present, record the issues on the repair order and repair as necessary before proceeding further with this bulletin.
Only perform the following repair procedure if the vehicles VIN appears in the VIP or RRT VIN list.
PARTS REQUIRED:
| Qty. | Description | Part No. |
|---|---|---|
| 1 | Tube, Urea Filler | 68145552AF |
| 1 | Tank, Diesel Exhaust Fluid, Part includes Temp Sensor and Level Unit | 68184663AH |
| 1 | Hose, Supply Tube | 68145551AH |
| 1 | Injector Kit, Dosing Module | 68232842AB |
| 1 | Gasket, Exhaust | 68160679AB |
| 1 | Converter, Selective Reduction (4×2) | 68243267AB |
| 1 | Converter, Selective Reduction (4×4) | 68243268AB |
| (AR) | Diesel Exhaust Fluid (1 Gallon) | 68035704AB |
REPAIR PROCEDURE:
Replace contaminated DEF system components.
- Disconnect and isolate the negative battery cable.
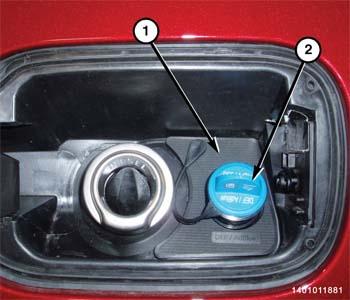
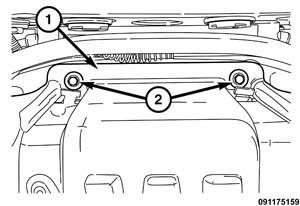
- Remove the DEF cap (2) and DEF filler tube bezel (1) (Fig. 1).
Fig. 1 DEF Cap And Bezel
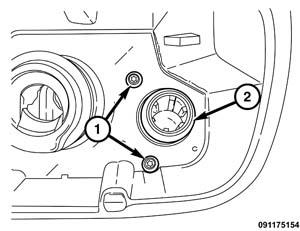
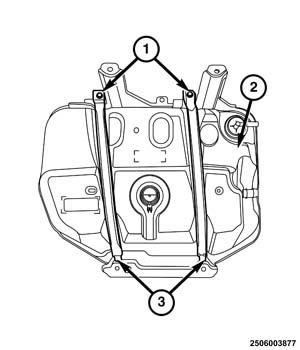
- Remove the screws (1) securing the DEF filler tube (2) (Fig. 2).
Fig. 2 Screws And DEF Filler Tube
- Raise and support the vehicle.
- Remove the left rear tire and wheel.
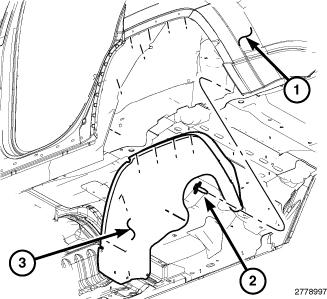
- Remove the left rear wheelhouse splash shield (3) (Fig. 3). Refer to the detailed service procedures available in DealerCONNECT> TechCONNECT > 23 Body/Exterior/SHIELD, Splash – Removal.
Fig. 3 Wheel House Splash Shield
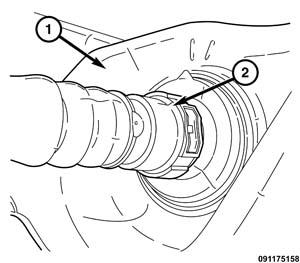
Fig. 4 DEF Tube
- Remove the DEF filler tube support brackets.
- Remove the DEF filler tube from the rubber grommet of the fuel filler housing and remove the DEF filler tube from the vehicle.
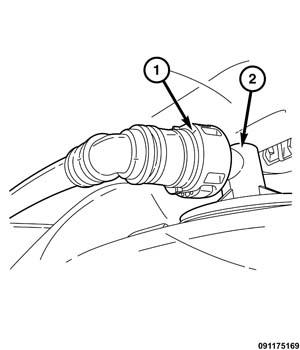
- Disconnect the DEF vent tube (1) from the vent valve (2) (Fig. 5).
Fig. 5 Vent Tube And Vent Valve
- Drain the DEF tank. Refer to the detailed service procedures available in DealerCONNECT> TechCONNECT > 25 – Emissions Control/Diesel Exhaust Fluid Emissions, Standard Procedure.
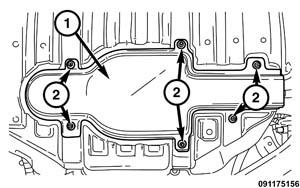
- Remove the nuts (2) and the DEF pump cover (1) (Fig. 6).
Fig. 6 DEF Pump Cover
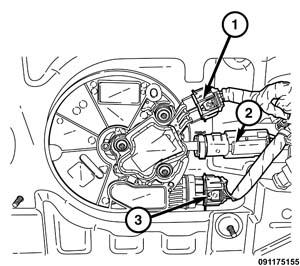
- Disconnect the DEF pump wire harness connector (1), supply line (2). Refer to the detailed service procedures available in DealerCONNECT> TechCONNECT > 25 Emissions Control/Diesel Exhaust Fluid Emissions/FITTING, Quick Connect/Standard Procedure) and level sensor/heater wire harness connector (3) (Fig. 7).
Fig. 7 DEF Pump
- Position a transmission jack under the DEF tank.
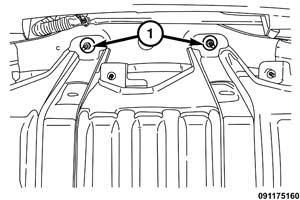
- Remove the rear DEF tank mounting bolts (1) (Fig. 8).
Fig. 8 Rear Tank Mounting Bolts
- Remove the front bolts (2) and lower the DEF tank (1) (Fig. 9).
Fig. 9 Front Tank Mounting Bolts
- Remove the DEF tank from the transmission jack.
- Remove the bolts (1, 3) and the DEF tank straps (Fig. 10).
- Remove the DEF tank (2) from mount (Fig. 10).
Fig. 10 DEF Tank
- Disconnect the supply line routing clip.
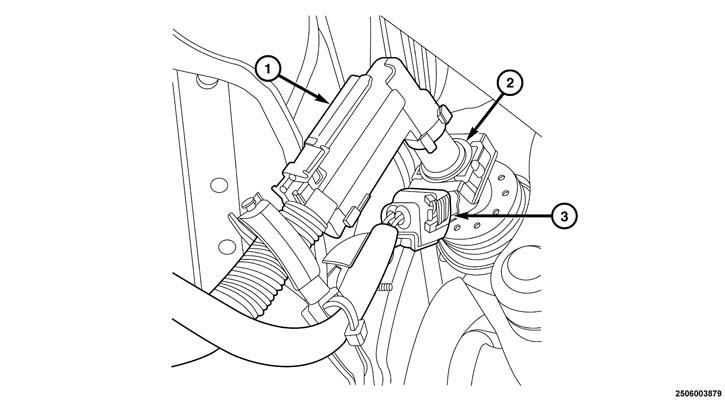
- Disconnect the DEF supply line connector (1) from the dosing injector (2), the DEF injector wire harness connector (3) and remove the supply line (Fig. 11). Refer to the detailed service procedures available in DealerCONNECT> TechCONNECT > 25 Emissions Control/Diesel Exhaust Fluid Emissions/FITTING, Quick Connect/Standard Procedure.
Fig. 11 Dosing Injector
- Saturate the DEF injector bolt with Mopar® Rust Inhibitor. Allow 5 minutes forpenetration.
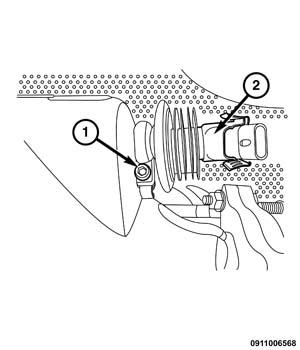
- Loosen the clamp (1) and remove the DEF injector (2) from the Selective Catalytic Reduction (SCR) Catalyst (Fig. 12).
Fig. 12 Dosing Injector Clamp
- If equipped, remove the skid plates.
- Disconnect the front exhaust temperature sensor’s wire harness connectors.
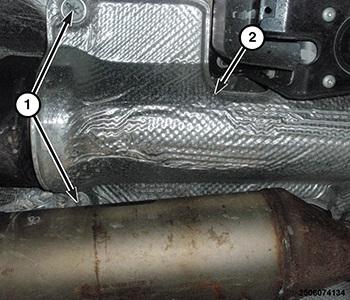
- Remove the fasteners (1) and the heat shield (2) (Fig. 13).
Fig. 13 Exhaust Heat Shield
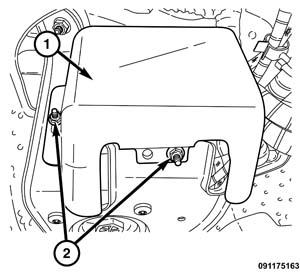
- Remove the nuts (2) and the fuel filter shield (1) (Fig. 14).
Fig. 14 Fuel Filter Shield
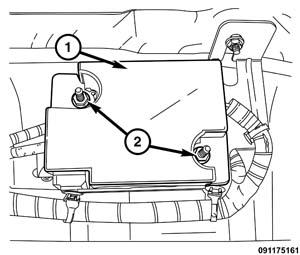
- Remove the nuts (2) and NOx and Particulate Matter (PM) sensor module cover (1) (Fig. 15).
Fig. 15 Module Cover
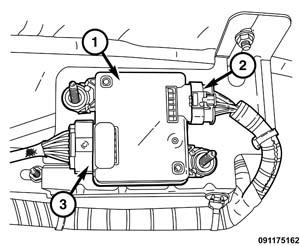
- Disconnect the NOx sensor wire harness connector (2) (Fig. 16).
Fig. 16 Modules
NOTE: DO NOT try to disconnect the wire harness connector (3) from the NOx sensor module (1).
- Remove the nuts (1) and the module mounting bracket (2) (Fig. 17).
Fig. 17 Mounting Bracket
NOTE: DO NOT try to disconnect the wire harness connector (3) from the Particulate Matter (PM) sensor module (1).
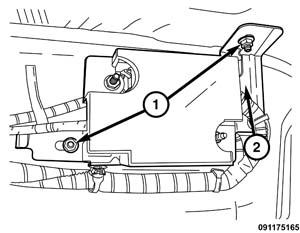
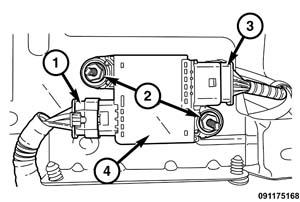
- Disconnect the PM sensor wire harness connector (1) (Fig. 18).
Fig. 18 PM Sensor
- Remove the nuts (2) and the PM module (4) (Fig. 18).
- Remove the tailpipe assembly. Refer to the detailed service procedures available in DealerCONNECT> TechCONNECT > 11 – Exhaust System/TAILPIPE, Exhaust/Removal.
- Remove the SCR Catalyst from the isolators.
- Remove the nuts and the SCR Catalyst.
- Remove and discard the flange gasket.
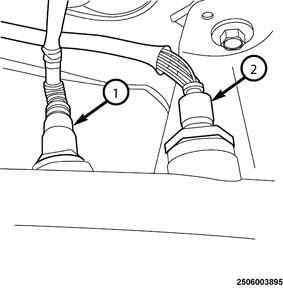
- Using a six sided crow foot to remove the PM sensor (1) and NOx sensor (2) from the SCR Catalyst (Fig. 19).
Fig. 19 Sensors
NOTE: DO NOT use a torch as a heat source.
NOTE: If the sensors fail to loosen use a torque wrench set to 160 N·m (118 ft. lbs.) and attempt to loosen them.
- If the sensors and are still not loose after applying 160 N·m (118 ft. lbs.) then use aheat gun to heat the bosses for 1 minute at 450°C (842°F).
- Install the PM sensor into the new SCR Catalyst and tighten to 60 N·m (44 ft. lbs.).
- Install the NOx sensor into the new SCR Catalyst and tighten to 55 N·m (41 ft. lbs.).
- Clean all the gasket sealing surfaces.
- Install the new SCR Catalyst and flange gasket.
- Position the SCR Catalyst onto flange and install the flange nuts and finger tighten.
- Install the isolators onto the SCR Catalyst hanger rods.
- Tighten the flange nuts to 32 N·m (24 ft. lbs.).
- Install the tail pipe assembly.
NOTE: Check the exhaust system for contact with the body panels. A minimum of 25 mm (1.0 in.) is required between the exhaust system components and body/frame parts. Make the necessary adjustments, if needed.
- Install the PM and NOx sensor modules.
- Install the module mounting bracket. Tighten the nuts to 11 N·m (8 ft. lbs.).
- Install the module cover. Tighten the nuts to 8 N·m (71 in. lbs.).
- Install the fuel filter shield. Tighten the nuts 14 N·m (10 ft. lbs.).
- Install the heat shield and fasteners.
- Install the new DEF injector and gasket.
- Install the DEF injector into SCR Catalyst. Tighten the clamp to 5 N·m (44 in. lbs.).
- Connect the DEF fluid supply line and DEF injector wire harness connector.
- Position the DEF tank onto tank mount.
- Install the DEF tank straps. Tighten the bolts to 54 N·m (40 ft. lbs.).
- Position the DEF Tank onto transmission jack and raise the tank part way into place.
- Install the rear DEF tank mounting nuts and tighten to 29 N·m (21 ft. lbs.).
- Install the front DEF tank mounting bolts and tighten to 33 N·m (24 ft. lbs.).
- Remove the transmission jack.
- Connect the DEF level sensor/heater wire harness connector, DEF supply line, andthe DEF level sensor/heater wire harness connector.
- Install the DEF pump cover. Tighten nuts to 15 N·m (11 ft. lbs.).
- Connect the DEF fill vent tube to the vent valve.
- Connect the DEF fill tube to the DEF tank.
- Position the DEF filler tube into the rubber grommet of the fuel filler housing.
- Install the DEF filler tube support bracket.
- Install the left rear wheelhouse splash shield. Refer to the detailed service proceduresavailable in DealerCONNECT> TechCONNECT > 23 – Body/Exterior/SHIELD, Splash, Wheelhouse/Installation.
- Install the left rear wheel and tire.
- Remove the support and lower the vehicle.
- Install the screws securing the filler tube and securely tighten.
- Install the DEF filler tube bezel.
- Install the DEF cap.
- Connect the negative battery cable.
NOTE: The following steps must be performed once the new DEF tank is filled. Failure to do so may result in DTC P20E8 – (Diesel Exhaust Fluid) Reductant Pressure Too Low setting in the PCM.
NOTE: The PCM must be at the latest available software level before performing the DEF Reductant Doser Pump Prime Override test. Refer to all applicable published service bulletins for detailed repair procedures and labor times.
- Ensure that the DEF tank is approximately 1/2 full.
- Using WiTECH, perform a DEF Reductant Doser Pump Prime Override test a total of10 times to ensure that the DEF pump has been sufficiently primed and that all air has been purged from the pump and filter.
- Turn the ignition key on and ensure the DEF level gauge is reading correctly.
POLICY:
Reimbursable within the provisions of the warranty.
TIME ALLOWANCE:
| Labor Operation No: | Description | Skill Category | Amount |
|---|---|---|---|
| 25-08-02-90 For vehicles built between 07/10/15 – 07/11/15 | Assembly, Diesel Exhaust Fluid Pump Replace (2 – Skilled) | 10 – Diesel | 3.7 Hrs |
| 25-08-02-91 For vehicles built between 08/24/15 – 08/25/15 | Assembly, Diesel Exhaust Fluid Pump Replace (2 – Skilled) | 10 – Diesel | 3.7 Hrs |
FAILURE CODE:
| ZZ | Service Action |
 Loading...
- One gallon of is used approximately every 300 miles
- A truck with a 20 gallon DEF tank can go up to 6000 miles between fill-ups
- When used in an SCR system will reduce the levels of NOx emissions of those engines
- Fit type: Universal
- One gallon of is used approximately every 300 miles
- A truck with a 20 gallon DEF tank can go up to 6000 miles between fill-ups
- When used in an SCR system will reduce the levels of NOx emissions of those engines
- Prime Guard DEF is a safe, environmentally friendly solution for Selective Catalytic Reduction
- Blue Def DEF002-2PK Diesel Exhaust Fluid, 2.5 Gallon, 2 Pack
- Meets GM Original Equipment specifications to be approved for use in GM vehicles as well as in non-GM diesel vehicles that have an SCR (Selective Catalytic Reduction) system to meet regulated NOx emissions (Based on EPA certification testing. Your actual emissions will vary based on several factors including temperature, terrain, and driving conditions).
- High quality formula is made from high purity urea and deionized water.
- Meets API regulations and ISO 22241 standard for purity and concentration
- Nozzles sold separately
- One gallon of BlueDEF is used approximately every 300 miles
- A truck with a 20 gallon DEF tank can go up to 6000 miles between fill-ups
- When used in an SCR system BlueDEF will reduce the levels of NOx emissions of those engines
- Non-flammable
- Diesel exhaust fluid
- DEF Fluid Pallet - Premium BlueDEF Fluid 40 Cases - BlueDEF Diesel Exhaust Fluid 2.5 Gallon Case - Pack of 40 BlueDEF Jugs and 1 Pack of Heavy Duty Wipes
- America's #1 brand of Diesel Exhaust Fluid Conforms to the ISO-22241-1 specification for DEF, and is an American Petroleum Institute (API) certified diesel exhaust fluid
- BlueDEF's Purity Guarantee is our assurance the DEF your are purchasing has been tested to meet or exceed the strictest OEM standards
Last update on 2025-05-08 / Affiliate links / Images from Amazon Product Advertising API
This product presentation was made with AAWP plugin.
