| “This site contains affiliate links for which OEMDTC may be compensated” |
NHTSA Campaign Number: 15V046
Component(s): AIR BAGS
Potential Number of Units Affected: 752,627
Manufacturer: Chrysler (FCA US LLC)
SUMMARY:
Chrysler (FCA US LLC) is recalling certain model year 2002-2003 Jeep
 Liberty vehicles manufactured January 9, 2001, to March 28, 2003, 2002-2004 Jeep
 Grand Cherokee vehicles manufactured February 13, 2001, to May 23 2003, and 2003-2004 Dodge
 Viper vehicles manufactured November 1, 2001, to June 30, 2004.
Due to electrical noise beyond the tolerance of the air bag electronic control module (ECM), a component in the ECM may fail, causing the front air bags, side air bags, and/or seatbelt pretensioners to deploy inadvertently while the vehicle is being operated.
CONSEQUENCE:
Inadvertent deployment of the air bags may increase the risk of injury and the possibility of a vehicle crash.
REMEDY:
Chrysler dealers will replace the air bag control module and side impact sensors as required, free of charge.
These parts are not currently available, however, an interim repair is available free of charge that reduces the risk of an inadvertent deployment.
This recall remedy was applied during earlier recall campaigns of these vehicles under safety recalls 12V527 and 13V040.
All owners that have not had the recall repair performed under safety recalls 12V527 or 13V040 are strongly encouraged to have it performed and not wait for the final remedy to be deployed to the field.
The recall began on December 29, 2015.
Owners may contact Chrysler customer service at 1-800-853-1403.
Chrysler ’s number for this recall is R06.
NOTES:
Owners may also contact the National Highway Traffic Safety Administration Vehicle Safety Hotline at 1-888-327-4236 (TTY 1-800-424-9153), or go to www.safercar.gov.
Check if your Vehicle has a Recall
Revised May 2016
Dealer Service Instructions for:
Safety Recall R06 / NHTSA 15V-046 Occupant Restraint Control Module
NOTE: The DRBIII emulator has been updated to allow the use of the wiTECH micro pod II. The service procedure has been revised to reflect this change.
Models
| IMPORTANT: Some of the involved vehicles may be in dealer used vehicle inventory. Dealers should complete this recall service on these vehicles before retail delivery. Dealers should also perform this recall on vehicles in for service. Involved vehicles can be determined by using the VIP inquiry process. |
Subject
The airbag system Occupant Restraint Control (ORC) module on about 745,800 of the above vehicles may experience a front airbag and/or seatbelt pretensioner inadvertent deployment. An inadvertent deployment while driving could distract the driver and cause a crash without warning.
Repair
The ORC module must be replaced on all involved vehicles.
Also, vehicles that had Safety Recall M35/N13 – Occupant Restraint Control Module Filter Circuit completed must also have the ORC module filter circuit removed.
Parts Information
ORC Module Packages with Impact Sensors:
| Part Number | Description |
| CBSZR062AA | Module, ORC (2002 KJ models) |
| CBSZR064AA | Module, ORC (2003 KJ models) |
CBSZR067AA | Module, ORC (WJ models with Supplemental Side Airbags / with sales code CGS) |
NOTE: To better manage required inventory for this recall, only approximately 10% of involved vehicles are expected to require impact sensor replacement.
ORC Module Packages without Impact Sensors:
| Part Number | Description |
| CBSZR065AA | Module, ORC (WJ models without Supplemental Side Airbags / without sales code CGS) |
| CBSZR066AA | Module, ORC (WJ models with Supplemental Side Airbags / sales code CGS) |
CBSZR061AA | Module, ORC (2002 KJ models) |
| CBSZR063AA | Module, ORC (2003 KJ models) |
NOTE: The ORC module packages (without impact sensors) above are only compatible with the impact sensors that originally came on the vehicle.
SPECIAL NOTE: For all (WJ) Jeep Grand Cherokee models, the new ORC modules provided in this recall do not require front impact sensors to operate correctly. The front impact sensors are permanently disabled. Do not order or replace the front impact sensors on WJ models.
| Part Number | Description |
| CBXTM352AA | Switch, Transfer Case |
| Part Number | Description |
| CBSZR068AA | Module, ORC (All ZB models) |
| Part Number | Description |
| 68065586AA | Tape, Abrasion (one roll of abrasion tape will repair 10 vehicles) |
NOTE: The abrasion tape is only required for repairing WJ models.
Parts Return
No parts return required for this campaign.
Special Tools
The following special tools are required to perform this repair:
| wiTECH VCI Pod II |
| Laptop Computer |
| wiTECH Software |
Service Procedure
A. Determine ORC Module Package Required (All Models)
- Connect the wiPOD to the vehicle data link connector.
- Start a wiTECH session.
- Select (1) “DRB III Standalone”.
- Select (1) “1998-2007 Diagnostics”.
- Select (1) “All (Except Below)”.
- Select (6) “Passive Restraints”
- Select (1) “Airbags”.
- Select (2) “Read DTC’s”.
- Select (1) “Active”.
- Select “Page Back” and then select (2) “Stored”.
- Record active and stored Diagnostic Trouble Codes (DTC’s) for right and left front impact sensors on KJ models and right and left side impact sensors on WJ models:
- If there are no Impact Sensor DTC’s, replace the Occupant Restraint Control (ORC)
NOTE: Install a new ORC module package that does not contain impact sensors.
- If there are Impact Sensor DTC’s, replace the Occupant Restraint Control (ORC) module and both impact
NOTE: Install a new ORC module package that contains new impact sensors.
CAUTION: If only the ORC module requires replacement at this time and at some point in the future an impact sensor(s) requires replacement, the ORC module and both impact sensors will require replacement. The ORC module packages (without impact sensors) in this recall contain an ORC module that is not compatible new impact sensors.
SPECIAL NOTE: If after completing this recall the airbag warning light is still illuminated, the cost to make additional repairs to other airbag system components is the responsibility of the vehicle owner.
B. Replace ORC Module (KJ Models)
WARNING: TO AVOID SERIOUS OR FATAL INJURY ON VEHICLES WITH AIRBAGS, DISABLE THE SUPPLEMENTAL RESTRAINT SYSTEM (SRS) BEFORE ATTEMPTING THIS REPAIR PROCEDURE. DISCONNECT AND ISOLATE THE BATTERY NEGATIVE (GROUND) CABLE, THEN WAIT TWO MINUTES FOR THE SYSTEM CAPACITOR TO DISCHARGE BEFORE PERFORMING SERVICE. THIS IS THE ONLY SURE WAY TO DISABLE THE SRS. FAILURE TO TAKE THE PROPER PRECAUTIONS COULD RESULT IN ACCIDENTAL AIRBAG DEPLOYMENT.
- Open the hood and disconnect the negative battery cable from the battery.
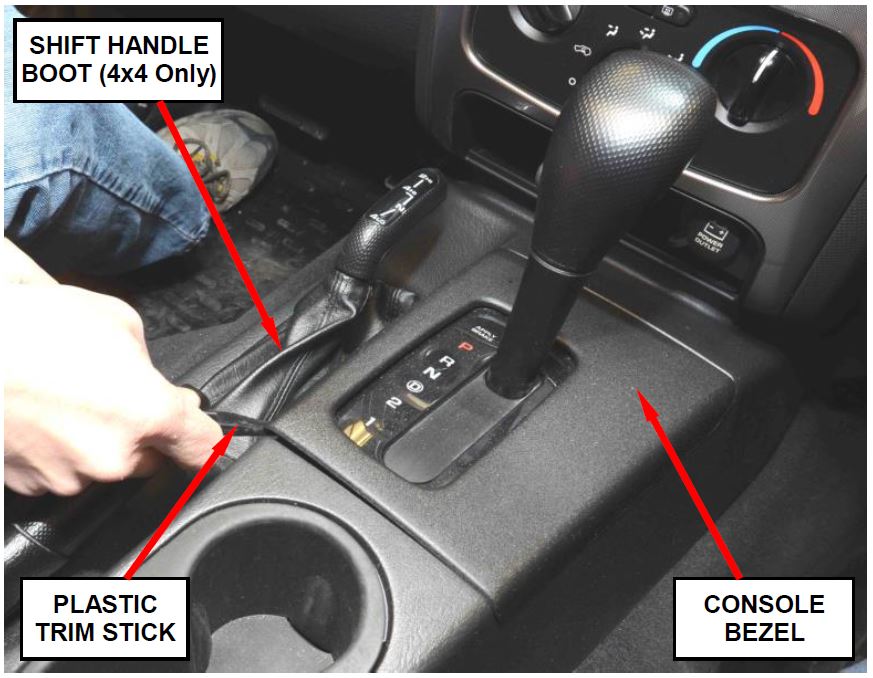
- Remove and save the gear shift lever center console bezel (Figure 1).
Figure 1 – Center Console Bezel and Shift Boot
- Apply the park brake and place gear shift lever in the neutral position.
- For vehicles equipped with four wheel drive, place the four wheel drive selector handle in the “four wheel low” position.
- For vehicles equipped with four wheel drive, remove and save the four wheel drive lever shift handle boot (Figure 1).
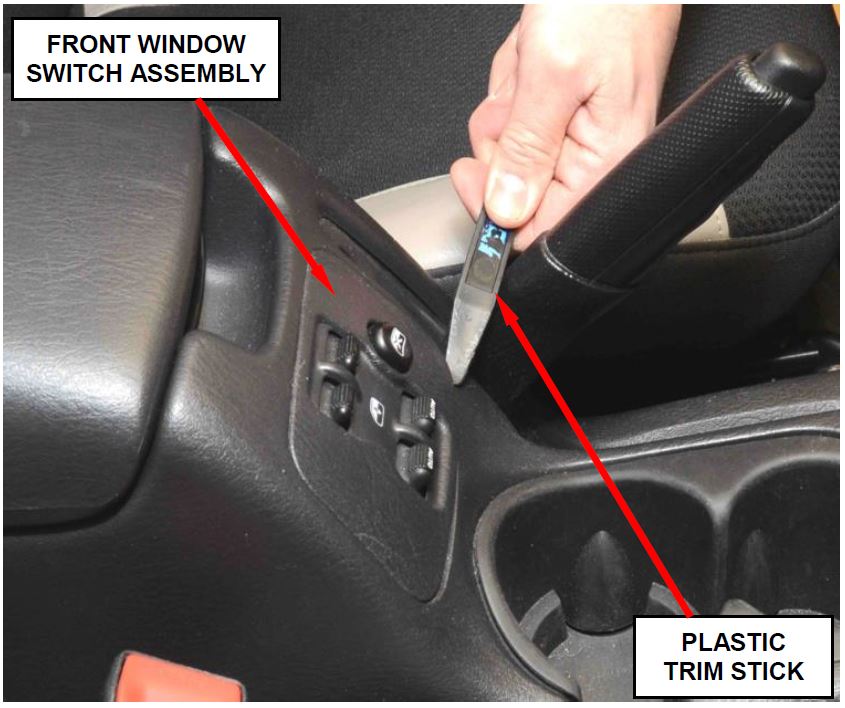
- For vehicles with power windows, remove and save the front window switch assembly (Figure 2).
Figure 2 – Front Window Switch Assembly
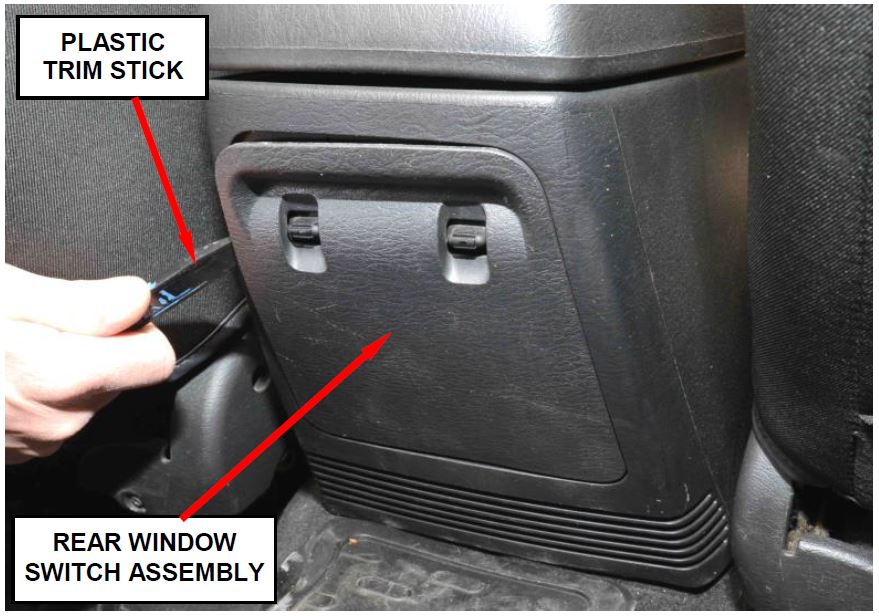
- Remove and save the rear window switch assembly from the center console (Figure 3).
Figure 3 – Rear Window Switch Assembly
- Remove and save the four center console retaining screws.
- Carefully remove and save the center console assembly.
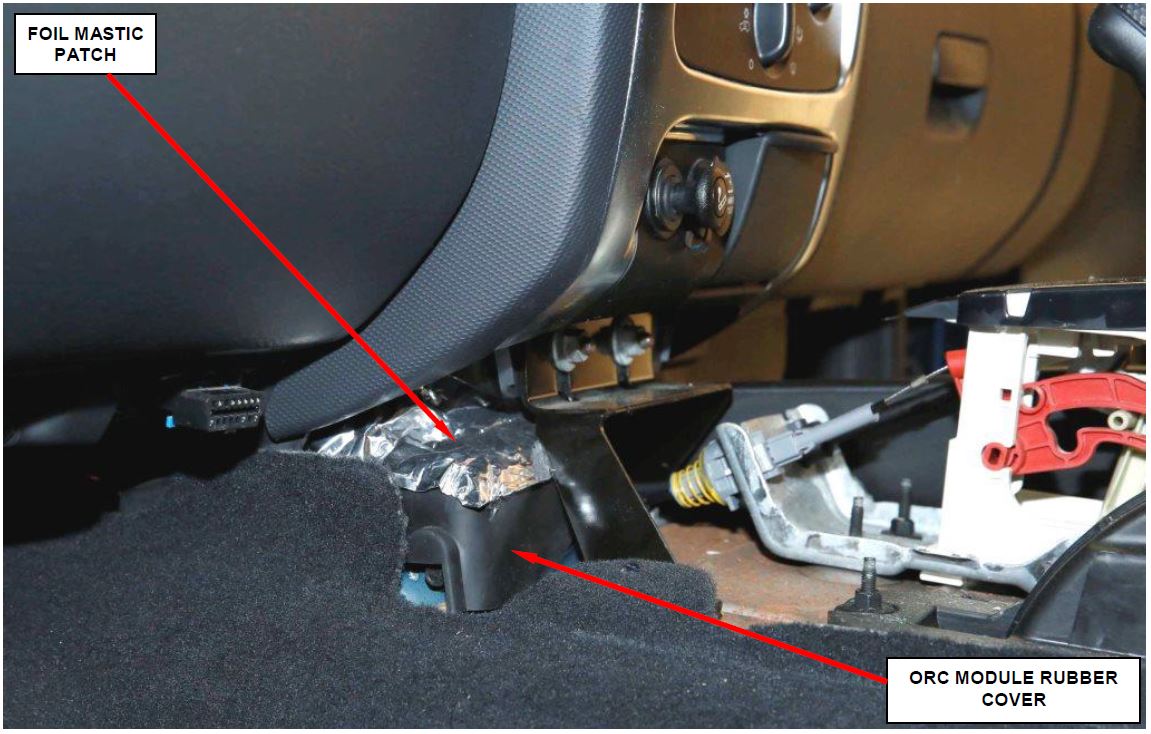
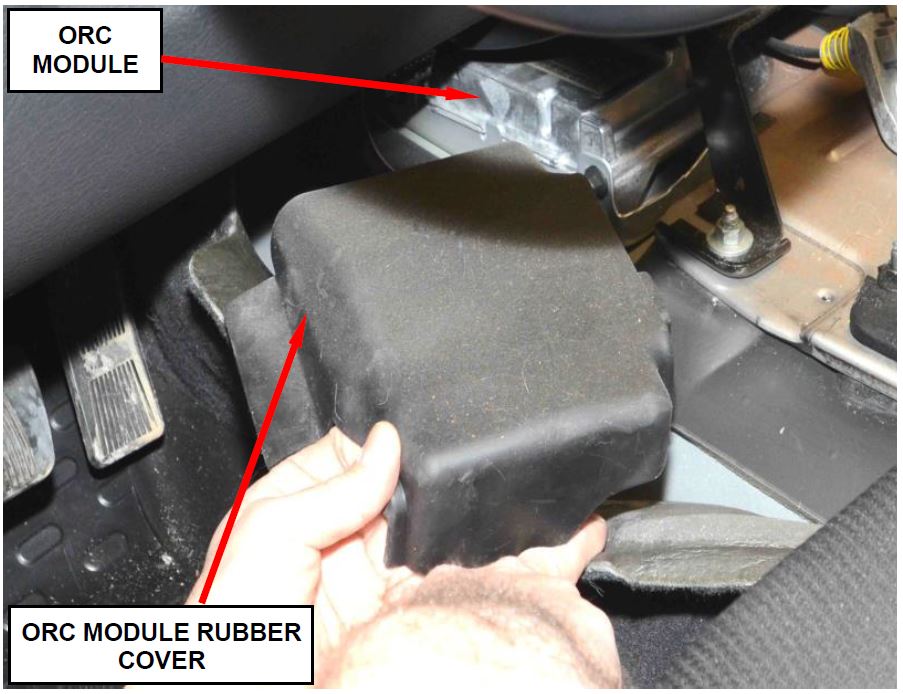
- For vehicles that had Safety Recall M35 performed, remove and discard the foil mastic patch from the ORC module rubber cover (Figure 4).
- Remove and save the ORC module rubber cover (Figure 4).
Figure 4 – Remove and Discard Foil Mastic Patch
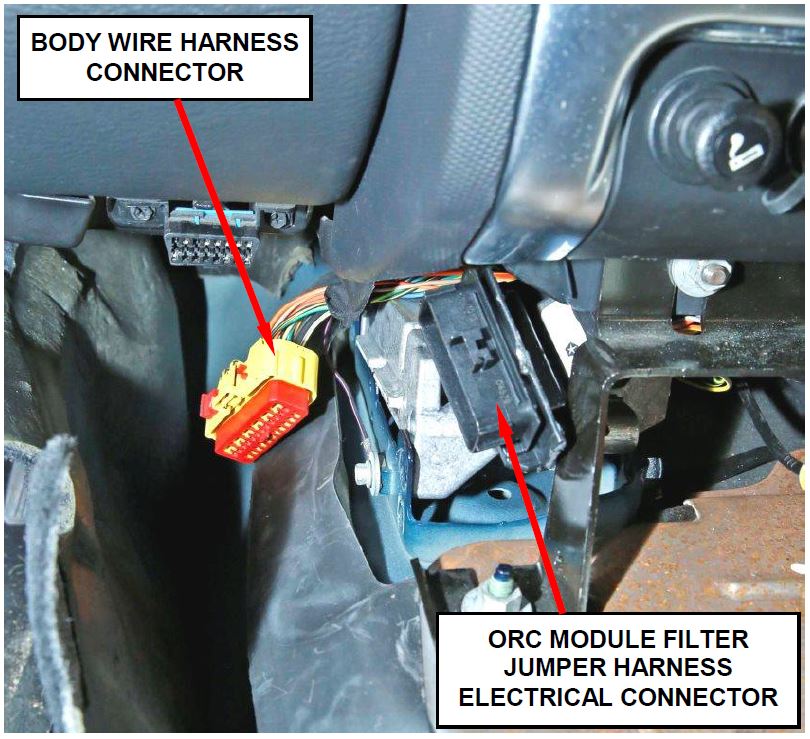
- For vehicles that had Safety Recall M35 performed, disconnect the ORC module jumper harness electrical connector from the body wire harness (Figure 5).
Figure 5 – Disconnect Electrical Connector
- Remove and save the three ORC module mounting bolts.
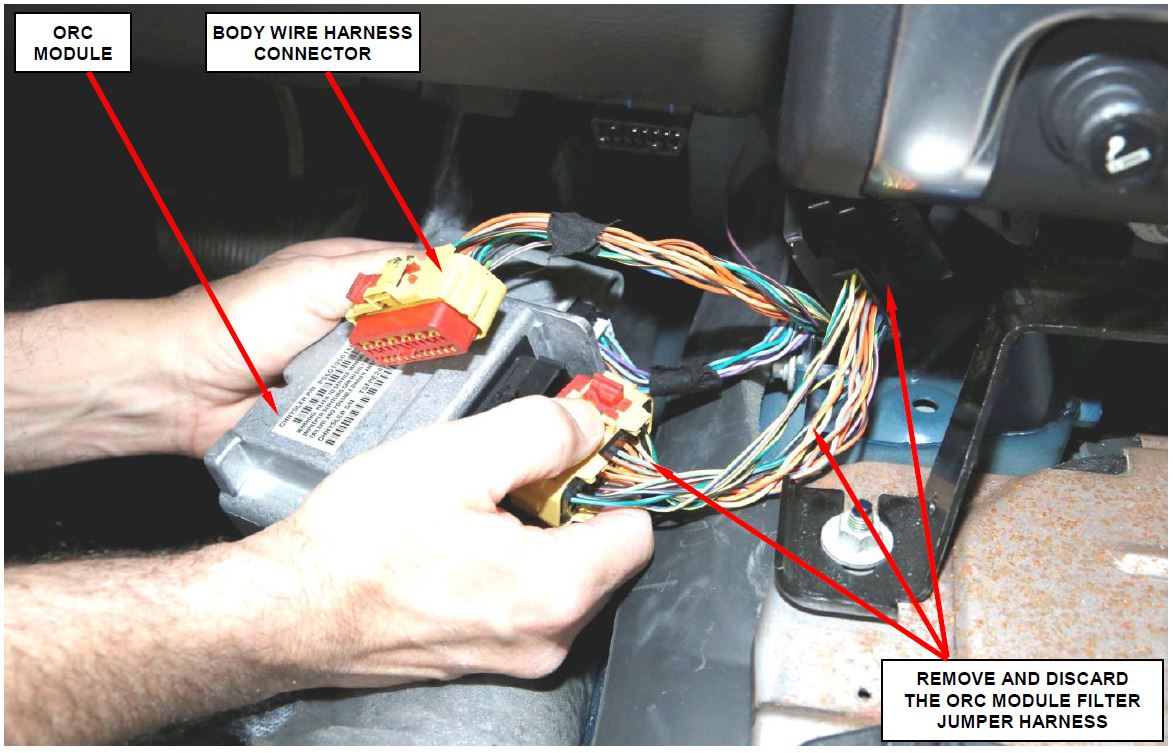
- Carefully pull the ORC module out of the vehicle and disconnect filter circuit jumper harness electrical connector (Figure 6).
- Discard the original filter circuit jumper harness (Figure 6).
Figure 6 – Disconnect and Discard the ORC Module Filter Jumper Harness
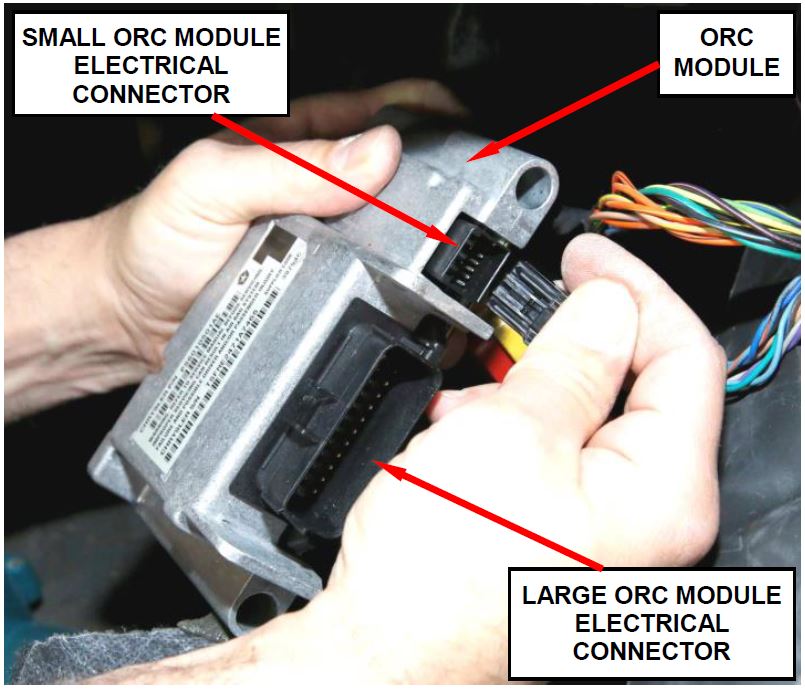
- Disconnect the small ORC module electrical connector (Figure 7).
- Destroy and discard the original ORC module.
- Connect the large and small body harness electrical connectors to the new ORC module and place the module into position (Figure 7).
Figure 7 – Disconnect Small ORC Module Electrical Connector
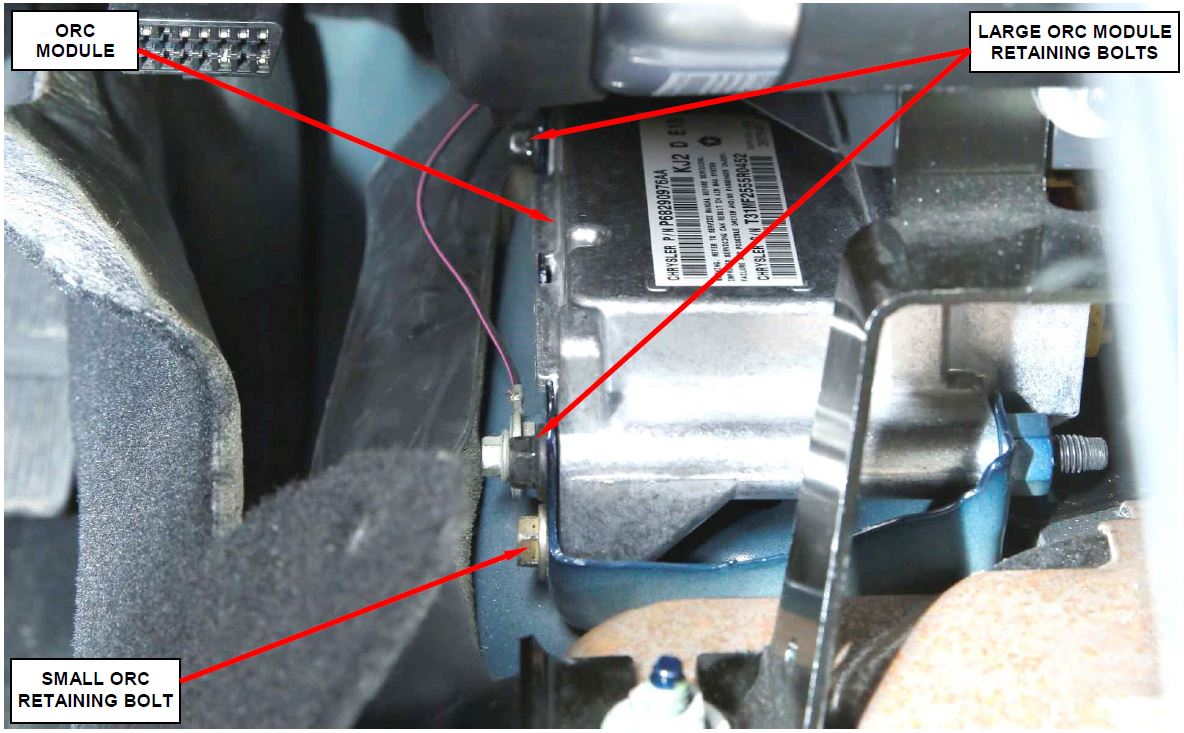
- Install the three retaining bolts. Tighten the two large retaining bolts to 26 ft. lbs. (36 N·m). Tighten the small retaining bolt to 105 in. lbs. (12 N·m) (Figure 8).
Figure 8 – Install Three ORC Module Retaining Bolts
- Clean off any residual glue on the ORC module rubber cover left behind by the foil mastic patch.
- Place the ORC module rubber cover into position over the ORC module (Figure 9).
Figure 9 – ORC Module Rubber Cover
- Install the center console assembly into position.
- Install the four center console retaining screws.
- Install the rear window switch assembly (Figure 3).
- Install the front window switch assembly (Figure 2).
- For vehicles equipped with four wheel drive, install the four wheel drive lever shift handle boot (Figure 1).
- Install the gear shift lever center console bezel (Figure 1).
- For vehicles that require front impact sensors, continue with Section C, Front Impact Sensor Replacement.
- For vehicles that do not require front impact sensors, continue with Step 30 of this procedure.
- Turn the ignition key to the “RUN” position, with no one inside the vehicle, connect the negative battery cable to the battery.
- Reset the clock on the radio.
- Start the vehicle.
- Connect the wiTECH scan tool and check for impact sensor and/or ORC module DTC’s:
- If there are no impact sensor and/or ORC module DTC’s, continue with Step 34 of this procedure.
- If there are impact sensor and/or ORC module DTC’s, make repairs to sensor and/or ORC module as required, then continue with Step 34 of this procedure.
NOTE: All replacement ORC Modules for this recall are configured for the optional side curtain airbag feature.
If a new ORC module is installed in a vehicle that is not equipped with the optional side curtain airbags, the airbag indicator lamp will illuminate and “No Right SIACM” and “No Left SIACM” DTC’s will be registered.
The new ORC module must be configured to disable the side curtain airbag feature using a DRBIII scan tool or wiTECH DRBIII emulator. Continue with Step 34 of this procedure.
NOTE: This procedure should only be performed on vehicles with active DTC’s “No Right SIACM and No Left SIACM”.
a. From the “SELECT FUNCTION” Screen on the DRBIII select (9) “Miscellaneous” button.
b. Select (1) “Configure for Side Airbag”
c. Screen Prompt : “Do you want to continue?” Select “Enter”
d. Verify Current Status is set to: “ACM with Side Airbags”
e. Select (2) “ACM without Side Airbags” then “Enter”
f. Verify Current Status a second time, should now read: “ACM without Side Airbags”
g. Select BACK PAGE to exit.
h. Select (2) Read DTC’s.
i. Select (1) Active.
j. Verify No DTC’s are Detected.
SPECIAL NOTE: If after completing this recall the airbag warning light is still illuminated, the cost to make additional repairs to other airbag system components is the responsibility of the vehicle owner.
- For vehicles equipped with four wheel drive, place the four wheel drive lever shift handle into the “2 Hi” position.
- For vehicles equipped with four wheel drive, check to insure that the four wheel drive indicator light is not illuminated.
- If the four wheel drive indicator light is not illuminated, no further action is required. Continue with Step 37 of this procedure.
- If the four wheel drive indicator light remains on, continue with Section F. Replace the Four Wheel Drive Indicator Light Switch.
- Remove the wiTECH scan tool and return the vehicle to the customer.
C. Front Impact Sensor Replacement
- Locate the front impact sensors.
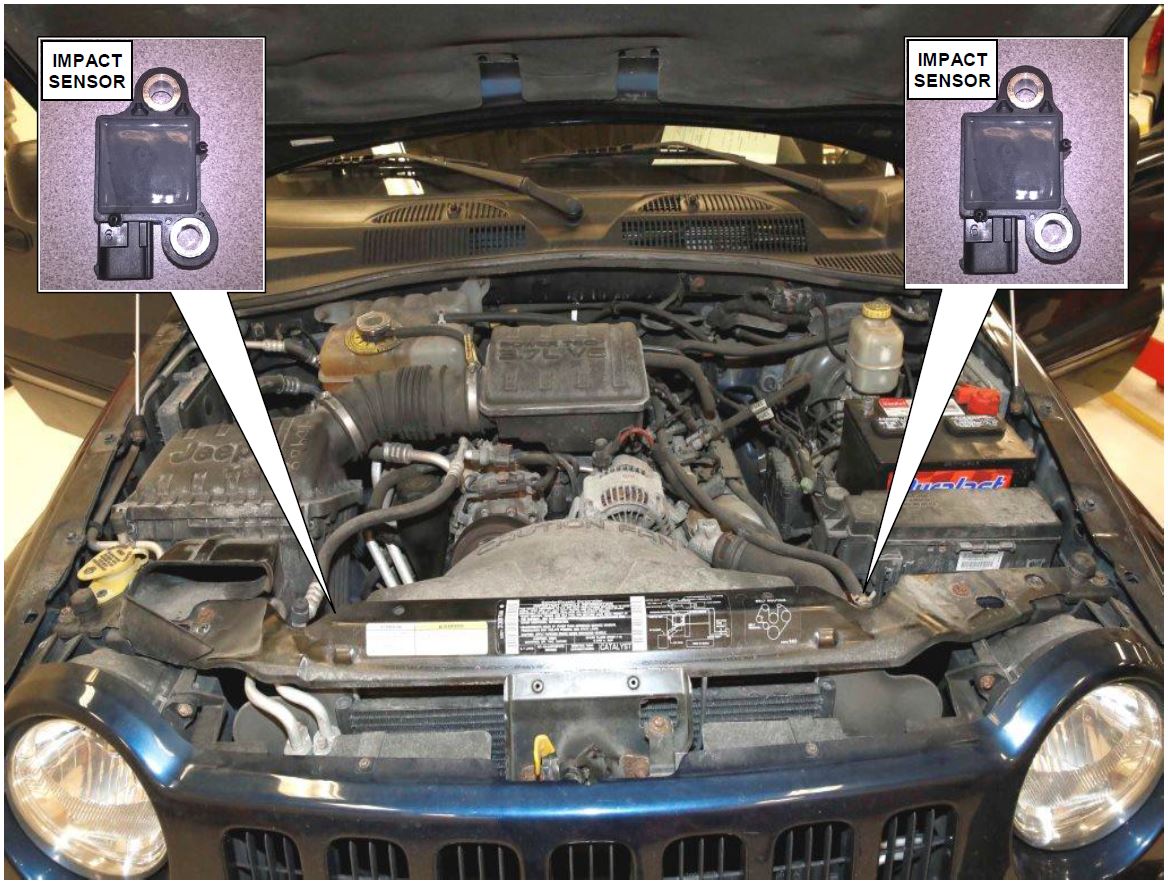
NOTE: The front impact sensors are located to the right and left of the radiator on the radiator support vertical member (Figure 10).
- Remove and save the two mounting bolts on the front impact sensor.
- Disconnect the electrical connector from the front impact sensor.
- Remove and discard the original front impact sensor.
Figure 10 – Front Impact Sensor Location
- Connect the vehicle wire harness connector to the new front impact sensor.
- Place the new front impact sensor into position and install the mounting bolts. Tighten the mounting bolts to 65 in. lbs. (7 N·m).
- Repeat Steps 1 through 6 to replace the second front impact sensor.
- Turn the ignition key to the “RUN” position, with no one inside the vehicle, connect the negative battery cable to the battery.
- Reset the clock on the radio.
- Connect the wiTECH scan tool and check for impact sensor and/or ORC module DTC’s:
- If there are no impact sensor and/or ORC module DTC’s, continue with Step 11 of this procedure.
- If there are impact sensor and/or ORC module DTC’s, make repairs to sensor and/or ORC module as required, then continue with Step 11 of this procedure.
SPECIAL NOTE: If after completing this recall the airbag warning light is still illuminated, the cost to make additional repairs to other airbag system components is the responsibility of the vehicle owner.
- For vehicles equipped with four wheel drive, place the four wheel drive lever shift handle into the “2 Hi” position.
- For vehicles equipped with four wheel drive, check to insure that the four wheel drive indicator light is not illuminated.
- If the four wheel drive indicator light is not illuminated, continue with Step 13 of this procedure.
- If the four wheel drive indicator light remains on, continue with Section F. Replace the Four Wheel Drive Indicator Light Switch.
- Remove the wiTECH scan tool and return the vehicle to the customer.
D. Replace ORC Module (WJ Models)
WARNING: TO AVOID SERIOUS OR FATAL INJURY ON VEHICLES EQUIPPED WITH AIRBAGS, DISABLE THE SUPPLEMENTAL RESTRAINT SYSTEM (SRS) BEFORE ATTEMPTING THIS REPAIR PROCEDURE. DISCONNECT AND ISOLATE THE BATTERY NEGATIVE (GROUND) CABLE, THEN WAIT TWO MINUTES FOR THE AIRBAG SYSTEM CAPACITOR TO DISCHARGE BEFORE PERFORMING SERVICE. THIS IS THE ONLY SURE WAY TO DISABLE THE SRS. FAILURE TO TAKE THE PROPER PRECAUTIONS COULD RESULT IN ACCIDENTAL AIRBAG DEPLOYMENT.
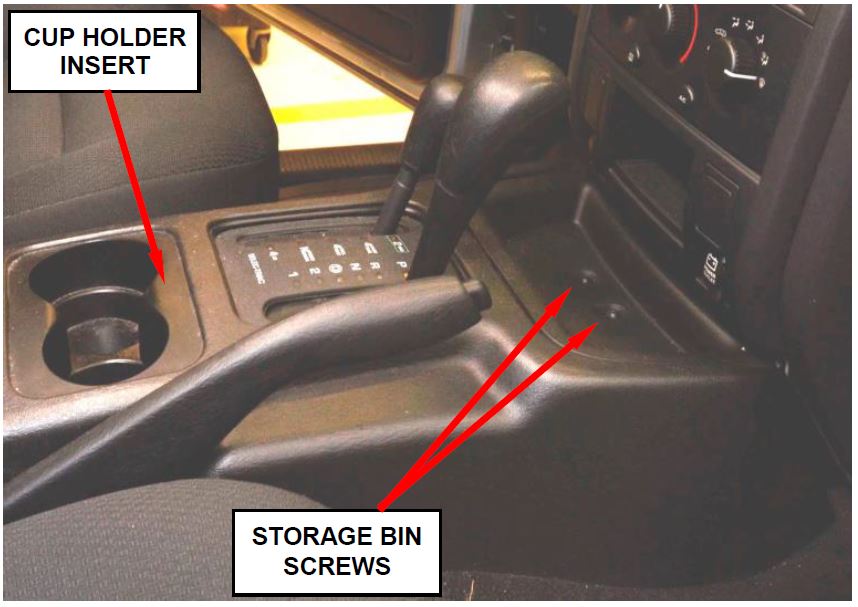
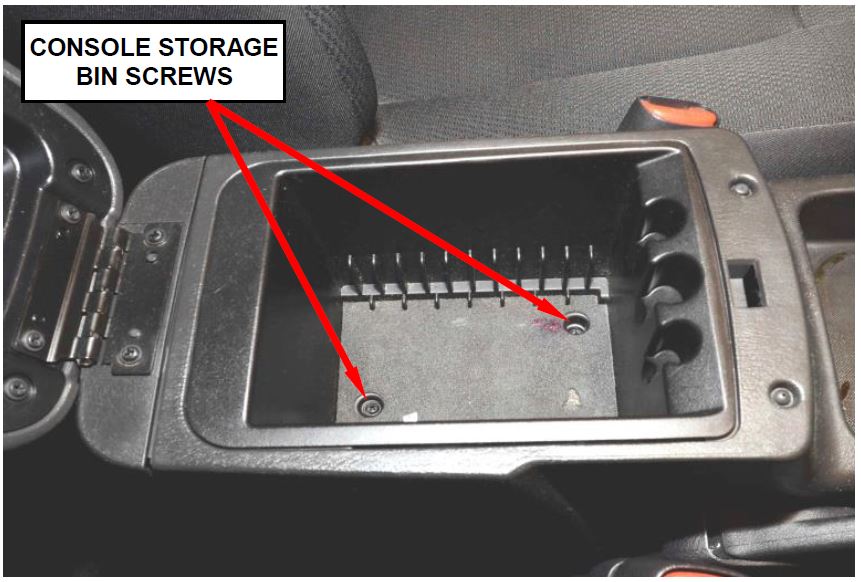
Figure 11 – Storage Bin Screws
- Disconnect the negative battery cable.
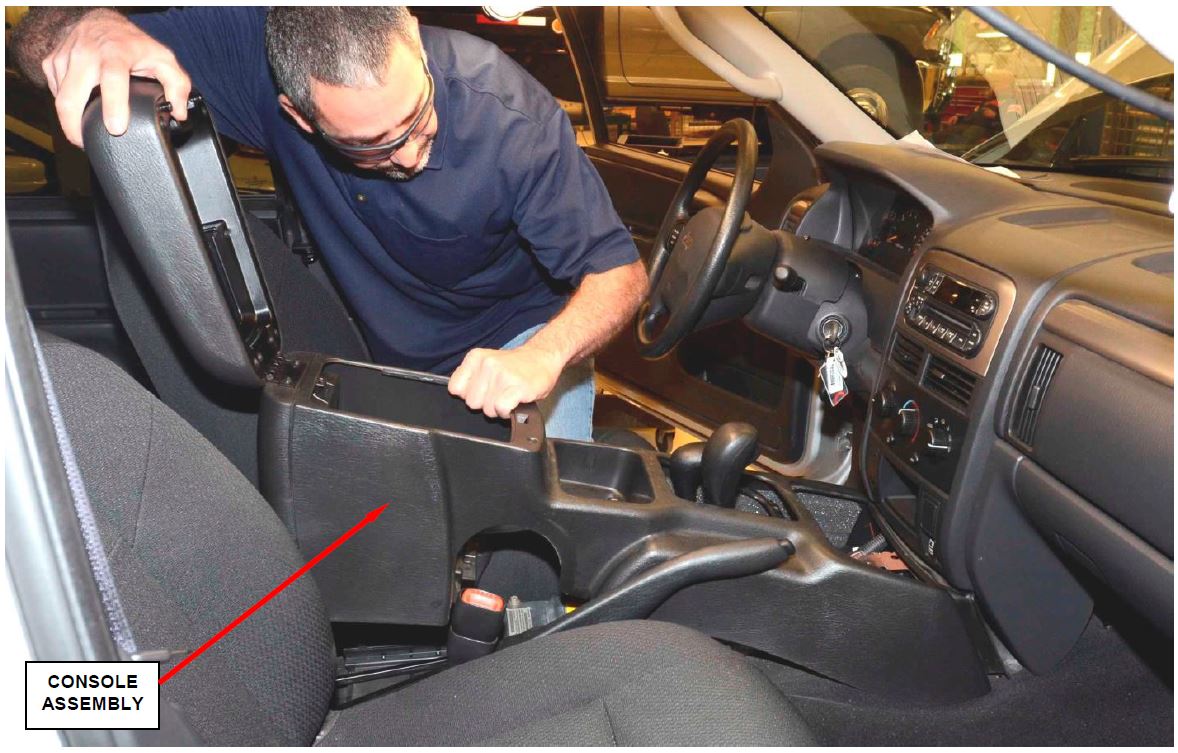
- Remove and save the center console using the following procedure:
a. Remove and save the two retaining screws in the console storage bin (Figure 11).
b. Remove and save the cup holder insert from the console (Figure 11).
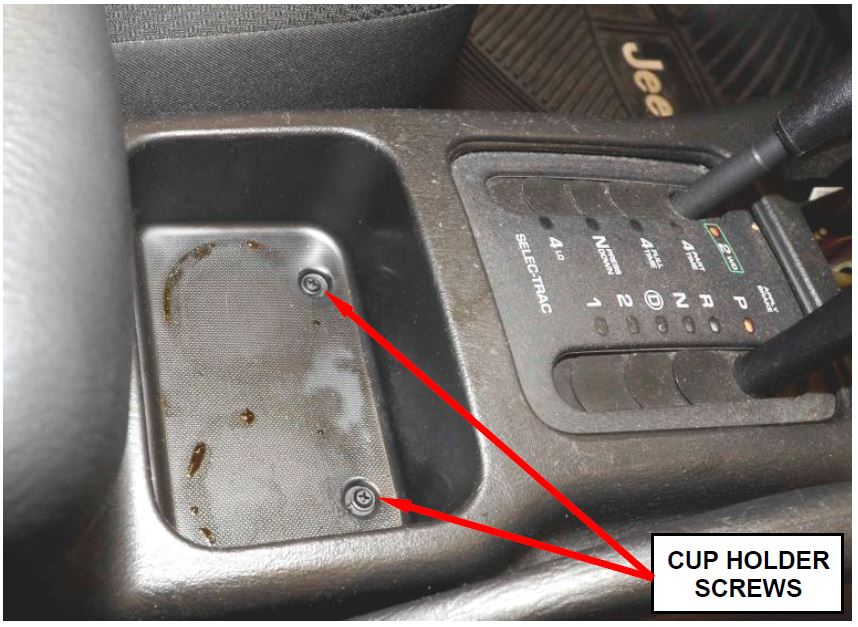
c. Remove and save the two screws under the cup holder insert (Figure 12).
Figure 12 – Cup Holder Screws
d. Open the center console and remove and save the two screws at the bottom of the console storage bin (Figure 13).
e. Remove and save the center console assembly (Figure 14).
Figure 13 – Console Storage Bin Screws
Figure 14 – Remove/Install Center Console
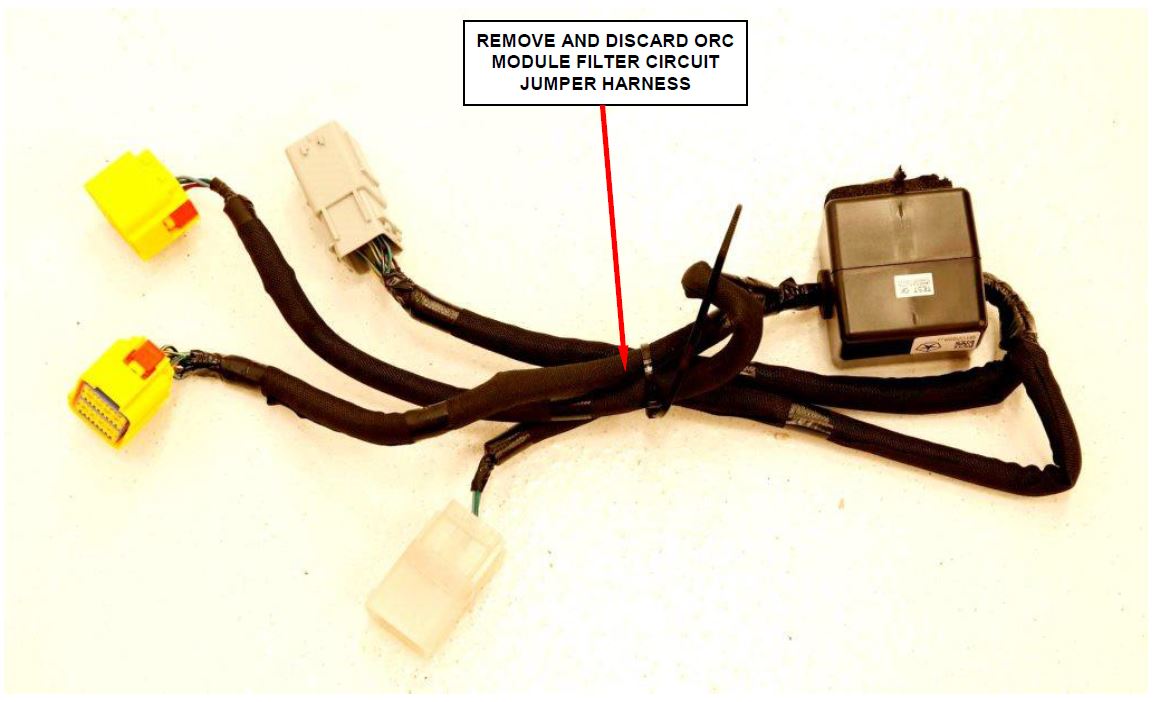
- For all vehicles that had Safety Recall M35 previously performed, remove and discard the ORC module filter circuit jumper harness (Figure 15).
Figure 15 – Remove and Discard the ORC Module Filter Circuit Jumper Harness
NOTE: Only vehicles that had Safety Recall M35 completed will have an ORC module filter circuit jumper harness.
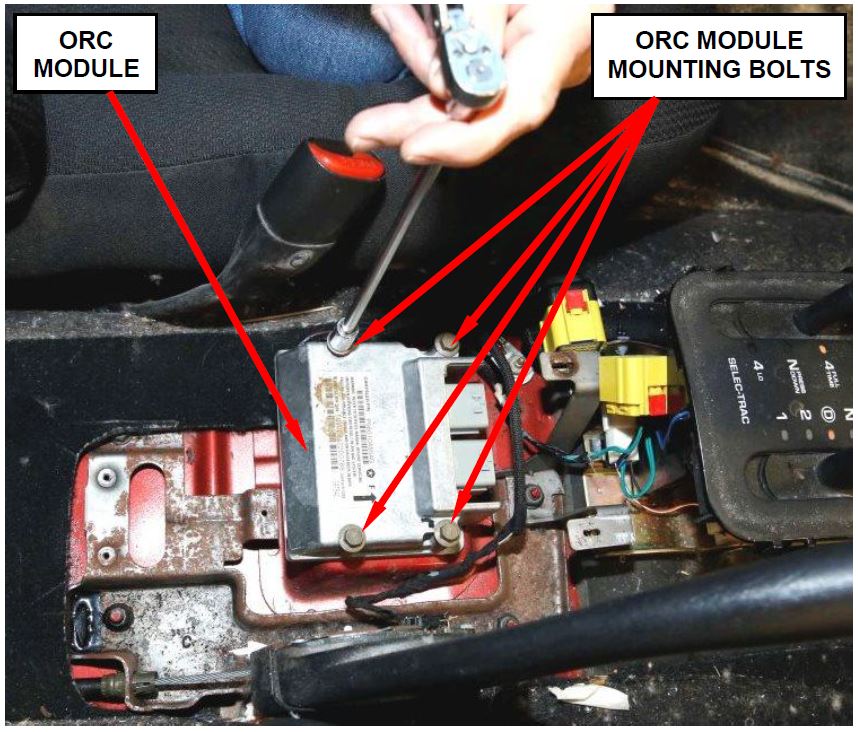
- Remove, destroy, and discard the original ORC module (Figure 16).
Figure 16 – Remove and Discard Original ORC Module
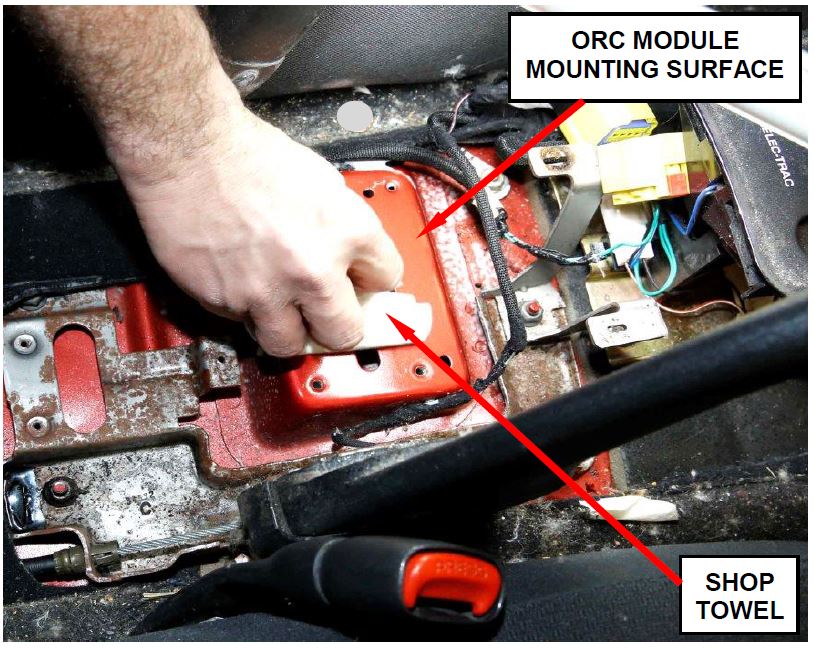
- Using Mopar glass cleaner or equivalent, clean the ORC module mounting surface (Figure 17).
Figure 17 – Clean ORC Module Mounting Surface
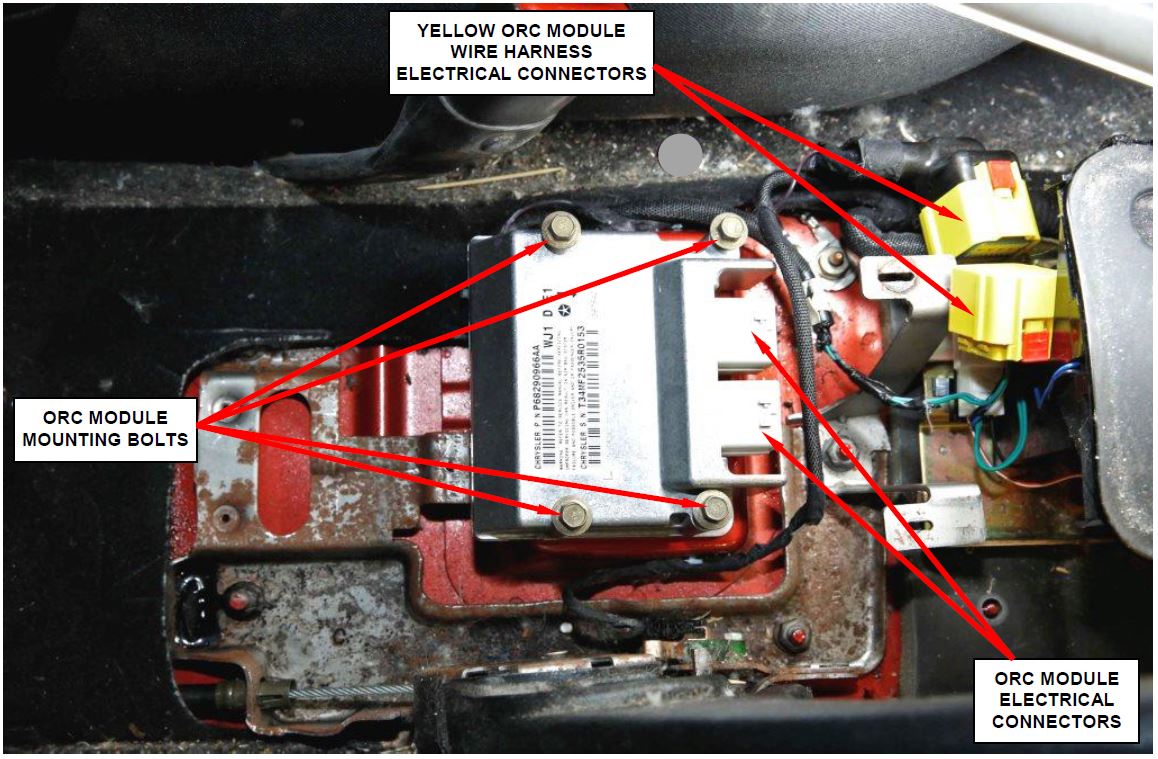
- Place the new ORC module into position and install the mounting bolts (Figure 18). Tighten the bolts to 95 in. lbs. (11 N·m).
Figure 18 – Install New ORC Module
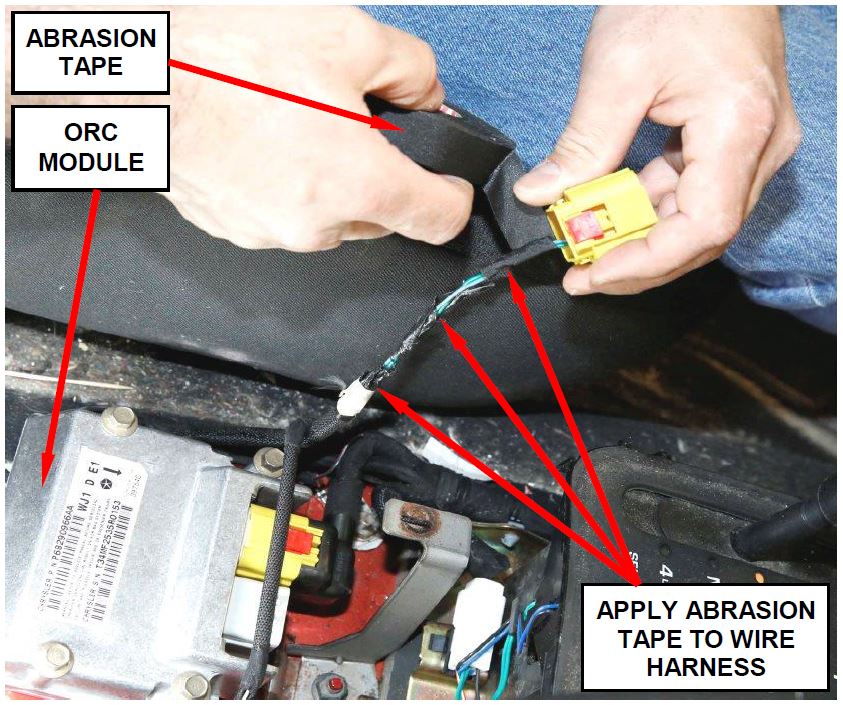
Figure 19 – Wrap Wiring with Tape
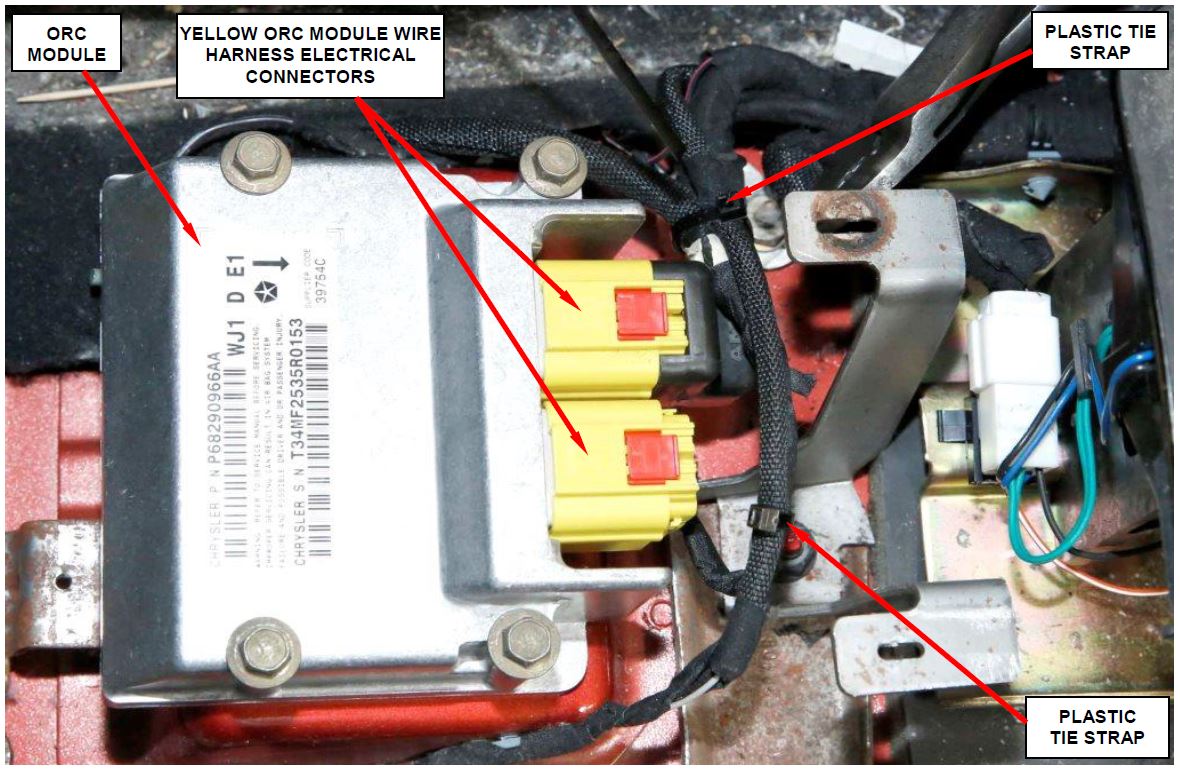
- Connect the yellow ORC module wire harness electrical connectors to the ORC module (Figure 20).
- Route the wires as shown in Figure 20 and secure them with two plastic tie straps.
CAUTION: Make sure that all wire harnesses are routed to prevent chafing and/or wire harness damage.
Figure 20 – Wire Routing and Tie Strap Location
- Install the center console.
- For vehicles that require side impact sensor replacement, perform the following steps:
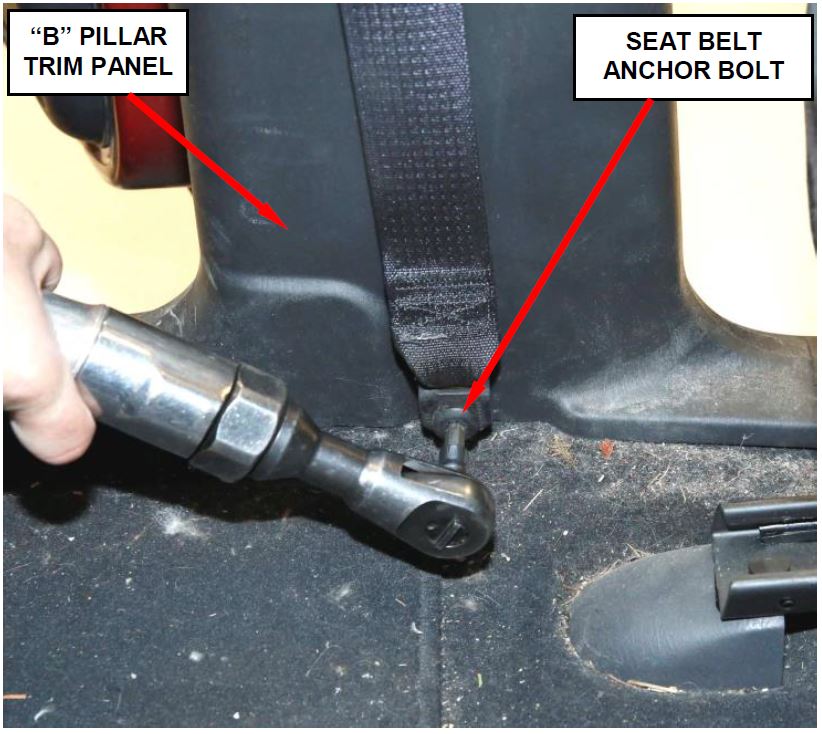
a. Remove and save the seat belt anchor bolt (Figure 21).
b. Remove and save the “B” pillar trim panel (Figure 21).
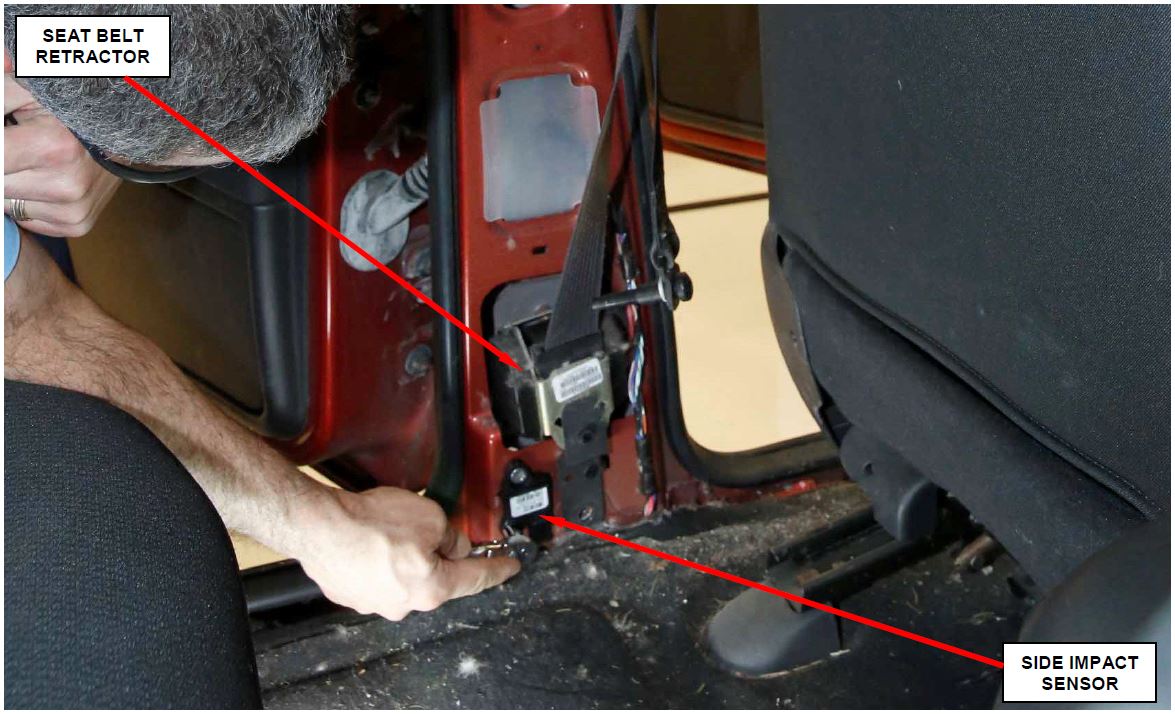
c. Remove and discard the original side impact sensor (Figure 22).
d. Install the new side impact sensor. Tighten the retaining bolts to 105 in. lbs. (12 N·m).
Figure 21 – Seat Belt Anchor Bolt
Figure 22 – Side Impact Sensor Location
e. Install the “B” pillar trim panel.
f. Install the seat belt anchor bolt (Figure 21).
g. Repeat Steps 11a. through 11f. on the opposite side of the vehicle to replace the second side impact sensor.
SPECIAL NOTE: On all (WJ) Grand Cherokee models, all of the new ORC modules provided in this recall do not require front impact sensors to operate correctly. The front impact sensors are permanently disabled.
- Turn the ignition key to the “RUN” position, with no one inside the vehicle, connect the negative battery cable to the battery.
- Reset the clock on the radio.
- Connect the wiTECH scan tool to the vehicle and check for impact sensor and/or ORC module DTC’s:
- If there are no impact sensor and/or ORC module DTC’s, continue with Step 15 of this procedure.
- If there are impact sensor and/or ORC module DTC’s, make repairs to sensor and/or ORC module as required, then continue with Step 15 of this procedure.
SPECIAL NOTE: If after completing this recall the airbag warning light is still illuminated, the cost to make additional repairs to other airbag system components is the responsibility of the vehicle owner.
- Remove the wiTECH scan tool from the vehicle.
- Return the vehicle to the customer.
E. Replace ORC Module (ZB Models)
WARNING: DISCONNECT AND ISOLATE THE NEGATIVE BATTERY CABLE AT THE NEGATIVE BATTERY POST BEFORE BEGINNING AIRBAG SYSTEM COMPONENT REMOVAL OR INSTALLATION PROCEDURES. THIS WILL DISABLE THE AIRBAG SYSTEM. FAILURE TO DISCONNECT THE BATTERY COULD RESULT IN ACCIDENTAL AIRBAG DEPLOYMENT AND POSSIBLE PERSONAL INJURY.
WARNING: ALLOW THE SYSTEM CAPACITOR TO DISCHARGE FOR TWO MINUTES BEFORE REMOVING ANY AIRBAG COMPONENTS.
- Roll down both windows.
- Open the rear deck lid.
- Remove and save the battery access cover located in the trunk.
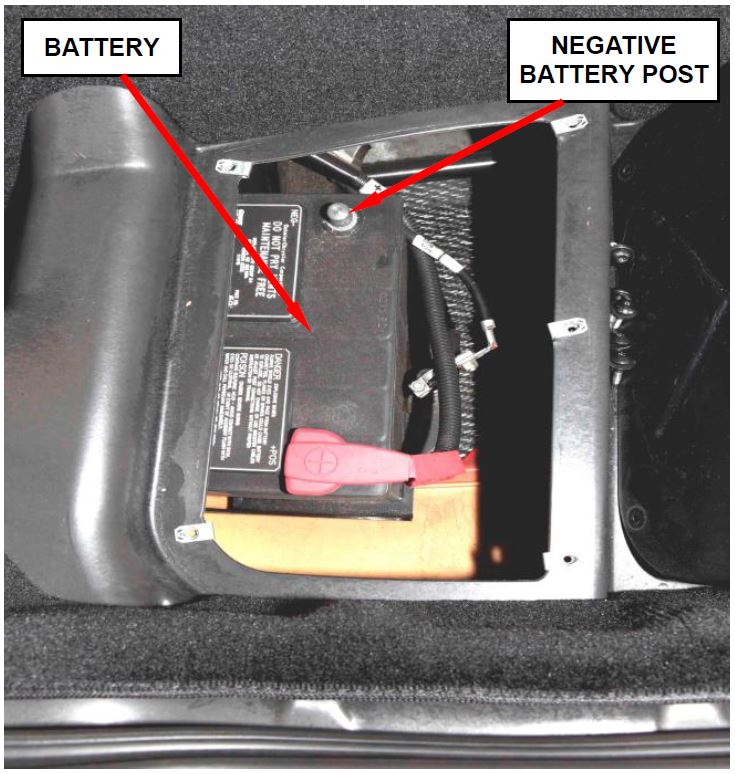
- Disconnect and isolate the negative battery cable from the battery (Figure 23).
Figure 23 – Battery Location
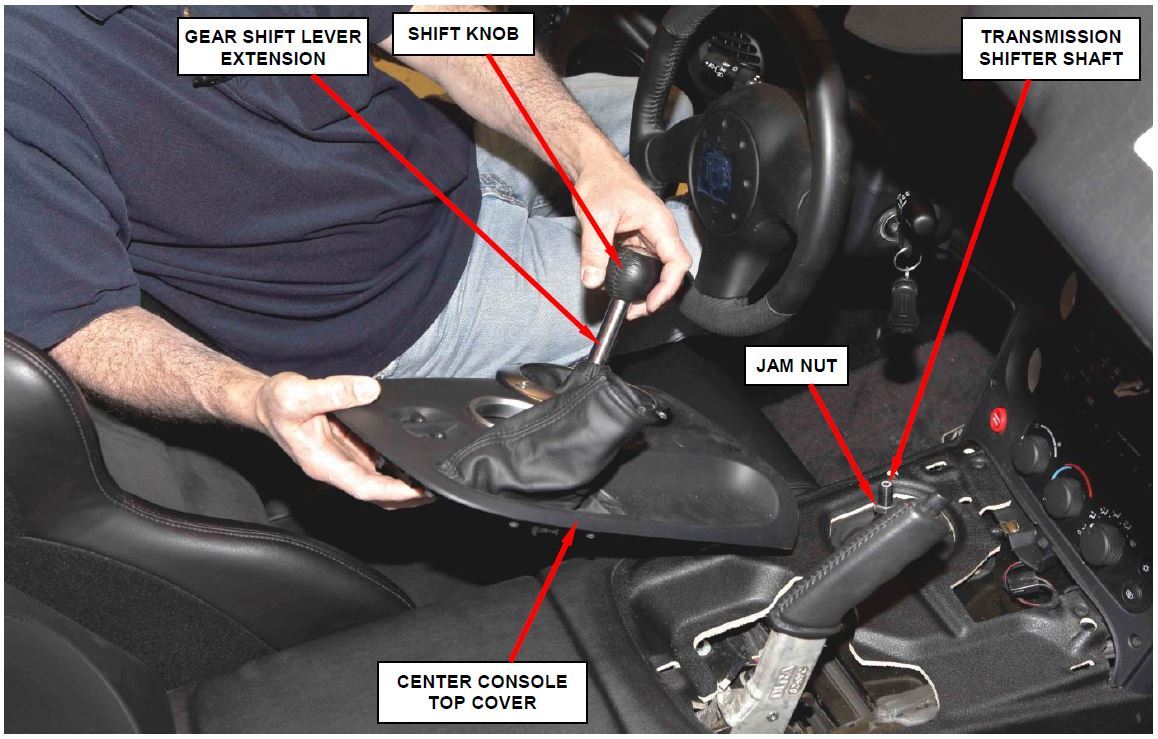
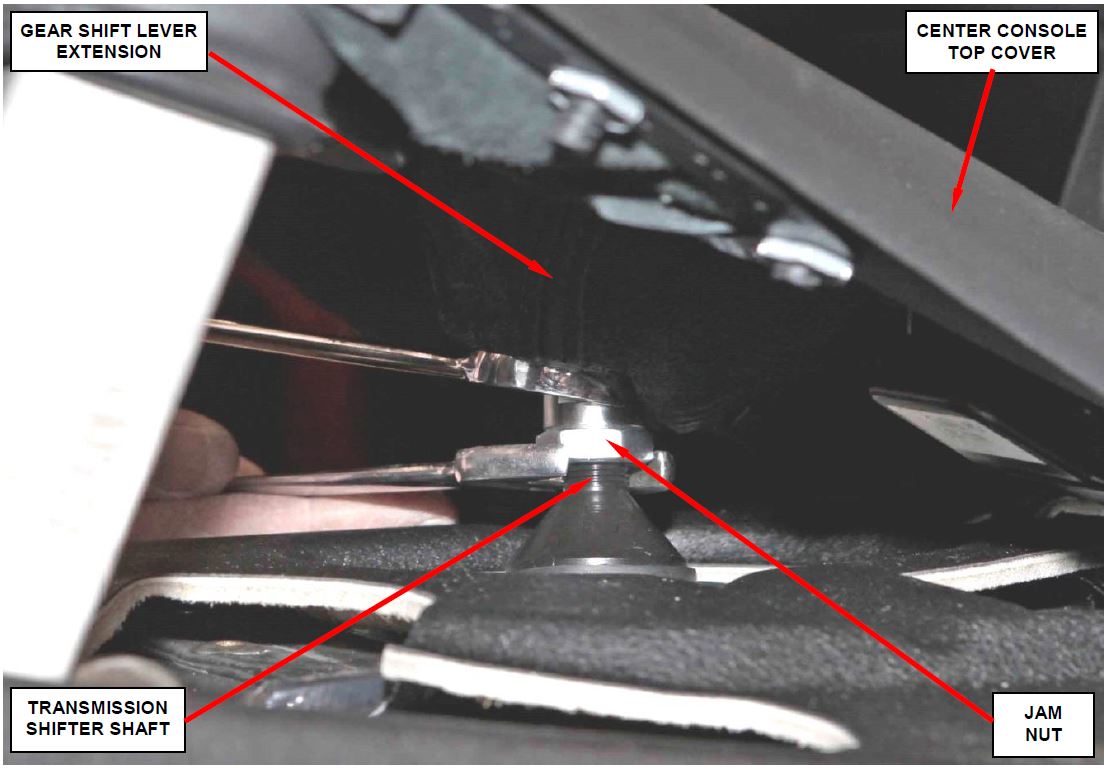
- Disengage the center console top cover from the center console (Figure 24).
- Reaching under the center console top cover, loosen the jam nut that retains the gear shift lever extension to the transmission shifter shaft (Figure 24).
- Unscrew and save the gear shift lever extension and gear shift ball as an assembly (Figure 24).
- Remove and save the center console top cover (Figure 24).
Figure 24 – Center Console Top Cover
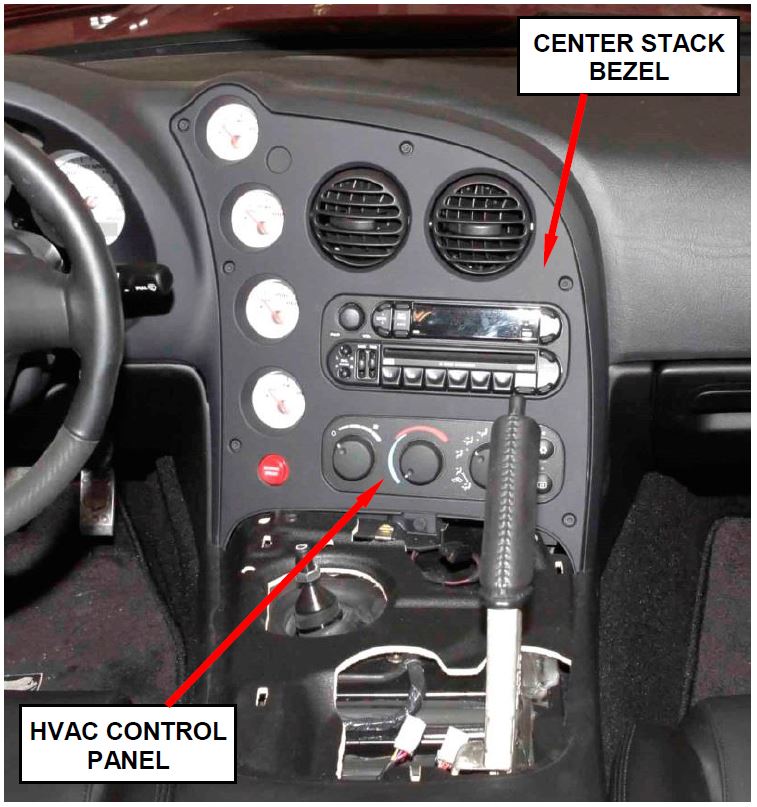
- Remove and save the eight instrument panel center stack bezel retaining screws and then remove the center stack bezel and HVAC control panel as an assembly (Figure 25).
Figure 25 – Center Stack Bezel
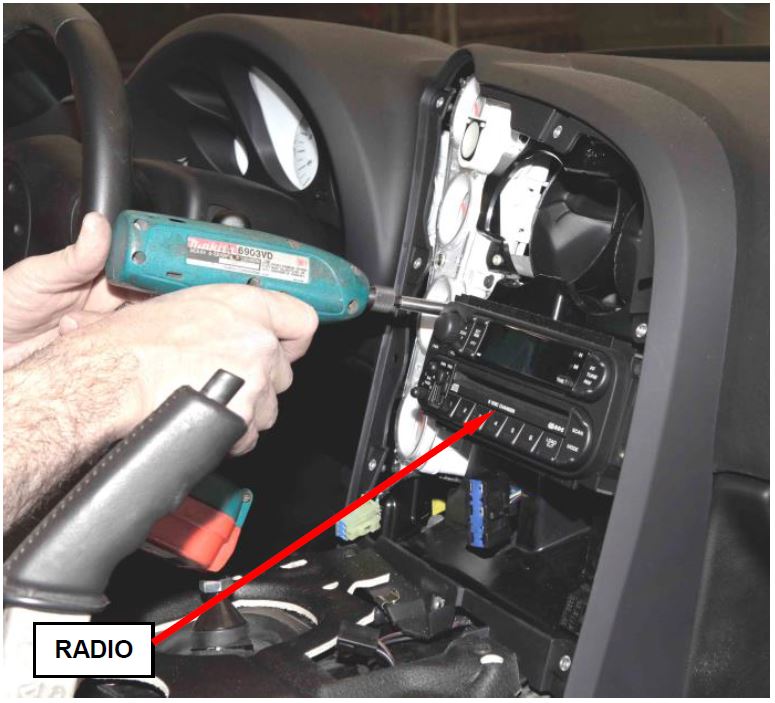
- Carefully remove and save the radio (Figure 26).
Figure 26 – Radio Remove/Install
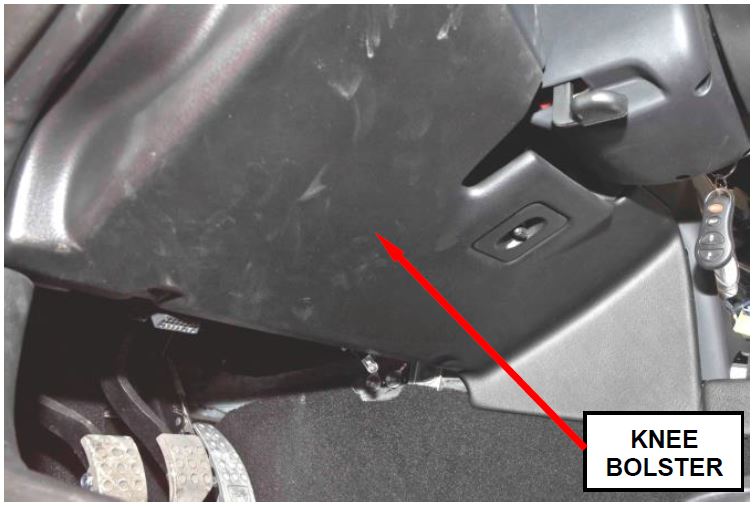
- Remove and save the left side knee bolster (Figure 27).
Figure 27 – Knee Bolster
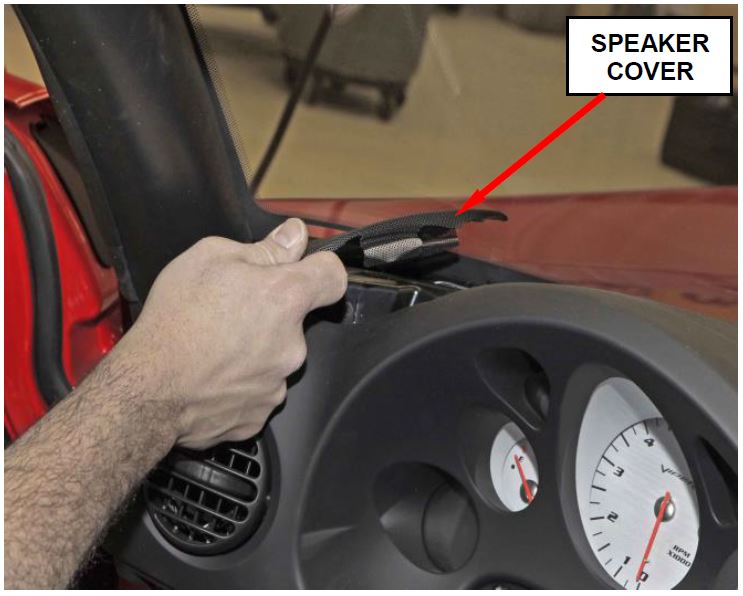
- Remove and save the left instrument panel speaker cover (Figure 28).
Figure 28 – Left Speaker Cover
- Remove and save the four steering column nuts and carefully lower the steering column.
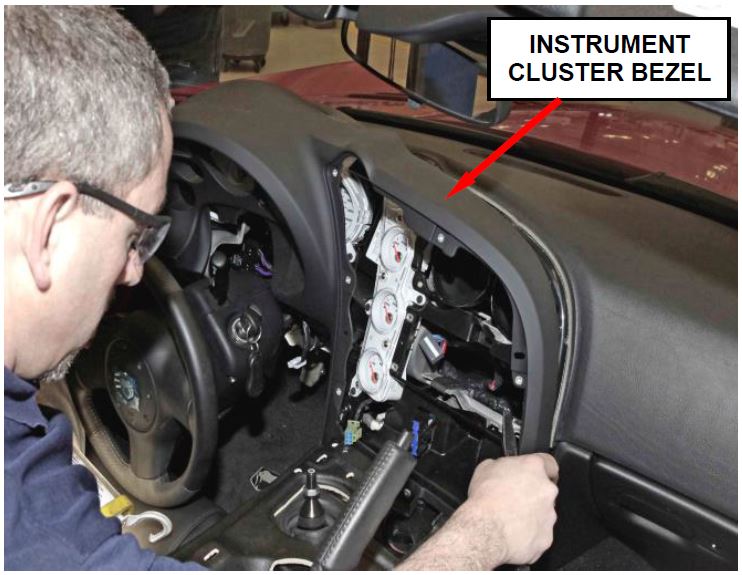
- Remove and save the instrument cluster bezel (Figure 29).
Figure 29 – Instrument Cluster Bezel
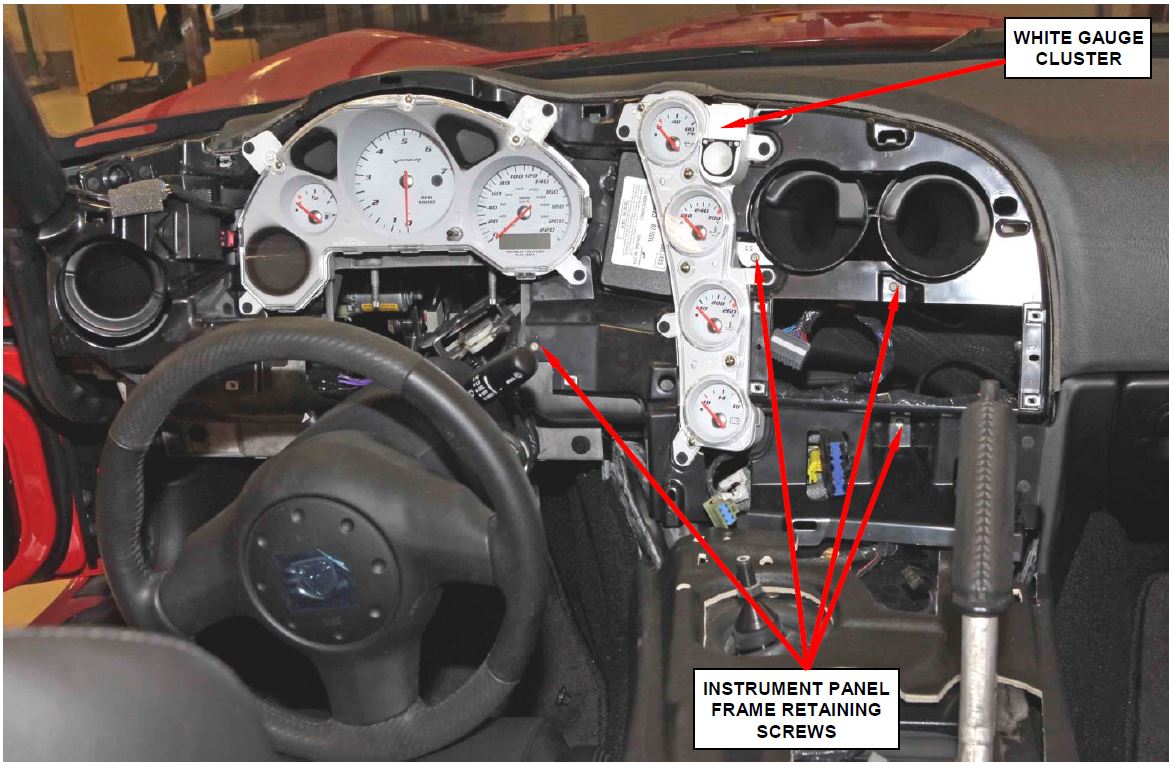
- Remove and save the instrument panel center stack white gauge cluster (Figure 30).
- Remove and save the instrument panel black plastic frame retaining screws (Figure 30).
Figure 30 – Instrument Panel Center Stack Gauge Cluster and Frame Retaining Screws
- Temporarily reinstall the steering column.
- Carefully relocate all of the disconnected instrument panel electrical connectors located near the ORC module.
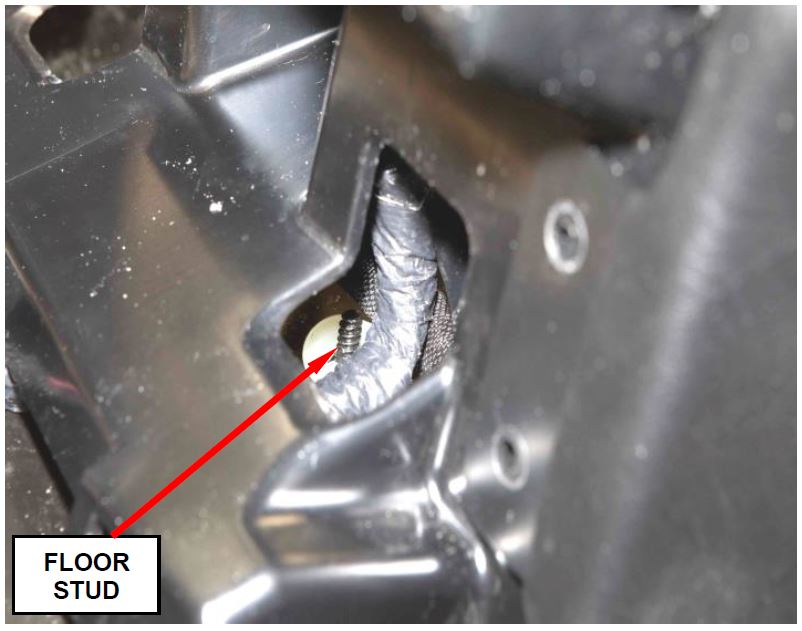
- Disengage the center console wire harness at the floor stud on the floor board (Figure 31).
Figure 31 – Floor Stud
- Disconnect the ORC module yellow connectors.
- Remove and save the ORC module mounting bolts.
- Remove, destroy, and discard the original ORC module.
- For vehicles that had Safety Recall N13 performed, remove and discard the ORC module filter circuit harness and box.
- Install the new ORC module.
- Install the ORC module mounting Tighten the bolts to 95 in. lbs. (11 N·m).
- Connect the yellow body wire harness to the ORC module connectors.
- Secure the center console wire harness to the floor stud on the floor board (Figure 24).
- Install the instrument panel black plastic frame retaining Tighten the screws securely (Figure 30).
- Install the instrument panel center stack white gauge cluster (Figure 30).
- Install the radio assembly (Figure 26).
- Lower the steering column.
- Install the instrument cluster bezel (Figure 29).
- Install the left instrument panel speaker cover (Figure 28).
- Install the steering column. Tighten the four steering column retaining nuts to 150 in. lbs. (17 N·m).
- Install the left side knee bolster (Figure 27).
- Install the instrument panel center stack bezel (Figure 25).
- Place the center console top cover partially into position (Figure 24).
- Screw the gear shift lever extension onto the transmission shifter shaft.
- Reaching under the center console top cover, tighten the jam nut that retains the gear shift lever extension to the transmission shifter shaft (Figure 32).
Figure 32 – Install Gear Shift Extension and Tighten Jam Nut
NOTE: Be sure that the gear shift knob gear shift pattern indicator is correctly orientated before tightening the jam nut.
- Snap the center console top cover into position.
- Place the ignition to the run position.
- After checking that no one is inside the vehicle, connect the negative battery cable.
- Install the battery access panel and close the deck lid (Figure 23).
- Connect the wiTECH scan tool to the vehicle and check for ORC module DTC’s:
- If there are no ORC module DTC’s, continue with Step 45 of this procedure.
- If there are ORC module DTC’s, make repairs to the ORC module as required, then continue with Step 45 of this procedure.
SPECIAL NOTE: If after completing this recall the airbag warning light is still illuminated, the cost to make additional repairs to other airbag system components is the responsibility of the vehicle owner.
- Remove the wiTECH scan tool from the vehicle.
- Reset the clock on the radio.
- Return the vehicle to the customer.
F. Replace the Four Wheel Drive Indicator Light Switch
- Carefully lift the vehicle on an appropriate hoist.
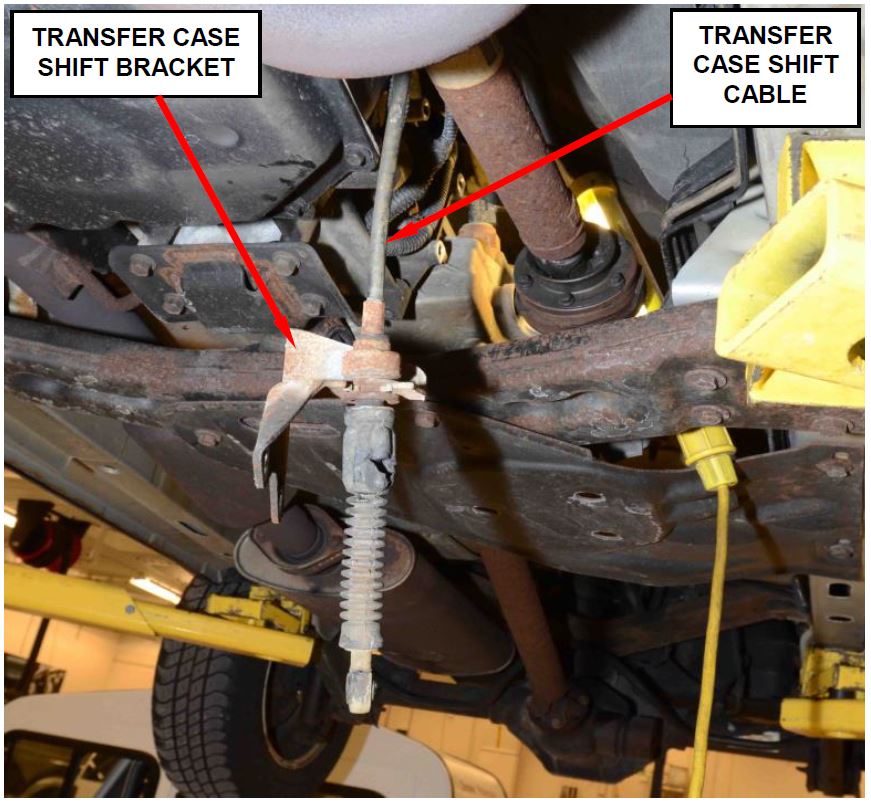
- Disconnect the transfer case shift cable at the transfer case lever on the transfer case.
- Remove and save the three transfer case shift cable bracket mounting bolts on the side of the transfer case.
- Relocate the transfer case shift cable bracket and shift cable to gain access to the transfer case four wheel drive indicator light switch (Figure 33).
Figure 33 – Shift Cable and Bracket
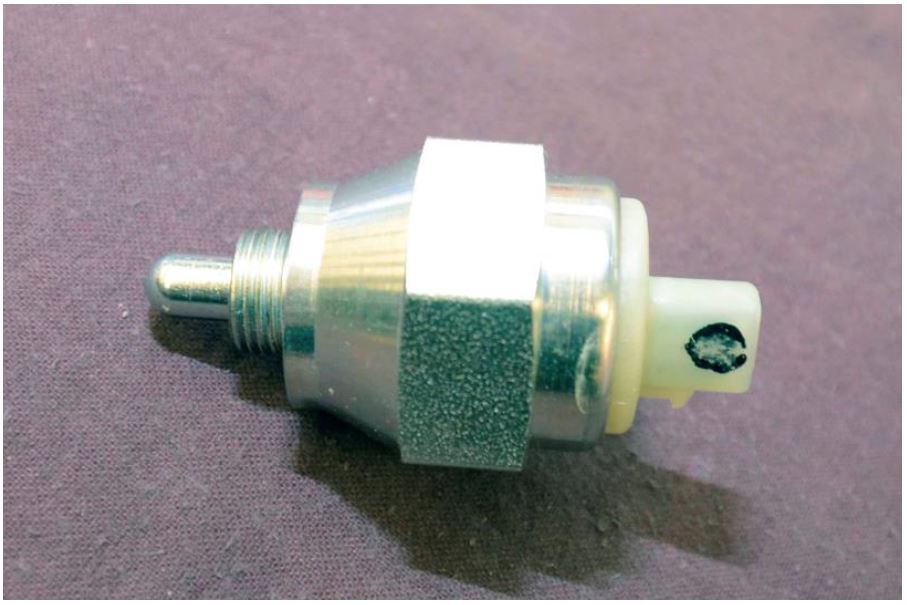
- Using a 1 ½ inch socket, remove and discard the original transfer case four wheel drive indicator light switch (Figure 34).
Figure 34 – Transfer Case Switch
- Install the new transfer case four wheel drive indicator light switch. Tighten the switch to 20 ft. lbs. (27 N·m).
- Place the transfer case shift cable bracket and shift cable into position.
- Install the three transfer case shift cable bracket mounting bolts. Tighten the bolts securely.
- Connect the transfer case shift cable to the transfer case lever on the transfer case.
- Lower the vehicle from the hoist.
Completion Reporting and Reimbursement
Claims for vehicles that have been serviced must be submitted on the DealerCONNECT Claim Entry Screen located on the Service tab. Claims submitted will be used by FCA to record recall service completions and provide dealer payments.
Use one of the following labor operation numbers and time allowances:
| Labor Operation Number | Time Allowance | |
|---|---|---|
| Replace ORC module (KJ models) | 08-R0-61-82 | 0.9 hours |
| Replace ORC module (WJ models) | 08-R0-61-83 | 0.5 hours |
| Replace ORC Module (ZB models) | 08-R0-61-84 | 1.7 hours |
| Related Operation (KJ Only) | ||
| Replace 4×4 transfer case switch | 08-R0-61-50 | 0.4 hours |
| Replace front impact sensors | 08-R0-61-51 | 0.2 hours |
| Optional Equipment (WJ Only) | ||
| Replace side airbag sensors | 08-R0-61-60 | 0.5 hours |
Add the cost of the recall parts package plus applicable dealer allowance to your claim.
NOTE: See the Warranty Administration Manual, Recall Claim Processing Section, for complete recall claim processing instructions.
Dealer Notification
To view this notification on DealerCONNECT, select “Global Recall System” on the Service tab, then click on the description of this notification.
Owner Notification and Service Scheduling
All involved vehicle owners known to FCA are being notified of the service requirement by first class mail. They are requested to schedule appointments for this service with their dealers. A generic copy of the owner letter is attached.
Enclosed with each owner letter is an Owner Notification postcard to allow owners to update our records if applicable.
Vehicle Lists, Global Recall System, VIP and Dealer Follow Up
All involved vehicles have been entered into the DealerCONNECT Global Recall System (GRS) and Vehicle Information Plus (VIP) for dealer inquiry as needed.
GRS provides involved dealers with an updated VIN list of their incomplete vehicles. The owner’s name, address and phone number are listed if known. Completed vehicles are removed from GRS within several days of repair claim submission.
To use this system, click on the “Service” tab and then click on “Global Recall System.” Your dealer’s VIN list for each recall displayed can be sorted by: those vehicles that were unsold at recall launch, those with a phone number, city, zip code, or VIN sequence.
Dealers must perform this repair on all unsold vehicles before retail delivery. Dealers should also use the VIN list to follow up with all owners to schedule appointments for this repair.
Recall VIN lists may contain confidential, restricted owner name and address information that was obtained from the Department of Motor Vehicles of various states. Use of this information is permitted for this recall only and is strictly prohibited from all other use.
Additional Information
If you have any questions or need assistance in completing this action, please contact your Service and Parts District Manager.
Customer Services / Field Operations
FCA US LLC
OCCUPANT RESTRAINT CONTROL MODULE
IMPORTANT SAFETY RECALL
R06 / NHTSA 15V-046
This notice applies to your vehicle (VIN: xxxxxxxxxxxxxxxxx).
This notice is sent to you in accordance with the National Traffic and Motor Vehicle Safety Act. Dear: (Name)
FCA US LLC has decided that a defect, which relates to motor vehicle safety, exists in certain 2002 and 2003 model year Jeep Liberty models; 2002 through 2004 model year Jeep Grand Cherokee models; and 2003 and 2004 model year Dodge Viper models.
| The problem is… | The airbag system Occupant Restraint Control (ORC) module on your vehicle may experience a front airbag and/or seatbelt pretensioner inadvertent deployment. An inadvertent deployment while driving could distract the driver and cause a crash without warning. |
| What your dealer will do… | FCA will repair your vehicle free of charge. To do this, your dealer will replace the Occupant Restraint Control module. The work will take about two hours to complete. However, additional time may be necessary depending on service schedules. |
| What you must do to ensure your safety… | Simply contact your Chrysler, Jeep, Dodge or RAM dealer right away to schedule a service appointment. Please bring this letter with you to your dealer. dealer right away to schedule a service appointment. Please bring this letter with you to your dealer. |
| If you need help… | If you have questions or concerns which your dealer is unable to resolve, please contact the FCA Group Recall Assistance Center at either fcarecalls.com or 1-800-853-1403. |
Please help us update our records by filling out the attached prepaid postcard if any of the conditions listed on the card apply to you or your vehicle. If you have further questions go to fcarecalls.com.
If you have already experienced this specific condition and have paid to have it repaired, you may visit www.fcarecallreimbursement.com to submit your reimbursement request online or you can mail your original receipts and proof of payment to the following address for reimbursement consideration: FCA Customer Assistance, P.O. Box 21-8004, Auburn Hills, MI 48321-8007, Attention: Recall Reimbursement. Once we receive and verify the required documents, reimbursement will be sent to you within 60 days. If you’ve had previous repairs and/or reimbursement you may still need to have the recall repair performed on your vehicle.
If your dealer fails or is unable to remedy this defect without charge and within a reasonable time, you may submit a written complaint to the Administrator, National Highway Traffic Safety Administration, 1200 New Jersey Ave., S.E., Washington, DC 20590, or you can call the toll-free Vehicle Safety Hotline at 1-888-327-4236 (TTY 1-800-424-9153), or go to safercar.gov.
We’re sorry for any inconvenience, but we are sincerely concerned about your safety. Thank you for your attention to this important matter.
Customer Services / Field Operations
FCA US LLC
Note to lessors receiving this recall: Federal regulation requires that you forward this recall notice to the lessee within 10 days.
 Loading...
 Loading...
 Loading...
 Loading...
- [Pro OBD2 Scanner] - BlueDriver is the easiest way to scan and understand your vehicle like a professional mechanic. Read and clear your car’s trouble codes and check engine light.
- [Read & Clear All The Codes] - BlueDriver's enhanced vehicle diagnostics gives you access to information normally available only to mechanics on their OBD2 scan tools. Now you can read and clear ABS, Airbag, SRS, TPMS codes, and many more.
- [Get The Right Fix & View Live Data] - Much more than a car code reader, BlueDriver is a diagnostic tool. You’ll get unlimited repair reports with possible causes and fixes, plus real-time health monitoring while you drive with the live data feature.
- [Wireless & Bluetooth Enabled] - Say goodbye to wires. BlueDriver connects with Bluetooth via your phone/tablet to a sensor that plugs into your car's OBDII port. Get all of the capabilities of an expensive code reader & scan tool without any annoying wires.
- [User-Friendly App and Repair Videos] - BlueDriver gives you more ways to scan and fix your vehicle. Our iOS & Android app connects you to a large database of repair videos with step-by-step directions of repairs.
- [Easy to Use--Work out of box] + [FOXWELL 2025 New Version] FOXWELL NT604 Elite scan tool is the 2025 new version from FOXWELL, which is designed for those car owners who want to figure out the cause issue before fixing the car problem via scanning the most common systems like abs srs engine and transmission.The NT604 Elite diagnostic tool comes with latest software, which can be used out of box. No need to waste time to download the software first.
- [Affordable] + [Reliable Car Health Monitor] Will you be confused what happen when the warning light of abs/srs/transmission/check engine flashes? Instead of taking your cars to dealership, this foxwell scanner will help you do a thorough scanning and detection for your cars and pinpoint the root cause. It will t-urn off the warning light car after the problem is fixed.👉TIPS: Airbag crash/collision data can NOT be cleared even you replace the new airbag.
- [5 in 1 Diagnostic Scanner] Compared with those auto scanners (50-100), NT604 Elite code scanner not only includes their OBDII diagnosis but also it can be an abs/srs scanner, transmission and check engine code reader. When it’s an odb2 scanner, you can use it to check if your car is ready for annual test through I/M readiness menu. In addition, live data stream, built-in DTC library, data play back and print, all these features are a big plus for it. Note: doesn't support maintenance function.
- [Fantastic AUTOVIN] + [No extra software fee] Through the AUTOVIN menu, this NT604 Elite car scanner allows you to get your V-IN and vehicle info rapidly, no need to take time to find your V-IN and input one by one. What's more, the NT604 Elite abs srs scanner supports 60+ car makes from worldwide (America/Asia/Europe). You don’t need to pay extra software fee.
- [Solid protective case KO plastic carrying bag] + [Lifetime update] Almost all same price-level obd scanner diagnostic tool only offers plastic bag to hold on the scanner.However, NT604 Elite automotive scanner is equipped with solid protective case, preventing your obd2 scanner from damage. Then you don’t need to pay extra money to buy a solid toolbox.
- [Brand-New ArtiDiag500] We've got everything you're looking for! Forget basic OBD2 scanners; TOPDON's ArtiDiag500 car scanner offers more. The all-new ArtiDiag500 not only includes full OBD2 functions and 4-system diagnostics but also provides DIYers with 6 maintenance services. The brand-new, cost effective AD500 is back in full swing!
- [4-System Diagnostics] DIY enthusiasts, take notice! Will these 4-system diagnostics be the treasure you've been seeking? The ArtiDiag500 code reader offers in-depth testing for the engine, transmission, ABS, and SRS systems, reading fault codes and data streams. It also visualizes real-time data in chart form, simplifying complex data for storage and future playback, aiding DIY users in problem detection.
- [6 Reset Functions] Hey, hang tight for a moment. With these 6 reset functions, the ArtiDiag500 has got you covered. It offers throttle adaptation along with reset capabilities for Oil, SAS, TPMS, BMS, and EPB. Seamlessly aligning the throttle, battery, tires, and brake pads with your vehicle, it also adjusts the steering angle and turns off the oil light. Looking to restore your car to its original condition? Look no further than the ArtiDiag500.
- [Multiple Functions] The Smart AutoVIN of this TOPDON OBD2 scanner keeps track of your manual selections for vehicle make, model, and year and directs you to the suitable diagnostics. Max 4 Live Data streams integrated for much easier data processing. Diagnostic feedback online with this diagnostic tool to help you get tough repair operations well-completed. Real-time car battery voltage monitoring identifies probable vehicle defects.
- [Global Support] Rest assured about compatibility with your vehicle and language – ArtiDiag500 currently supports 67+ car brands, 10,000+ models, covering most vehicles worldwide, and is available in 12 languages. Whether it's for your car or preferred language, there's an ideal choice for you. Plus, it's fully compatible with Android 11 for smoother use.
- 【Great Ideal For Every Car Owner】Prefect choice for your father, husband, brother or boyfriend. EVERY CAR OWNER WILL NEED IT! Also, the lifetime update is provided for more vehicle coverage, bug fixes. SAVE AT LEAST $1000+ PER YEAR!Get LAUNCH CRP123 V2.0 Elite car diagnostic scanner and give your lover a surprise!*R each us to Get the Extra Gifts :Protective Case Storage Bag.
- 【2025 Newly Added 3 Reset Functions】CRP123 V2.0 obd2 scanner with upgrades it offers Throttle Adaptation,Oil Reset and SAS Reset functions for FREE now!! Optimize your engine performance with Throttle Adaptation, reset your oil life system with ease to save time and money on maintenance, and enhance your vehicle's handling and safety with SAS Reset.Covering more daily repairs,become the most cost-effective product in its price range,save your time and money!
- 【 Read & Clear/Reset Engine/ABS/SRS/Transmission Diagnostic Scan Tool 】LAUNCH CRP123 V2.0 OBD2 Scanner can test Engine, Transmission, ABS and Airbag four systems, also reads and resets code, displays data stream graphic, stores and playbacks dynamic data stream,helps to quick analysis and diagnosis.
- 【 Error Fault Code Reader】Except the full 10 modes OBD2 diagnostic functions like, retrieving I/M readiness, Freeze Frame Data, Read Dynamic Data stream and V-ehicle Information, O2 Sensor Test, EVAP Test of F-uel Tank System (Mode 8) and Advanced On-board Monitoring (Mode 6), launch crp123 v2.0 obd2 scanner can not only reveal what error codes your car is producing, but also erase your v-ehicle’s check engine light after problem fixed, the DTC help and explanation also tell you the exact problem.
- 【 Live Data Graphing + Read/Record/Playback Data stream + Print diagnostic data 】Live Data Graphing,more intuitive to know your vehicle’s problem.Large size Color Screen ;Print Function:Print the diagnose result easily; with user manual and register & update tutorial video uploaded in the link by us,you can Look up it anytime by ONE-CLICK.
- [ABS Diagnosis] - Quickly identify and resolve ABS-related issues, including sensor faults (such as wheel speed sensors), wiring problems (faulty circuits or connectors within the ABS system), or ABS pump failures (malfunctions in the ECU controlling the ABS). Ensure proper system operation, restore optimal braking performance, and clear any warning lights.
- [SRS Diagnosis] - Quickly detect the airbag ECU itself, airbag sensor failure, airbag system plug disconnection or poor contact, seat belt sensor failure, or system error, etc, to ensure that the SRS (Supplemental Restraint system) is working properly. After repair, reset the system to clear the warning light and restore full safety performance. NOTE: It cannot reset Airbag crash or transmission codes.
- [Full OBD2 Function] - Read and clear trouble codes for all OBD2 systems, including show real-time data, freeze frame data, I/M Readiness, DTC lookup, test results for o-xygen sensor, On-board monitor test, request vehicle information, component test, modules present and e-vap test. Allowing you to quickly identify and troubleshoot vehicle issues.
- [AutoVIN Technology] - It simplifies diagnostics by automatically identifying the vehicle’s model and configuration, eliminating the need for manual input, and ensures accurate diagnostics by applying the correct data and algorithms, reducing errors caused by manual entry. Improves efficiency and streamlines the diagnostic process.
- [ABS Auto Bleeding] - Helps bleed your vehicle's Anti-lock Braking System (ABS), removing air from the brake lines to ensure optimal brake performance. It helps prevent brake issues such as spongy pedals, inconsistent braking, and reduced stopping power, and enhances vehicle safety by ensuring the ABS system is working properly, especially during critical driving situations. NOTE: It’s not compatible with vehicles that only support manual bleeding.
- [Transform Your Car Care Experience] - With BLCKTEC, instantly become your own professional mechanic. Effortlessly read and clear your car’s trouble codes and check engine light, ensuring your vehicle stays in top condition.
- [Empower Yourself with Comprehensive Diagnostics] - Unlock the full potential of your vehicle with the BLCKTEC 430. Access detailed diagnostics previously exclusive to professional mechanics’ OBD2 scan tools, including ABS, Airbag, SRS, TPMS codes, and beyond, right at your fingertips.
- [Drive with Confidence] - The BLCKTEC 430 is more than just a car code reader; it's your personal vehicle health advisor. Receive tailored repair reports with potential causes and verified solutions for your specific make and model, guiding you to the right fix every time.
- [Seamless Connectivity, Ultimate Convenience] - Experience the freedom of wireless diagnostics with this portable car scanner. Easily connect via Bluetooth to our intuitive sensor and enjoy all the functionalities of high-end scan tools without the clutter of wires, directly from your smartphone or tablet. To connect the tool to the App, please DO NOT go to device's Bluetooth settings, instead, open RepairSolutions2 App and follow the instructions on the App to pair the BLCKTEC 430.
- [DIY Repairs Made Easy] - Navigate car maintenance with ease using our premium app. Access a vast library of easy-to-follow repair videos, guiding you through each step of the repair process, compatible with both iOS & Android devices.

- 9 Reset Services Car Scanner: TOPDON obd2 scanner AD600S is the upgrade version of TOPDON AD600, AD500 and AD500S. The latest version adds 1 reset function again. Except for OIL RESET, BRAKE RESET, TPMS RESET, Throttle Adaptation, SAS RESET, BMS RESET, ABS BLEEDING, DPF RESET, it add the Injector Coding, more practical reset functions than TOPDON AD600 and AD500. For the cost you' re getting value from this handy car scanner to reset systems. *Function menu varies by vehicle’s specifics
- Recommended by Youtuber Samcrac: 4 Systems Diagnostic Tool, AUTOAUTH FOR FCA GATEWAY ACCESS: This is an OBDII scanner and 4 systems diagnostic tool made for home mechanics, DIYers, and professionals. You can access AT/ENG/ABS/SRS fault codes to find the right troubleshooting procedure, and diagnose with full 10 OBD2 test modes to fix most of emission issues. Give your aging cars satisfying routine maintenance to avoid costly repairs, a breakdown, or even a crash. *DOESN'T WORK WITH 5G
- No extra software fee + One-click Free Updates + 32G memory: The touch-sensitive screen on this scan tool makes operation much easier than the simple button-based OBD2 code readers. The icons are clear and its 5” color screen with high resolution will leave you with no trouble interpreting results in a dark garage. One-click updates over Wi-Fi will keep the software current and the coverage addition constant. Android 11.0 ensures lightning-fast bootup and processing
- Powerful Compatibility + Work on 90 Vehicle Brands: Most OBD2 scanners work with vehicles manufactured after 2001, but TOPDON ArtiDiag600S compatible with OBDII-equipped vehicles built after 1996, and it works on more than 90 Vehicle Brands.It supports Diesel (12v only), gasoline, 12V passenger car, pickup, light-duty truck, SUV, minivans, compatible with OBD2/EOBD/JOBD&CAN/CAN-FD protocols.*Menus vary by make, model, and year of gasoline or diesel engine vehicle. Email us your VIN data
- Versatile Scan Tool+AUTO VIN+DTC Lookup: This OBD2 scanner has automatic VIN technology to identify the car without manual input. Live data display in text or 4-in-1 merged waveform graph, you can save, share, print, or email the overall inspection report for easier analysis. Inbuilt “Feedback” module provides customized repair suggestions from our certified professionals. Onboard DTC library saves your Google searching time when interpreting the error codes. AutoVIN doesn’t work on ALL cars
- 【Designed for Volkswagen(VAG) Cars Diagnostics】The VD500 OBD2 scanner is specifically designed to diagnose Volkswagen Group (Fits for VW/Audi/Skoda/ SEAT) 12-volt 16-pin vehicles, but can also be used with other 12-volt (non-Volkswagen) and light trucks (non-electric) vehicles manufactured in 1996 or later that are OBD II -compliant with standard 16-pin OBD II protocols (J1850 VPM, J1850PWM, ISO9141, KWP 2000 and CAN)
- 【Basic + Special Advanced Functions for VAG Vehicle】The ANCEL VD500 scan tool for vw can not only read and clear codes on engine, ABS, transmission, SAS (not all cars), ESP, TPMS and other systems, but also reset the oil, brake pad(epb service) and throttle position adaption. If you don't know how to do it, please con-tact us in time. Include your car model, year and the function you want to do
- 【Plug and Play, No Complex Connection】The ANCEL VD500 is truly plug-and-play—no complicated networking or batteries required. Simply connect it and use it anywhere in your car, anytime. Fast, easy, and convenient
- 【Full Access, No Hidden Costs】Unlike other detectors that charge extra for features, the ANCEL VD500 is 100% no extra additional charges, with no hidden costs. The full functionality is accessible, and the system upgrade is included, a favorite choice among customers
- 【Wide Compatibility for Volkswagen Cars】The VD500 diagnostic scanner for audi offering for Volkswagen vehicles covers the following vehicles: fits for VW (CC, EOS, Golf, GTI, Jetta, Passat, Phaeton, Polo, Rabbit, Sharan, Tiguan, Touran, Touareg); fits for Audi (A3, A4, A6, A7, A8, A5, Q3, Q5, Q7, R8, RS3, TT, RS, RS5, S4, S6); fits for Skoda (Octavia, Rapid, Yeti, Kodiaq, Fabio, Superb); fits for SEAT (Leon, Ateca, Ibiza, Altea, Cushion, Cord, Alhambra) Diagnostics
- 【ENHANCED DIAGNOSTIC SCAN TOOL WITH ABS/SRS/ECM/TCM SYSTEMS】 The XpertAuto S515 OBD2 scan diagnostic tool helps diagnose issues with ABS, SRS, ECM, and TCM systems. This car diagnostic scan tool reads and clears error codes, reads data streams, retrieves ECU info,and quickly locates ABS, SRS, ECM, TCM problems
- 【8 HOT RESET SERVICES】The XpertAuto S515 professional level car code reader and reset tool offers 8 hot reset services, including oil, airbag, SAS, EPB, ETS, ABS bleed, DPF regeneration and battery reset. This car code reader is perfect for thoughtful and attentive service, covering everything from routine maintenance and warning light removal to auto part replacement and more
- 【PROFESSIONAL-GRADE OBD2 SCANNER】 The car scanner diagnostic tool delivers professional-grade functionality at a consumer price. It covers all the essentials: Read Codes, Erase Fault Codes, MIL Fault Indicator Light, Live Data, EVAP System Test, View Freeze-Frame, Vehicle Info, I/M Readiness, and DTCs Look-up, ensuring accurate diagnosis and peace of mind
- 【AUTOSEARCH VIN - SCREENSHOT & RECORDING】 The Vehicle Code Reader features intelligent Auto VIN technology for fast and accurate one-touch vehicle identification. It scans ECUs, collects vehicle information and performs diagnostics on selected systems. This car diagnostic tool comes with unique screenshot and video recording function, allowing you to save extensive data effortlessly
- 【MULTIPLE DISPLAY OF LIVE DATA】 The car diagnostic tool can display data streams through numbers, images, and a combination of both. It also allows comparison with historical data for a comprehensive view of your car's condition and changes at a glance. Car diagnostic reports can be easily saved, shared, printed, and emailed
- 【Best Bang For Your Buck!-FOXWELL NT614 Elite】1. 2025 New software-faster than old one. 2. One click lifetime WIFI f-ree update, no need to use the annoying Micro SD card. 3. New Update-No need to register on the FOXWELL website before use, more convenient! 4. More intuitive viewing with new interface, you can find I/M, Battery Test, DTC Lookup directly.
- 【UPGRADE OF NT604-POWERFUL 5 RESETS】Wanna to do maintenance service for your car however the basic 4 system scanner tool can't do it? Then FOXWELL NT614 Elite-the upgraded version of nt604, was born for providing you with 5 special functions-ABS Bleeding/Oil Reset/SAS Calibration/EPB Reset/Throttle Reset. These functions are enough for your daily needs. No need to buy those 300-600 dollors obd2 scanner. Saving your unnecessary repair fee with FOXWELL nt614 car scanner diagnostic tool!
- 【ENGINE/ABS/SRS/TRANSMISSION CODE READER】Don't know what's wrong with your car when the warning light of ABS, transmission, SRS, Engine flashes? NT614 Elite obd2 scanner can pinpoint the problem components. It boasts many functions of engine, abs, srs and transmission such as read & erase fault codes and grapgh live data like engine temp, wheel speed sensor, read transmission temperature, etc. Compared with car repairs, using foxwell nt614 elite is more convenient and a-ffordable.
- 【ABS BLEEDING OBD SCANNER】Do you always feel the brake pedal was slowly sinking to floor or it's loose after doing a complete front & rear brake job? And then you need to take more time than normal to stop your car, which is very dangerous. That's because when you open the brake system to replace components, air gets inside. To get a firm brake pedal, the air need to be removed by bleeding the brakes. NT614 Elite odb2 scanner can do ABS BLEEDING perfectly for your cars.
- 【SMART AUTOVIN & LIFETIME F-REE WIFI UPDATE & PERFECT GIFT CHOICE】With the fantastic AUTOVIN function, this nt614 scan tool can get your VIN and vehicle info rapidly. No need to spend much time in finding your VIN and input it one by one. Also, the lifetime f-ree wifi update is provided for more vehicle coverage, bug fixes, newly added parameters. SAVE AT LEAST 1000+ PER YEAR. And this automotive scanner is a best gift for your Dad, Husband, Boyfriend and Handy Men.
Last update on 2025-05-08 / Affiliate links / Images from Amazon Product Advertising API
This product presentation was made with AAWP plugin.



Good afternoon, tell me please I have a block P56010488AF I want to replace it with a new one because the front pillows worked during the impact, what do I need? not to be mistaken, the car Jeep Grand Cherokee II 2.7 CRD 4WD 2002