| “This site contains affiliate links for which OEMDTC may be compensated” |
NHTSA Campaign Number: 15V517
Component(s): ELECTRICAL SYSTEM , ENGINE AND ENGINE COOLING
Potential Number of Units Affected: 1,655
Manufacturer: Chrysler (FCA US LLC)
SUMMARY:
Chrysler (FCA US LLC) is recalling certain model year 2014-2015 Ram
 1500 diesel 4×2 trucks manufactured August 8, 2013, to July 2, 2015.
The affected vehicles have a battery harness that may rub against the frame bracket for the right engine mount resulting in an electrical short.
CONSEQUENCE:
If the harness shorts, the vehicle may stall and there is an increased risk of a fire.
REMEDY:
Chrysler will notify owners, and dealers will inspect the vehicles to confirm that the battery harness is correctly routed and secured.
Any harness that shows evidence of wear will be replaced.
These repairs will be performed free of charge.
The recall began on October 8, 2015.
Owners may contact Chrysler customer service at 1-800-853-1403.
Chrysler ’s number for this recall is R43.
NOTES:
Owners may also contact the National Highway Traffic Safety Administration Vehicle Safety Hotline at 1-888-327-4236 (TTY 1-800-424-9153), or go to www.safercar.gov.
Check if your Vehicle has a Recall
October 2015
Dealer Service Instructions for:
Safety Recall R43 / NHTSA 15V-517 Battery Wire Harness
Models
| 2014 | (DS) | RAM Trucks (1500 series) (1500 series) |
NOTE: This recall applies only to the above vehicles equipped with a 3.0L diesel engine (sales code EXF) and 4×2 drivetrain built at the Warren Assembly Plant (“S” in the 11th VIN Position) built from August 08, 2013 through June 13, 2014 (MDH 080802 through 061300).
| 2014 – 2015 | (DS) | RAM Trucks (1500 series) (1500 series) |
NOTE: This recall applies only to the above vehicles equipped with a 3.0L diesel engine (sales code EXF) and 4×2 drivetrain built at the Saltillo Assembly Plant (“G” in the 11th VIN Position).
Subject
The battery (B+) wire harness on about 1,650 of the above vehicles may have been routed against the right engine mount frame bracket. Continuous battery wire harness contact with the right engine mount frame bracket could cause the battery wire harness sheathing to wear and create a high resistive short circuit. A high resistive short circuit could cause the vehicle to stall and/or an underhood electrical fire.
This condition could also cause miscellaneous fuses to blow, the Malfunction Indicator Lamp (MIL) to illuminate, a “No Start” condition, an engine stall followed by a “No Start” condition and/or the battery to go dead when the vehicle is parked overnight.
Repair
The battery wire harness must be inspected for a rub through of the wire harness. Trucks found with a damaged battery wire harness must have the battery wire harness replaced. Trucks found with no damage to the battery wire harness will have new battery wire harness routing clips installed. All involved trucks will receive revised battery wire harness routing to eliminate battery wire harness contact with the right engine mount frame bracket.
Parts Information
| Part Number | Description |
|---|---|
| CBAFR431AA | Harness, Battery Wire |
| Due to the small number of involved vehicles expected to require a battery wire harness, no parts will be distributed initially. A battery wire harness should be ordered only after inspection determines that repair is required. | |
| Part Number | Description |
| 68307392AA | Clip, Off Set (one per vehicle) |
| 68307393AA | Clip, Tower (one per vehicle) |
Parts Return
No parts return required for this campaign.
Special Tools
The following special tools may be required to perform this repair:
| wiTECH VCI Pod Kit |
| Laptop Computer |
| wiTECH Software |
Service Procedure
A. Wire Harness Inspection
- Lift the vehicle on an appropriate hoist.
- Remove and save the right tire/wheel assembly.
- Remove and save the right front wheel opening plastic liner.
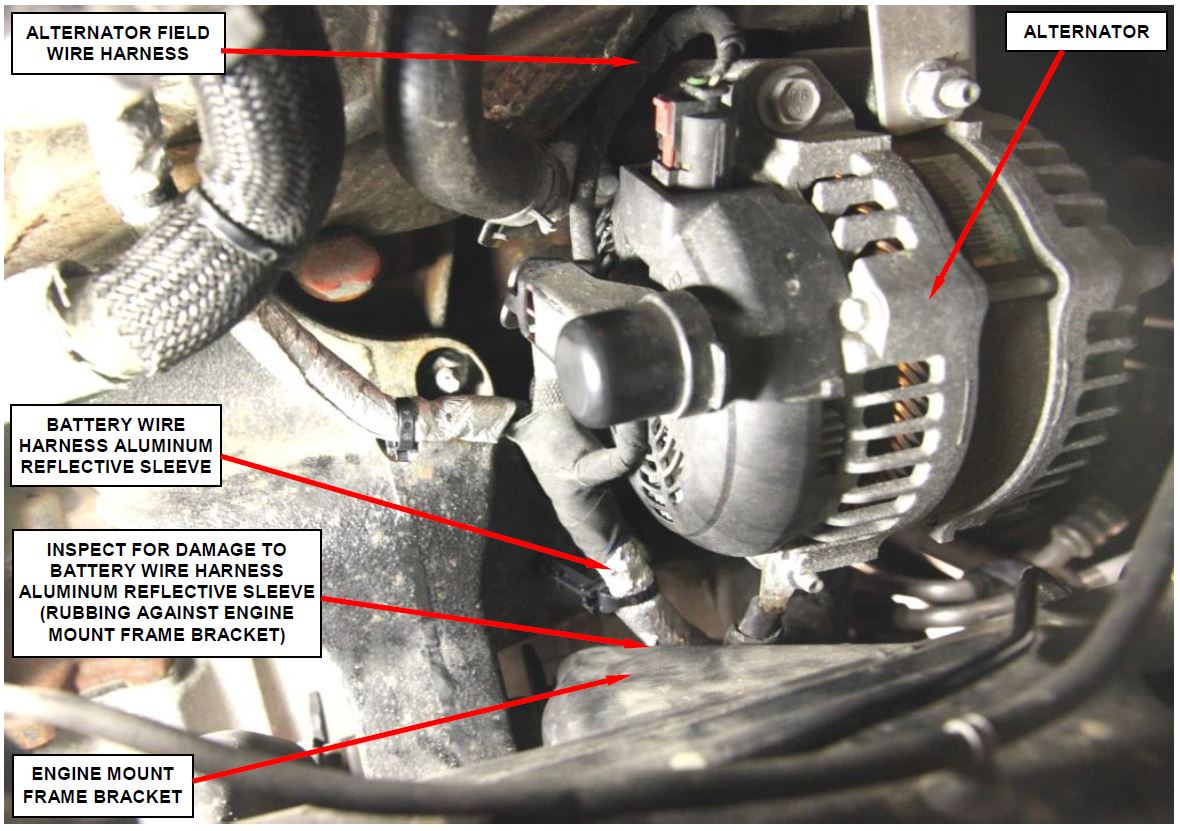
- Inspect for battery wire harness contact at the engine mount frame bracket (Figure 1):
- If there is no rub through of the aluminum reflective sleeve, continue with Step 5 of this procedure.
- If there is a rub through of the aluminum reflective sleeve, continue with Section B. Replace Engine Wire Harness.
Figure 1 – Inspect Wire Harness for Damage at Engine Mount Frame Bracket
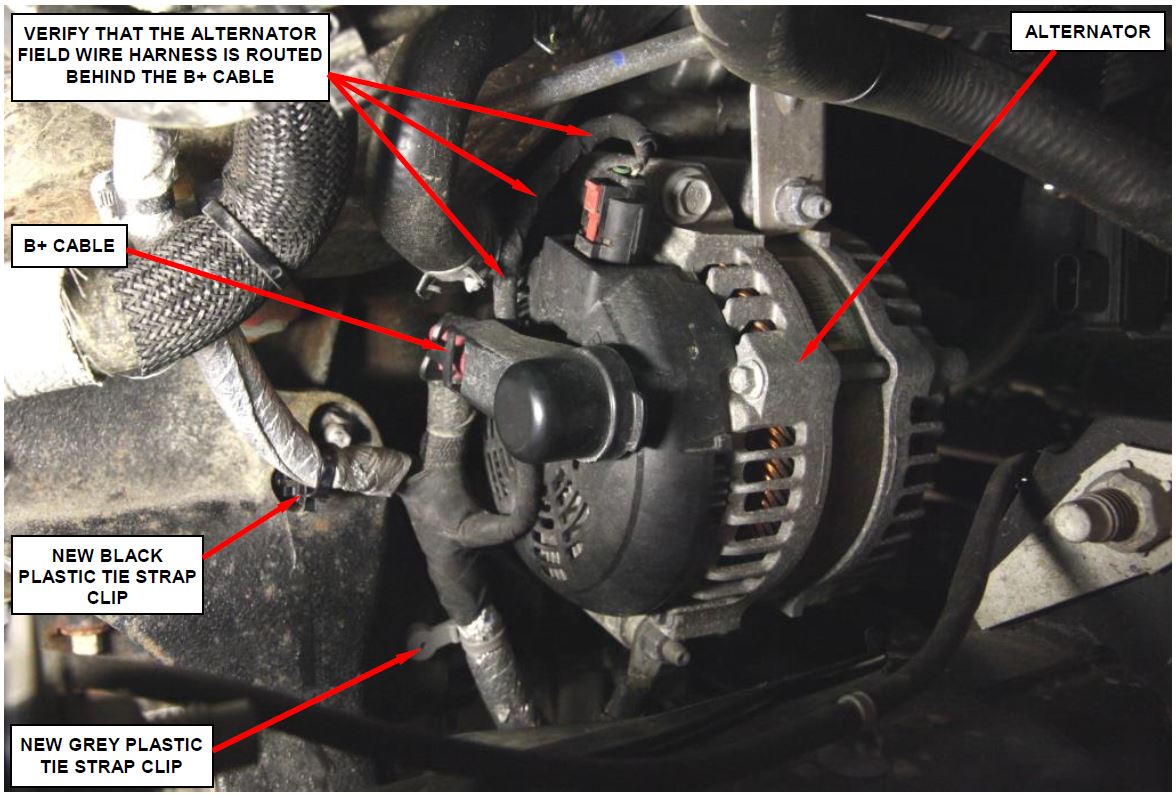
- Verify that the alternator field wire harness at the alternator is routed as shown in Figure 2. Reroute the alternator field wire harness if required.
- Remove and discard the two original tie strap clips on the battery harness (Figure 2).
- Install the two new wire harness clips as shown in Figure 2.
Figure 2 – Verify Alternator Field Wire Harness Routing and Install New Tie Strap Clips
- Install the right front wheel opening plastic liner.
- Install the right tire/wheel assembly. Tighten the lug nuts to 130 ft. lbs. (176 N·m).
- Lower the vehicle from the hoist.
- Return the vehicle to the customer.
B. Replace Battery Wire Harness
NOTE: The following procedure is required if the engine wire harness requires replacement per the inspection in Section “A.” Very few vehicles are expected to require this repair.
- Lower the vehicle from the hoist.
- Disconnect and isolate the negative battery cable from the negative battery post.
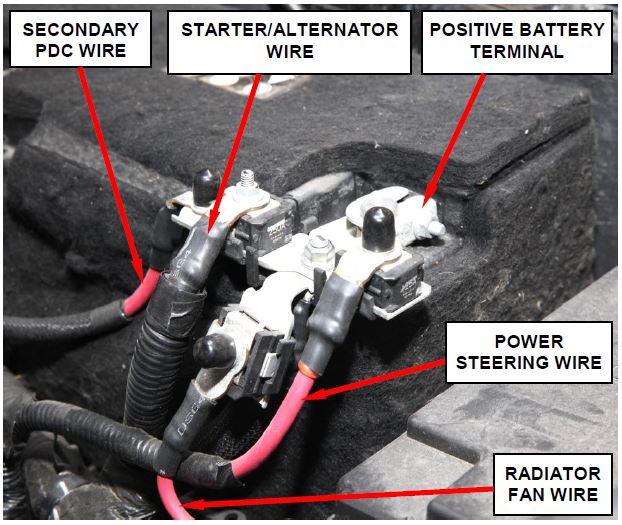
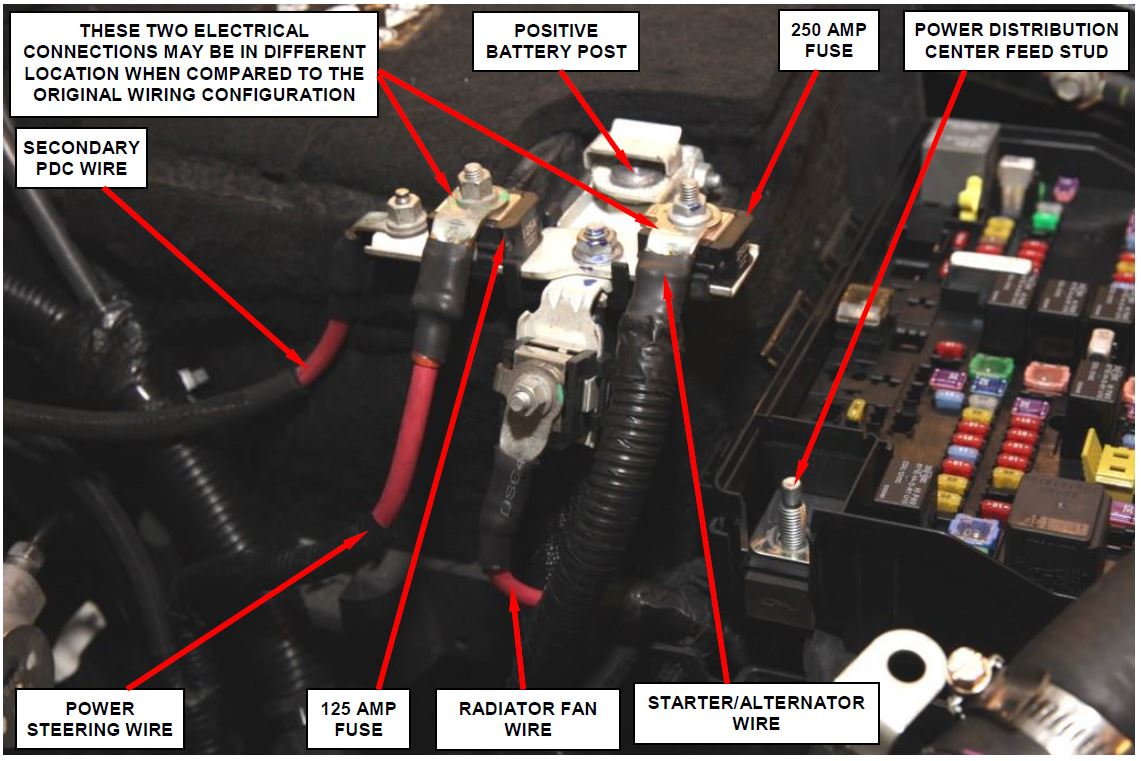
- Disconnect the battery feed wires at the positive battery post terminal studs (Figure 3).
Figure 3 – Battery Positive Connections
- Disconnect the positive battery terminal from the positive battery post (Figure 3).
- Remove and save the Power Distribution Center (PDC) cover.
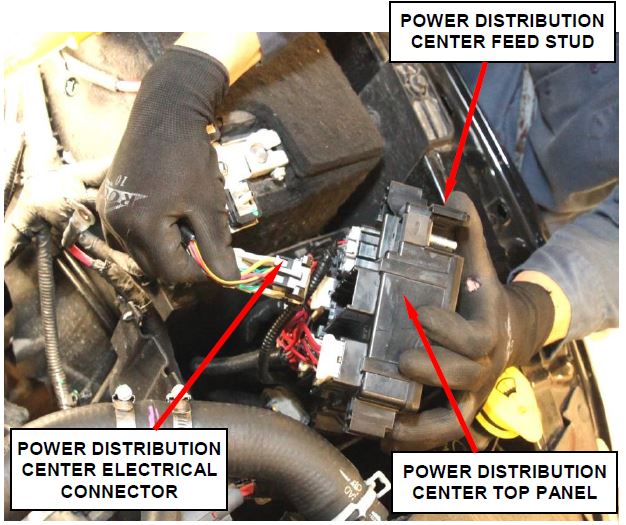
- Disconnect the PDC battery B+ feed wire from the PDC feed stud (Figure 4).
- Separate the PDC top panel from the PDC housing and disconnect the PDC electrical connector (Figure 4).
Figure 4 – PDC Electrical Connections
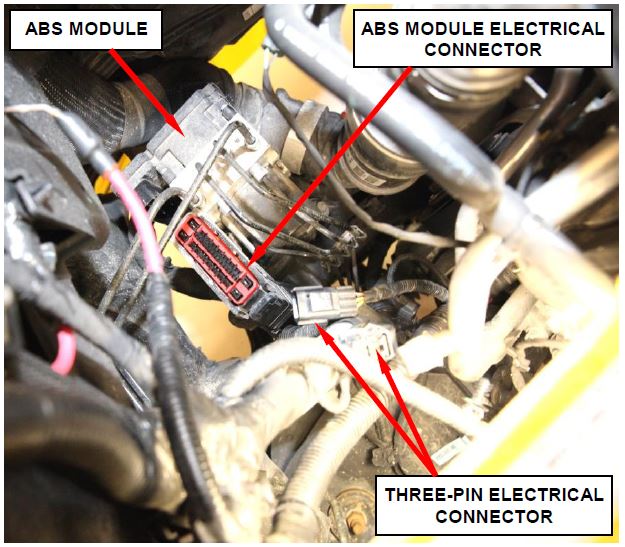
- Disconnect the wire harness three-pin electrical connector (Figure 5).
- Disconnect the A/C compressor clutch electrical connector.
- Disconnect the Anti-Lock Brake System (ABS) control module electrical connector (Figure 5).
Figure 5 – ABS Connector
- Disconnect the left front wheel speed sensor.
- Disconnect the brake fluid level sensor electrical connector.
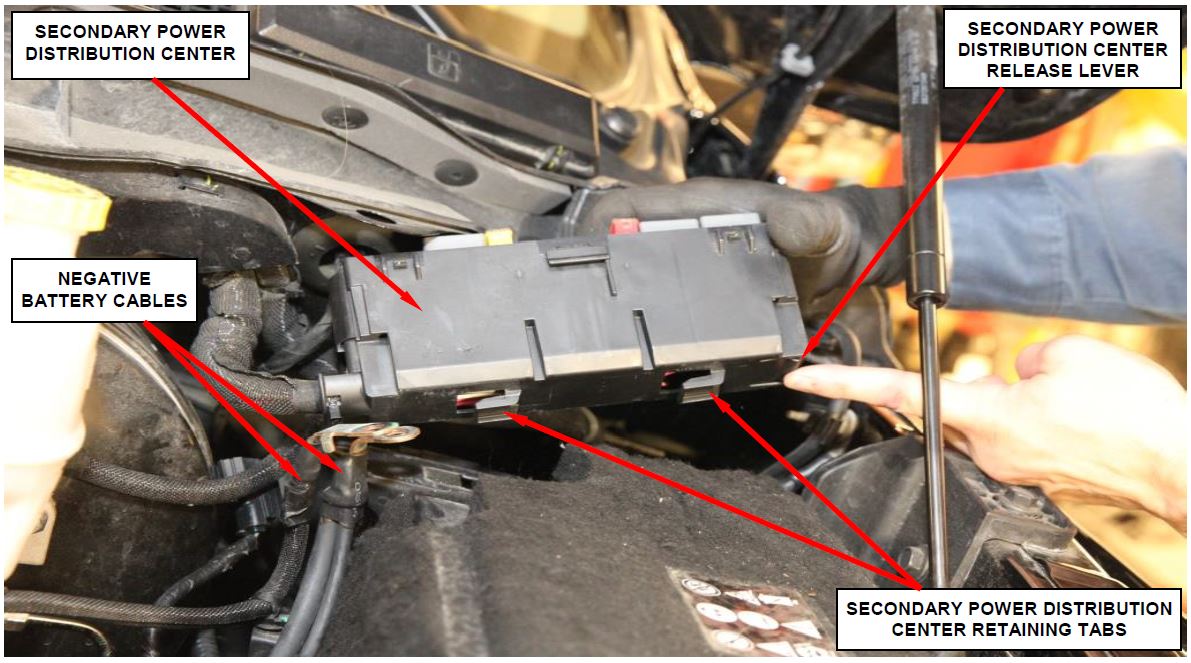
- Disconnect the negative cables from the negative battery terminal (Figure 6).
- Unclip the secondary Power Distribution Center (PDC) from the battery tray (Figure 6).
Figure 6 – Secondary Power Distribution Center
- Disconnect the body-to-battery wire harness 34-way electrical connector located under the secondary PDC.
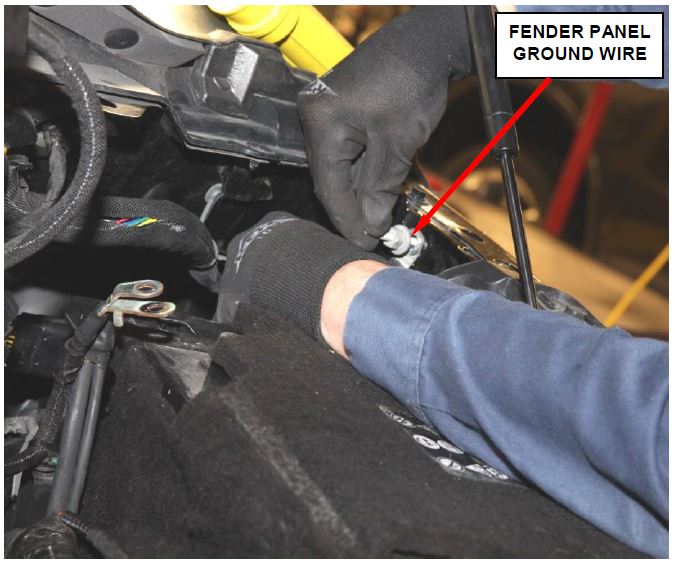
- Disconnect the fender panel ground wire (Figure 7).
Figure 7 – Fender Panel Ground Wire
- Lift the vehicle on the hoist.
- Disconnect the frame ground wire from the left frame rail.
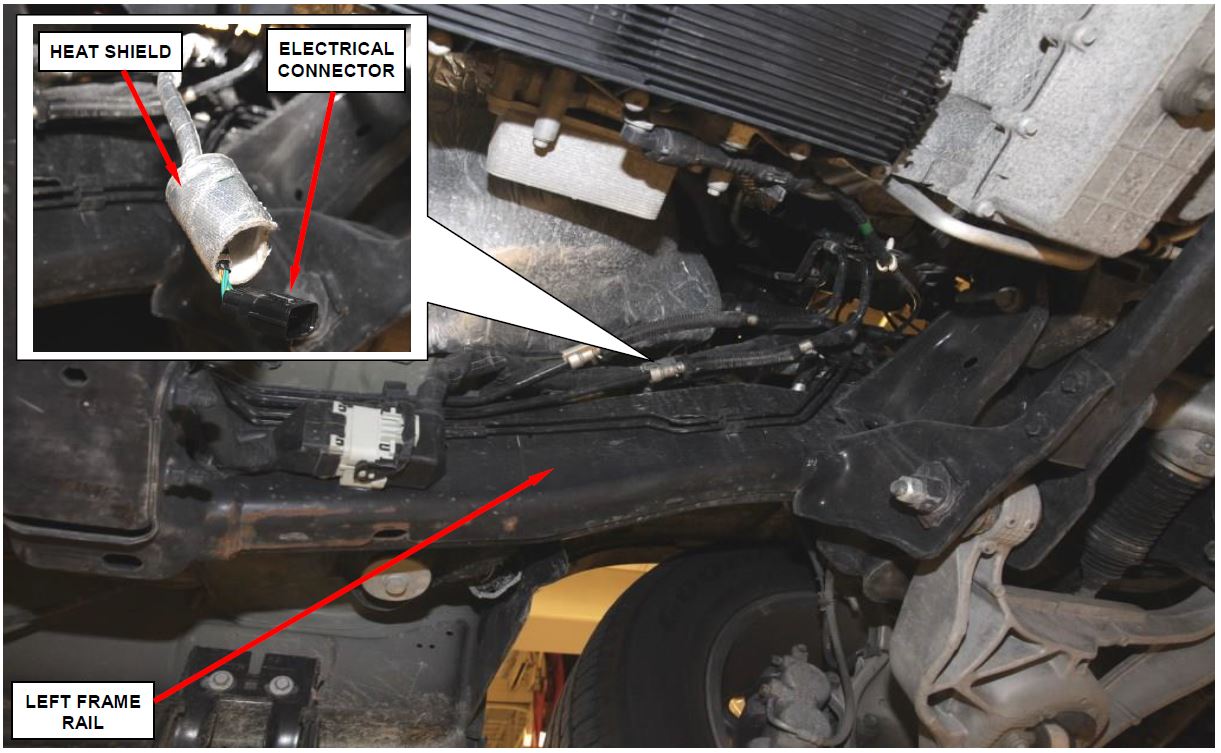
- Disconnect the fuel pump electrical connector at the frame rail (Figure 8).
Figure 8 – Fuel Pump Electrical Connector
- Disconnect the engine starter wiring.
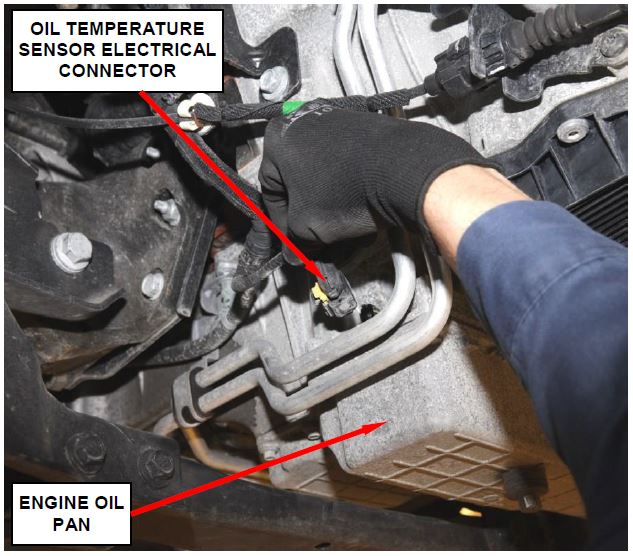
- Disconnect the oil temperature sensor electrical connector (Figure 9).
Figure 9 – Engine Oil Temperature Sensor
- Disconnect the left side battery wire harness routing clips.
- Remove and save the two oil pan wiring trough nuts.
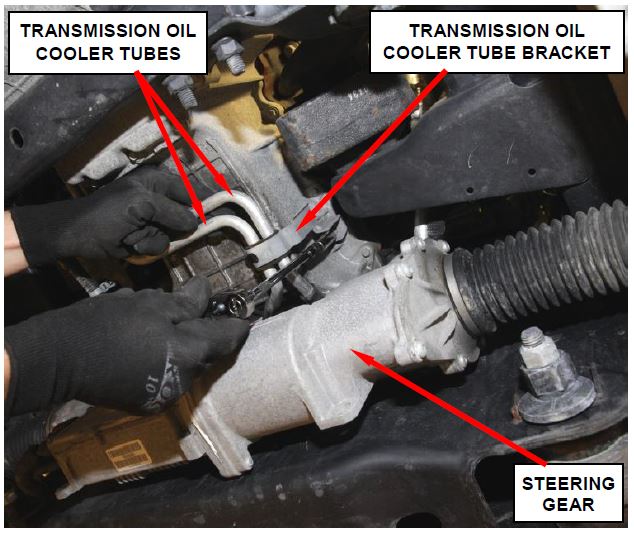
- Remove and save the transmission oil cooler tube bracket at the engine oil pan (Figure 10).
Figure 10 – Transmission Oil Cooler Bracket
- Remove and save the alternator ground nut and disconnect the ground wire.
- Disconnect the alternator B+ wire at the back of the alternator.
- Disconnect the alternator field wire electrical connector located on the backside of the alternator.
- Disconnect the engine right side electrical connector.
- Carefully remove the original battery wire harness from the vehicle.
- Place the new battery wire harness into position in the vehicle.
- Connect the engine right side electrical connector.
- Connect the alternator field wire electrical connector located on the backside of the alternator.
- Connect the alternator B+ wire at the back of the alternator. Tighten the alternator B+ wire retaining nut to 106 in. lbs. (12 N·m).
- Connect the engine right side battery wire harness routing clips.
- Connect the alternator ground wire to the alternator. Tighten the ground wire retaining nut to 97 in. lbs. (11 N·m).
- Place the battery wiring harness trough into position and install the two trough retaining nuts. Tighten the nuts to 44 in. lbs. (5 N·m).
- Connect the transmission oil cooler tube bracket to the engine oil pan (Figure 10).
- Connect the oil temperature sensor electrical connector (Figure 9).
- Connect the left side battery wire harness routing clips.
- Connect the engine starter wiring. Tighten the Starter B+ wire retaining nut to 106 in. lbs. (12 N·m).
- Transfer the fuel pump electrical connector heat shield from the original battery wire harness to the new battery wire harness (Figure 8).
- Connect the fuel pump electrical connector at the frame rail (Figure 8).
- Connect the frame rail ground wire to the left frame rail.
- Lower the vehicle from the hoist.
- 45Connect the fender panel ground wire (Figure 7). Tighten the fastener to 13 ft. lbs. (18 N·m).
- Connect the body-to-battery wire harness 34-way electrical connector located under the secondary PDC.
- Clip the secondary Power Distribution Center (PDC) to the battery tray (Figure 6).
- Connect the negative battery cables to the negative battery terminal. Tighten the retaining nut to 132 in. lbs. (15 N·m).
- Connect the brake fluid level sensor electrical connector.
- Connect the left front wheel speed sensor electrical connector.
- Connect the Anti-Lock Brake (ABS) control module electrical connector (Figure 5).
- Connect the A/C compressor clutch electrical connector.
- Connect the wire harness three-pin electrical connector (Figure 5).
- Connect the Power Distribution Center (PDC) electrical connector to the bottom of the PDC top panel (Figure 4).
- Snap the PDC top panel into the PDC housing.
- Connect the PDC battery B+ feed wire to the PDC feed stud (Figure 11). Tighten the retaining nut to 106 in. lbs. (12 N·m).
- Install the PDC cover.
- Connect the positive battery terminal to the positive battery post. Tighten the battery terminal nut to 48 in. lbs. (5.4 N·m).
- Connect the battery feed wires at the positive battery post terminal studs (Figure 11). Tighten the nuts to 80 in. lbs. (9 N·m).
CAUTION: Some of the B+ terminal positions for the battery feed wires have moved to different locations on the positive battery post terminal.
Figure 11 – Battery Positive Electrical Connections
- Connect the negative battery cable to the negative battery post. Tighten the nut to 53 in. lbs. (6 N·m).
- Visually inspect the entire new battery wire harness to ensure that it is routed properly. Adjust the battery wire harness as required to ensure proper routing.
- Install the right front wheel opening plastic liner.
- Install the right tire/wheel assembly. Tighten the lug nuts to 130 ft. lbs. (176 N·m).
- Lower the vehicle from the hoist.
- Connect the wiTECH scan tool to the vehicle and start a wiTECH session.
- Using the wiTECH scan tool, clear all Diagnostic Trouble Codes (DTC’s).
- Remove the wiTECH scan tool from the vehicle.
- Return the vehicle to the customer.
Completion Reporting and Reimbursement
Claims for vehicles that have been serviced must be submitted on the DealerCONNECT Claim Entry Screen located on the Service tab. Claims submitted will be used by FCA to record recall service completions and provide dealer payments.
Use one of the following labor operation numbers and time allowances:
| Labor Operation Number | Time Allowance | |
|---|---|---|
| Inspect battery wire harness and install new wire harness retaining clips | 08-R4-31-82 | 0.4 hours |
| Inspect and replace battery wire harness | 08-R4-31-83 | 1.7 hours |
Add the cost of the recall parts package plus applicable dealer allowance to your claim.
NOTE: See the Warranty Administration Manual, Recall Claim Processing Section, for complete recall claim processing instructions.
Dealer Notification
To view this notification on DealerCONNECT, select “Global Recall System” on the Service tab, then click on the description of this notification.
Owner Notification and Service Scheduling
All involved vehicle owners known to FCA are being notified of the service requirement by first class mail. They are requested to schedule appointments for this service with their dealers. A generic copy of the owner letter is attached.
Enclosed with each owner letter is an Owner Notification postcard to allow owners to update our records if applicable.
Vehicle Lists, Global Recall System, VIP and Dealer Follow Up
All involved vehicles have been entered into the DealerCONNECT Global Recall System (GRS) and Vehicle Information Plus (VIP) for dealer inquiry as needed.
GRS provides involved dealers with an updated VIN list of their incomplete vehicles. The owner’s name, address and phone number are listed if known. Completed vehicles are removed from GRS within several days of repair claim submission.
To use this system, click on the “Service” tab and then click on “Global Recall System.” Your dealer’s VIN list for each recall displayed can be sorted by: those vehicles that were unsold at recall launch, those with a phone number, city, zip code, or VIN sequence.
Dealers must perform this repair on all unsold vehicles before retail delivery. Dealers should also use the VIN list to follow up with all owners to schedule appointments for this repair.
Recall VIN lists may contain confidential, restricted owner name and address information that was obtained from the Department of Motor Vehicles of various states. Use of this information is permitted for this recall only and is strictly prohibited from all other use.
Additional Information
If you have any questions or need assistance in completing this action, please contact your Service and Parts District Manager.
Customer Services / Field Operations
FCA US LLC
BATTERY WIRE HARNESS
IMPORTANT SAFETY RECALL
R43 / NHTSA 15V-517
This notice applies to your vehicle (VIN: xxxxxxxxxxxxxxxxx).
This notice is sent to you in accordance with the National Traffic and Motor Vehicle Safety Act. Dear: (Name)
FCA has decided that a defect, which relates to motor vehicle safety, exists in certain 2014 and 2015 model year RAM trucks equipped with a 3.0L diesel engine and a 4×2 drivetrain.
| The problem is… | The battery wire harness on your truck may have been routed against the right engine mount frame bracket. Continuous battery wire harness contact with the right engine mount frame bracket could cause the battery wire harness sheathing to wear and create a high resistive short circuit. A high resistive short circuit could cause the vehicle to stall and/or an underhood electrical fire. |
| What your dealer will do… | FCA will repair your vehicle free of charge. To do this, your dealer will inspect the battery wire harness and replace it if necessary. The work will take about two hours to complete. However, additional time may be necessary depending on service schedules. |
| What you must do to ensure your safety… | Simply contact your Chrysler , Jeep , Jeep , Dodge , Dodge or RAM or RAM dealer right away to schedule a service appointment. Ask the dealer to hold the parts for your vehicle or to order them before your appointment. Please bring this letter with you to your dealer. dealer right away to schedule a service appointment. Ask the dealer to hold the parts for your vehicle or to order them before your appointment. Please bring this letter with you to your dealer. |
| If you need help… | If you have questions or concerns which your dealer is unable to resolve, please contact the FCA Group Recall Assistance Center at either fcarecalls.com or 1-800-853-1403. |
Please help us update our records by filling out the attached prepaid postcard if any of the conditions listed on the card apply to you or your vehicle. If you have further questions go to fcarecalls.com.
If you have already experienced this specific condition and have paid to have it repaired, you may visit www.fcarecallreimbursement.com to submit your reimbursement request online or you can mail your original receipts and proof of payment to the following address for reimbursement consideration: FCA Customer Assistance, P.O. Box 21-8004, Auburn Hills, MI 48321-8007, Attention: Recall Reimbursement. Once we receive and verify the required documents, reimbursement will be sent to you within 60 days. If you’ve had previous repairs and/or reimbursement you may still need to have the recall repair performed on your vehicle.
If your dealer fails or is unable to remedy this defect without charge and within a reasonable time, you may submit a written complaint to the Administrator, National Highway Traffic Safety Administration, 1200 New Jersey Ave., S.E., Washington, DC 20590, or you can call the toll-free Vehicle Safety Hotline at 1-888-327-4236 (TTY 1-800-424-9153), or go to safercar.gov.
We’re sorry for any inconvenience, but we are sincerely concerned about your safety. Thank you for your attention to this important matter.
Customer Services / Field Operations
FCA US LLC
Note to lessors receiving this recall: Federal regulation requires that you forward this recall notice to the lessee within 10 days.
 Loading...
