| “This site contains affiliate links for which OEMDTC may be compensated” |
NUMBER: 19-002-15
GROUP: Steering
DATE: April 08, 2015
SUBJECT:
Clunking Noise From The Steering Column While Turning The Steering Wheel
OVERVIEW:
This bulletin involves replacing the steering intermediate shaft.
MODELS:
| 2012 – 2015 | (FF) | Fiat 500 500 |
NOTE: This bulletin applies to vehicles built on or after January 1, 2012 (MDH 0101XX) and on or before March 24, 2015 (MDH 0324XX).
SYMPTOM/CONDITION:
Clunking, popping, knocking noise from the lower steering column while turning the steering wheel.
DIAGNOSIS:
If the customer describes the symptom, perform the Repair Procedure.
PARTS REQUIRED:
| Qty. | Part No. | Description |
|---|---|---|
| 1 | 68105066AE | Shaft Kit – Steering Column Intermediate (includes fasteners) |
REPAIR PROCEDURE:
- Is this vehicle a Battery Electric Vehicle (BEV) equipped with sales code (E99) Electric Motor?
- YES>>> The following Repair Procedure may ONLY be performed by a level 3 – Highly Skilled technician.
- No>>> The following Repair Procedure may be performed by a level 2- Skilled technician.
NOTE: For testing, windows must be up, radio must be turned off, HVAC system must be turned off. Turn off or eliminate any other possible noise sources before beginning the test.
- With the vehicle in park mode and steering wheel centered, front wheels pointed straight ahead (not turned to right or left), perform the following diagnostic steps: a. Insert the ignition key into the ignition and start the vehicle.
- Turn the steering wheel to the right or left one half turn past center then reverse thedirection by turning the steering wheel in the opposite direction one half turn past center.
- Repeat turning the steering wheel right and left one half turn past center in eachdirection a few times while listening and feeling for a clunking, popping, knocking noise coming from the lower steering column during direction reversal.
- Was a clunk, pop, or knock noise heard or felt in the lower steering column during steering wheel direction reversal?
- YES>>> Perform the Repair Procedure. Proceed to Step #7.
- NO>>> Continue with Step #4.
- If a clunk, pop, or knock noise was not heard or felt while in park mode during steering wheel direction reversal, drive the vehicle in a safe location at low speeds while performing the following diagnostic steps:
- Turn the steering wheel to the right or left one half turn past center then reverse thedirection by turning the steering wheel in the opposite direction one half turn past center.
- Repeat turning the steering wheel right and left one half turn past center in eachdirection a few times while listening and feeling for a clunking, popping, knocking noise coming from the lower steering column during direction reversal.
- Was a clunk, pop, or knock noise heard or felt in the lower steering column during steering wheel direction reversal?
- YES>>> Perform the Repair Procedure. Proceed to Step #7.
- NO>>> This Bulletin does not apply. Normal diagnostics should be performed.
WARNING:When performing any repairs that involve contact with high voltage components or systems, the technician performing repairs on the vehicle must verify that the system remains powered down during high voltage repairs.
- If this is a Battery Electric Vehicle (BEV), perform the High-Voltage Power Down Procedure. Refer to the detailed service procedures available in DealerCONNECT> TechCONNECT> under: Service Info> 12 – Electric Powertrain System> Electric Vehicle Control System> Standard Procedure.
- Remove the intermediate shaft (I-shaft) and bolts. Refer to the detailed service procedures available in DealerCONNECT> TechCONNECT> under: Service Info> 19 Steering> Column> SHAFT, Intermediate> Removal.
- Obtain the NEW I-shaft and bolts included in the I-shaft kit listed in the Parts Required section of this bulletin.
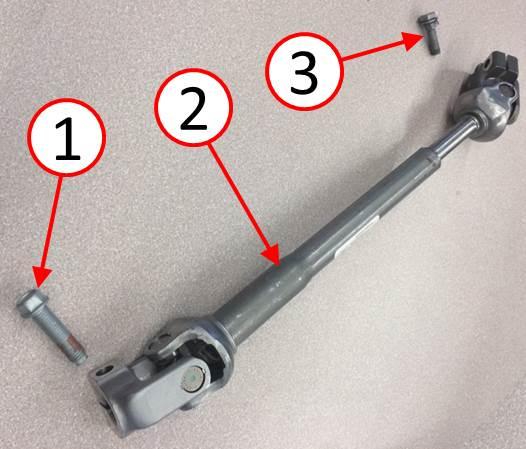
- Install the NEW I-shaft and bolts. Tighten the upper M8 bolt (I-shaft to column) to 28 N·m (21 ft. lbs.). Tighten the lower M10 bolt (I-shaft to gear) to 55 N·m (40 ft. lbs.) ( 1). Refer to the detailed service procedures available in DealerCONNECT> TechCONNECT> under: Service Info> 19 – Steering> Column> SHAFT, Intermediate> Installation.
Fig. 1
1 – Bolt Hex Head M10 (I-shaft to gear)
2 – Intermediate Shaft (I-shaft assembly)
3 – Bolt Hex Head M8 (I-shaft to column)
- Once the repair procedure is completed and if this is a Battery Electric Vehicle (BEV), perform the High-Voltage Power UP procedure. Refer to the detailed service procedures available in DealerCONNECT> TechCONNECT> under: Service Info> 12 Electric Powertrain System> Electric Vehicle Control System> Standard Procedure.
POLICY:
Reimbursable within the provisions of the warranty.
TIME ALLOWANCE:
| Labor Operation No: | Description | Skill Category | Amount |
|---|---|---|---|
| 19-20-81-90 | Shaft, Intermediate -Test Only (2 – Skilled) | 6 – Electrical and Body Systems | 0.2 Hrs. |
| 19-20-81-91 | Shaft, Intermediate – Test And Replace (2 – Skilled) | 6 – Electrical and Body Systems | 0.5 Hrs. |
| 19-20-81-94 | Shaft, Intermediate – Test And Replace (Battery Electric Vehicle Only) (3 – Highly Skilled) | 6 – Electrical and Body Systems | 1.1 Hrs. |
FAILURE CODE:
| ZZ | Service Action |
 Loading...


