
NUMBER: 23-021-15
GROUP: Body
DATE: May 28, 2015
SUBJECT:
Squeak Noise Coming From The Rear Seat
OVERVIEW:
This bulletin involves applying tape to the rear seat track J-rail.
MODELS:
| 2014 – 2015 | (KL) | Jeep Cherokee |
NOTE: This bulletin applies to vehicles built on or before April 23, 2015 (MDH 0423XX).
SYMPTOM/CONDITION:
The customer may describe a squeak noise coming from the rear seat, typically when the seat is unoccupied.
The noise may be caused by metal to metal contact of the rear seat track J-rail.
DIAGNOSIS:
If the customer describes the symptom/condition listed above, perform the Repair Procedure.
PARTS REQUIRED:
| Qty. | Part No. | Description |
| 1 | 05019054AA | TAPE |
NOTE: Each package of tape will service 24 vehicles.
REPAIR PROCEDURE:
NOTE: Do NOT move the rear seat position prior to diagnosis or symptom/condition may disappear.
- Verify the squeak noise by striking the middle of the seat back with the palm of a hand.
- Is a squeak noise coming from the rear seat?
- YES>>> Continue to Step #3.
- NO>>> This Bulletin does not apply. Normal diagnosis should be performed.
- If the squeak noise was heard, move the 60 percent side rear seat track forward 1 or 2 positions and reverify the squeak noise by striking the middle of the seat back with the palm of a hand.
- Was the squeak noise eliminated by moving the seat forward?
- YES>>> Continue with the Repair Procedure Step #5.
- NO>>> This Bulletin does not apply. Normal diagnosis should be performed.
WARNING:To avoid serious or fatal injury on vehicles equipped with airbags, disable the Supplemental Restraint System (SRS) before attempting any steering wheel, steering column, airbag, Occupant Classification System (OCS), seat belt tensioner, impact sensor or instrument panel component diagnosis or service. Disconnect and isolate the battery negative (ground) cable, then wait two minutes for the system capacitor to discharge before performing further diagnosis or service. This is the only sure way to disable the SRS. Failure to follow these instructions may result in accidental airbag deployment.
- Disconnect and isolate the negative battery cable. If equipped with an Intelligent Battery Sensor (IBS), disconnect the IBS connector first before disconnecting the negative battery cable.
- Disconnect the rear seat electrical connectors and remove the fasteners attaching the rear seat to the vehicle. DO NOT REMOVE THE SEAT FROM THE VEHICLE. Refer to the detailed service procedures available in DealerCONNECT> TechCONNECT under: Service Info> 23 – Body> Seats, Rear> SEAT, Rear> Removal.
- With the seat back folded down and seat track in the full rearward position, lift the seat off the rear studs and flip 90 degrees so that the bottom of the seat is exposed (Fig. 1).
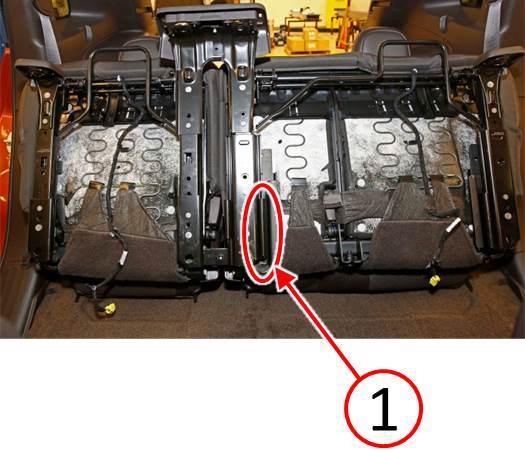
Fig. 1 Rear Seat Unbolted And Repositioned In Vehicle
1 – Area Of Concern On 60 Percent Side
- Examine the rearward portion of the 60 percent side inner seat track for a “V” shaped gap with a touch condition at the rear lower edge of the seat track (Fig. 2).
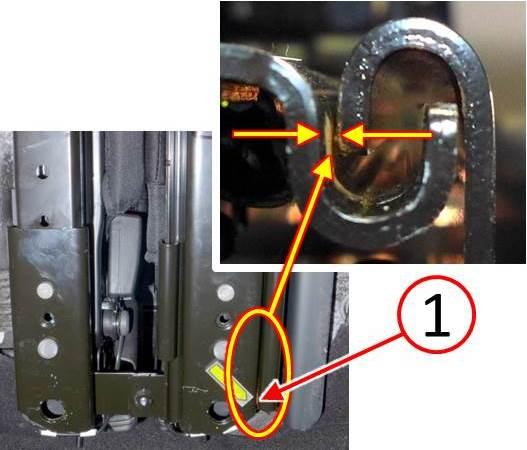
Fig. 2 Inspect Gap At The 60 Percent Inboard Side
1 – Touch Condition At Rear Lower Edge
- If the seat track J-rail rear lower edge is touching, use a suitable tool (1) to reposition the seat track so that a 1.5 mm (0.06 in.) gap (2) is present between the J-rails (Fig. 3).
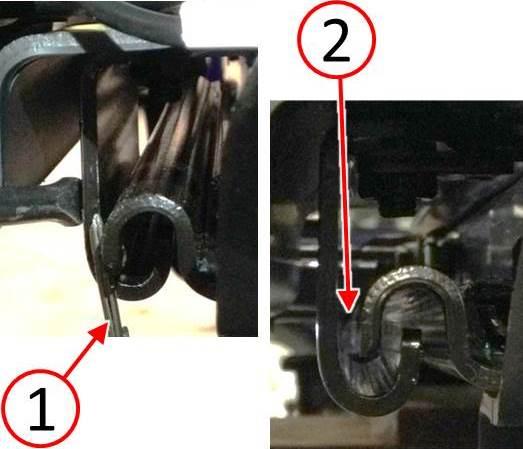
Fig. 3 Adjust 60 Percent J-Rail For Clearance
1 – Suitable Tool
2 – J-Rail Clearance
- Move the seat track position so that the rear portion of the J-rail is visible.
- Clean the J-rail (1) with isopropyl alcohol or equivalent (2), to remove any oil or grease residue from the area of the seat track to which the tape will be applied (Fig. 4).
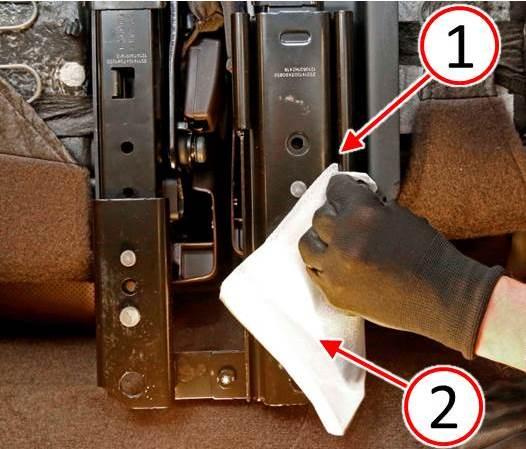
Fig. 4 Clean J-Rail
1 – Seat Track J-Rail
2 – Clean With Isopropyl Alcohol
- Cut the tape (1) in half (Fig. 5).
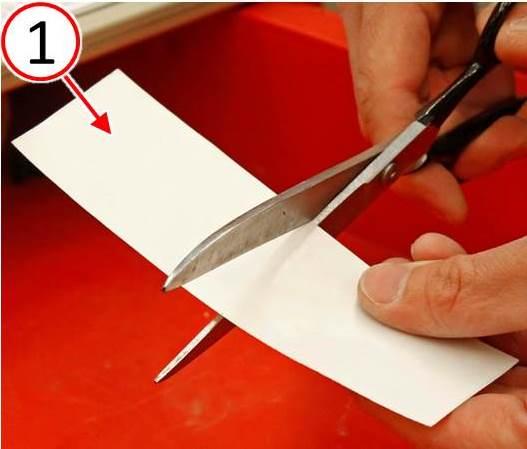
Fig. 5 Cut Tape In Half
1 – Tape
- Apply the tape (2) to the lower inner J-rail, taking care not to apply the tape to the underside of the seat track area (1) where it will contact the body mount (Fig. 6).
- Using fingers and a trim stick or equivalent, firmly press on the tape to ensure complete contact of tape to J-rail surface (3) without air gaps (Fig. 6).
- Wrap the tape (4) over the J-rail and ensure the tape is fully adhered to the outer surface of the J-rail without air gaps (Fig. 6).
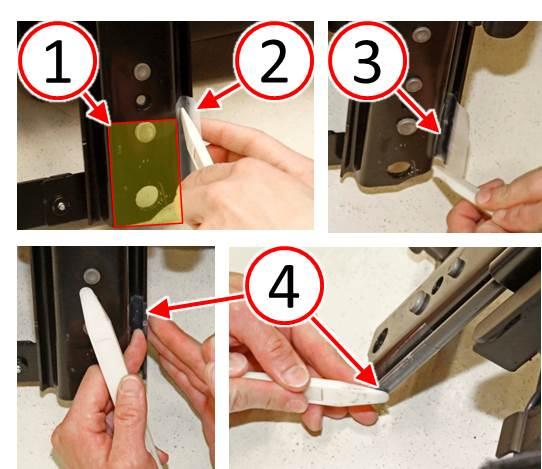
Fig. 6 Apply Tape To Inner J-Rail Rear Edge
1 – No Tape Zone On Underside Of Seat Track
2 – Apply Tape To Rear Edge Of Inner J-Rail
3 – Ensure Tape Is Fully Adhered In J-Rail Channel
4 – Wrap Tape over J-Rail And Adhere To J-Rail Side
- Cycle the seat track a few times to ensure that the J-rail does not peel the tape away.
- Did the tape peel away?
- If further adjustment of the seat track is necessary, remove the rear seat from thevehicle.
- Remove the 60 percent side lower seat cushion (2) enough to expose the inboard sideseat track fasteners (1) (Fig. 7). Refer to the detailed service procedures available in DealerCONNECT> TechCONNECT under: Service Info> 23 – Body> Seats, Rear> COVER, Seat Cushion> Removal.
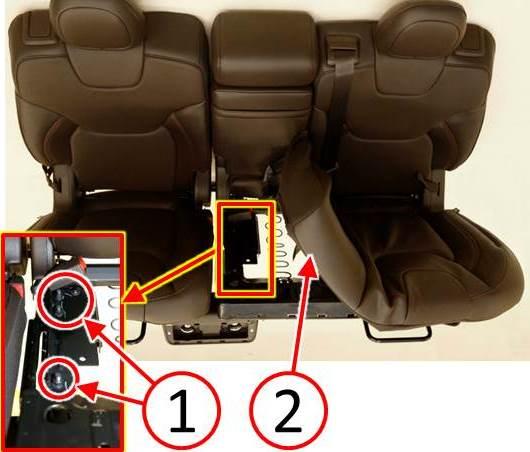
Fig. 7 Access Seat Track Fasteners Under Seat Cushion
1 – Seat Track Fasteners
2 – 60 Percent Side Lower Seat Cushion
- Loosen the 60 percent side inboard seat track fasteners (1) (Fig. 8).
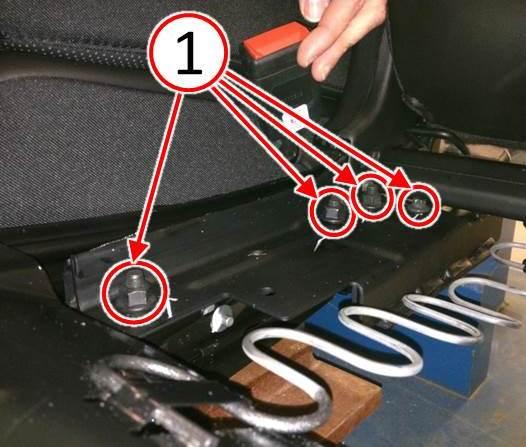
Fig. 8 Remove Seat Cushion To Access Seat Rail Fasteners
1 – Seat Track Fasteners
- Adjust the seat track alignment (1) to ensure a minimum of 1.5 mm (0.06 in.) gap between the J-rails (2) at the rear of the seat track (Fig. 9).
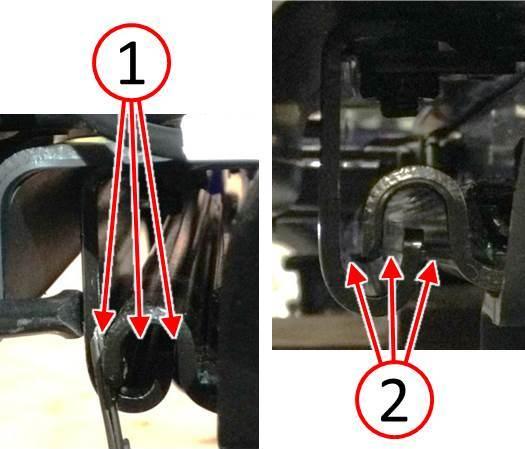
Fig. 9 Position 60 Percent Rail To Achieve Even Spacing
1 – J-Rail Gap Uneven
2 – J-Rail Gap Even
- Tighten the three M10 nuts (1) to 50 N·m (37 ft. lbs.) and the one M8 bolt (2) to 25 N·m (18 ft. lbs.) (Fig. 10).
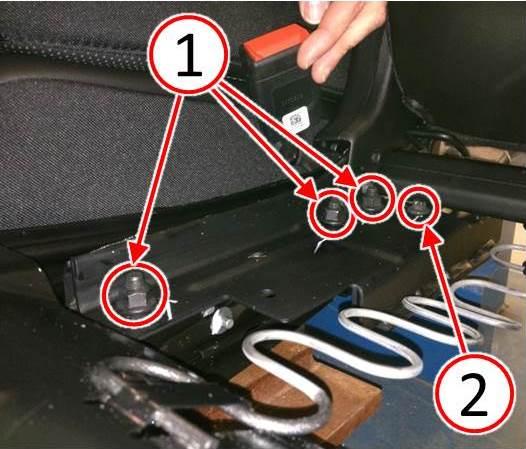
Fig. 10 Tighten Seat Rail Fasteners
1 – M10 Nuts
2 – M8 Bolt
- Repeat Step #10 through Step #16.
- Install the seat 60 percent side lower seat cushion. Refer to the detailed serviceprocedures available in DealerCONNECT> TechCONNECT under: Service Info> 23 Body> Seats, Rear> COVER, Seat Cushion> Installation.
- Install the rear seat to the vehicle following the detailed procedure in DealerCONNECT> TechCONNECT under: Service Info> 23 – Body> Seats, Rear> SEAT, Rear> Installation.
- Connect the negative battery cable. If equipped with an Intelligent Battery Sensor(IBS), connect the IBS connector to the negative battery cable.
POLICY:
Reimbursable within the provisions of the warranty.
TIME ALLOWANCE:
| Labor Operation No: | Description | Skill Category | Amount |
| 23-13-35-94 | Install Tape On Track (1 – Semi- Skilled) | 6 – Electrical and Body Systems | 0.5 Hrs. |
| 23-13-35-95 | Remove Seat Cushion To Adjust Track And Install Tape On Track (1 – Semi- Skilled) | 6 – Electrical and Body Systems | 1.0 Hrs. |
FAILURE CODE:
| ZZ | Service Action |
PART REIMBURSEMENT DETAIL:
| Part No: | Description |
| NPN | 1/24 Of Tape Package |
NOTE: This part number is for reimbursement only and will need to be claimed for 1/24 of Dealer Net of Part No. 05019054AA or it will be rejected.
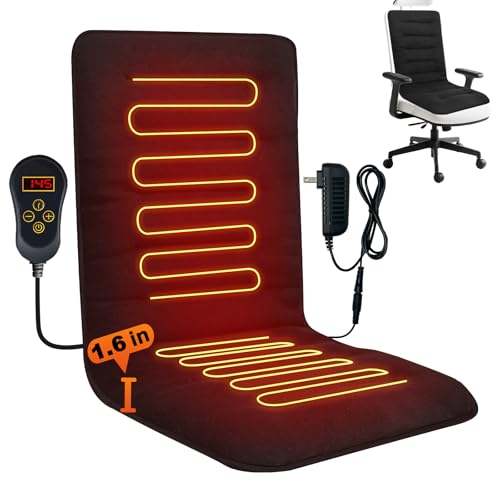
- 1.Thick & Soft Sitting Experience - This heated chair pad for office has a surface made of fleece fabric and is filled with memory foam inside. The heating pad has a thickness of 1.6 inches, providing you with greater comfort when sitting and keeping warm in winter.

- Heating Pad Versatile Use:Made with soft flannel fabric, it is designed for women and men to warm up their entire body more quickly, covering the back, neck, shoulders, abdomen, arms, legs, and feet, etc.It's a Perfect valentine's day gifts for her him,Great Gift for friend and elderly
- Heating Pad for Back 6 Heating Levels & 4 Timer Setting:Choose from 6 adjustable heat settings to find your perfect level of warmth and comfort.The timer can be set to 30/60/90/120 minutes.Heating pad with overheat protection and 2 hours auto shut-off ensures your peace of mind after each use
- Electric Heat Pad is Different Colors and Sizes:including 12”x 24”, 20”x 24 ”, 33”x 17” and 40”x 20”,Suitable for different body types and usage scenarios.say goodbye to a single color tone, our heating pads come in a variety of colors for you to choose from,add vibrant colors to your life
- Electric Blanket Easy to Use: The 75 inch power cord allows you extra movement while using it.You can easily adjust the position and placement of the heating pad whether you're on the sofa, in bed, in the office, or in your favorite chair
- Our heating pad is easy maintenance,machine wash-safe to make clean-up a breeze. Simply unplug and toss right in for a thorough cleansing before next use,you need to make sure it is completely dry before reassembling the unit. Since it has built-in heating wires, please do not machine wash it frequently

- The Tusk UTV Seat Heater is the ideal accessory to add to your machine when riding in cold weather conditions.
- Cold Weather Seat Heating - Provides consistent warmth for UTV riding in cold conditions with a maximum temperature of 158°F (70°C).
- Adjustable Heat Settings - Includes an on/off switch with High and Low settings to control heat output while riding.
- Under-Seat Installation - Heating panel installs beneath the seat cover and connects directly to the vehicle battery.
- Universal Fit Design - Designed to work with most UTV seats without modification.

- 1.The Universal Seat comfort Kit is designed to fit into 90% of vehicles.
- 2.The Cushion is equipped with a temperature protector.
- 3. Online installation video.
- 4. This product is prohibited for use by unconscious persons and people with reduced mobility.

- Versatile Compatibility: This universal seat comfort kit is designed to fit various models of cars, pickup trucks, and other vehicles.
- Cozy: Equipped with a cushion, this kit provides soothing warmth for enhanced comfort during cold weather drives.
- Customizable Temperature: Adjust the temperature settings to your desired level for personalized preferences.
- Convenient Installation: Easy to set up and remove, allowing you to use it in multiple vehicles as needed.
- Compact and Portable: The kit's compact size makes it easy to store and transport when not in use.
This product presentation was made with AAWP plugin.