| “This site contains affiliate links for which OEMDTC may be compensated” |
NHTSA Campaign Number: 17V541
Manufacturer Chrysler (FCA US LLC)
Components POWER TRAIN
Potential Number of Units Affected 4
If a halfshaft is too short, it may disengage from the differential causing a loss of drive and increasing the risk of a crash.
Summary
Chrysler (FCA US LLC) is recalling certain 2017 Dodge
 Durango vehicles. The vehicles may have been assembled with rear axle halfshafts that are too short.
Remedy
Chrysler has notified owners, and dealers will replace both halfshafts, free of charge.
The recall began on September 18, 2017.
Owners may contact Chrysler customer service at 1-800-853-1403.
Chrysler ’s number for this recall is T55.
Notes
Owners may also contact the National Highway Traffic Safety Administration Vehicle Safety Hotline at 1-888-327-4236 (TTY 1-800-424-9153), or go to www.safercar.gov.
Check if your Vehicle has a Recall
September 2017
Dealer Service Instructions for:
Safety Recall T55 / NHTSA 17V-541 Rear Axle Halfshafts
Models
| 2017 | (WD) | Dodge Durango Durango |
NOTE: This recall applies only to the above vehicles equipped with rear wheel drive (RWD) 4X2 and 230MM rear axle (sales code DR1) built from May 25, 2017 through June 02, 2017 (MDH 052509 through 060208).
| IMPORTANT: Some of the involved vehicles may be in dealer new vehicle inventory. Federal law requires you to complete this recall service on these vehicles before retail delivery. Dealers should also consider this requirement to apply to used vehicle inventory and should perform this recall on vehicles in for service. Involved vehicles can be determined by using the VIP inquiry process. |
Subject
The rear axle halfshafts on about four of the above vehicles may be too short for the intended application. A halfshaft that is too short could disengage from the rear axle differential resulting in an unexpected loss of motive power and the ability to shift, including the achievement of park. This could increase the risk of a vehicle crash without warning.
Repair
Replace both rear axle halfshafts and if the original halfshafts were not properly engaged into the rear axle differential, inspect the rear axle differential side gear splines for damage. Only if the rear axle differential side gear splines show signs of damage will rear axle differential replacement also be necessary.
Alternate Transportation
Dealers should attempt to minimize customer inconvenience by placing the owner in a loaner vehicle if inspection determines that rear axle differential replacement is required and the vehicle must be held overnight.
Parts Information
Due to only four involved vehicles, no parts will be distributed initially. The three part numbers below are required for all four involved vehicles.
| Part Number | Quantity | Description |
|---|---|---|
| 52123524AB | 2 | Halfshaft Assembly |
| 06509298AA | 2 | Nut, Hex Flange Lock, M22x1.50 (Halfshaft to Hub and Bearing Assembly) |
| 06104718AA | 6 | Nut, Hex Flange Lock, M12X1.50 (Camber, Tension and Toe Links to Knuckle) |
Rear axle differential and related components below should be ordered only after inspection determines that rear axle differential replacement is required. No vehicles are expected to require rear axle differential replacement.
| Part Number | Quantity | Description |
|---|---|---|
| 68251551AA | 1 | Differential, Rear Axle, 230MM |
| 68091399AA | 1 | Mount, Differential |
| 68139485AA | 4 | Bolt and Washer Assembly (Driveshaft to Differential) |
| 68083381AA | 2 | Lubricant, Gear, MOPAR GL-5 Synthetic Axle Lubricant SAE 75W-85 (Required: 1.1 Liters / 1.2 Quarts) |
| 06104462AA | 3 | Screw, Hex Head. M12X1.5X100.00 (Rear Axle Differential Mounting) |
| 06104718AA | 1 | Nut, Hex Flange Lock, M12X1.50 (Rear Axle Differential Mounting) |
Parts Return
No parts return required for this campaign.
Special Tools
The following special tool is required to perform this repair:
| Protector, Halfshaft, Drive |
The following special tools are ONLY required to perform rear axle differential replacement which is NOT anticipated for this campaign:
| Press, Ball Joint |
| Adapter, Center Screw Pin |
| Adapter, Ball Joint Press |
| Remover,Large Bushing |
| Installer, Small Bushing |
Service Procedure
A. Rear Axle Halfshaft Replacement
NOTE: All of the following rear axle halfshaft replacement procedure steps must be performed to both the right side and left side of the vehicle.
- Raise and support the vehicle.
- Remove and save the rear wheel and tire assemblies.
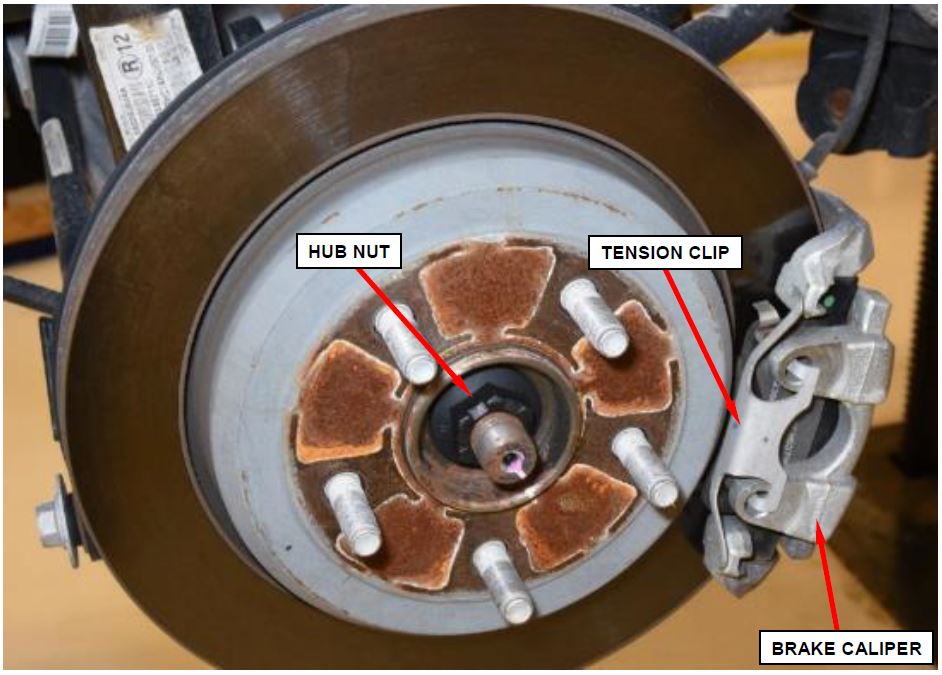
- While a helper applies the brakes to keep the hub from rotating, remove the hub nut from the halfshaft and discard. The used hub nut is not reusable (Figure 1).
NOTE: Always install a new hub nut. The original hub nut is one-time use only and should be discarded when removed.
- Remove and save the brake caliper tension clip by pressing forward on the clip to release the clip while pulling the clip away from the brake caliper (Figure 1).
Figure 1 – Rear Hub and Brake Caliper
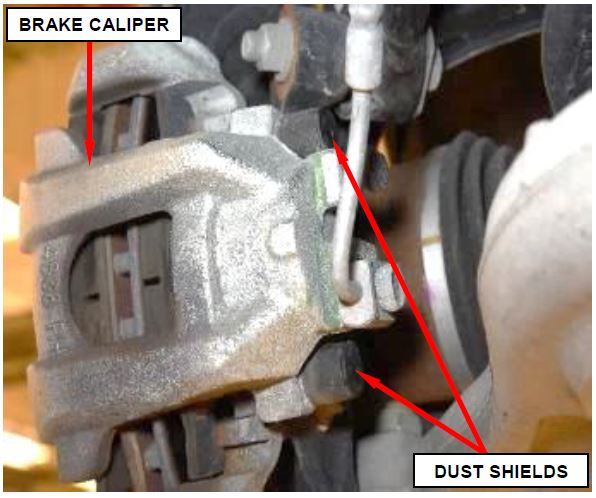
- Remove and save the slide bolt (guide pin) dust shields from the rear brake caliper (Figure 2).
Figure 2 – Brake Caliper Dust Shields
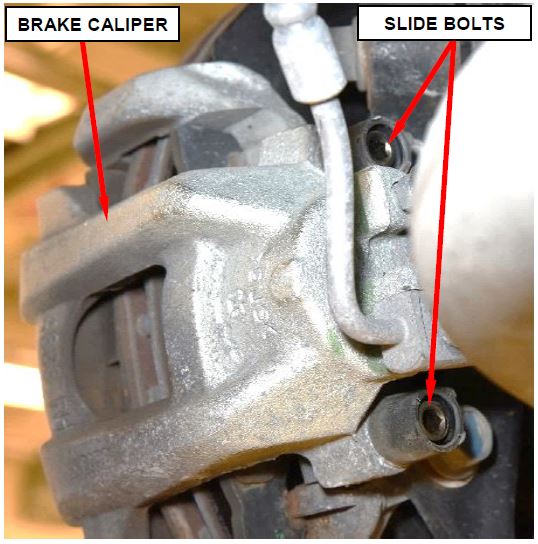
- Fully loosen (unthread) the brake caliper slide bolts (guide pins) from the brake caliper adapter (Figure 3).
NOTE: It is not necessary to fully remove the slide bolts (guide pins) from the caliper.
Figure 3 – Brake Caliper Slide Bolts
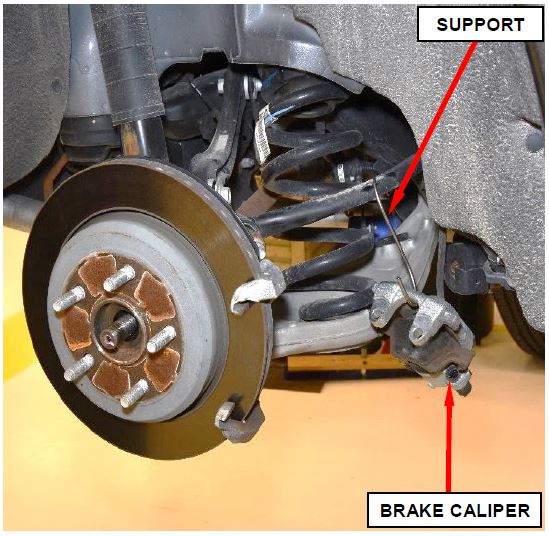
- Remove the brake caliper from the brake caliper adapter and support the brake caliper so that no weight is applied to the brake hose (Figure 4).
Figure 4 – Support Brake Caliper
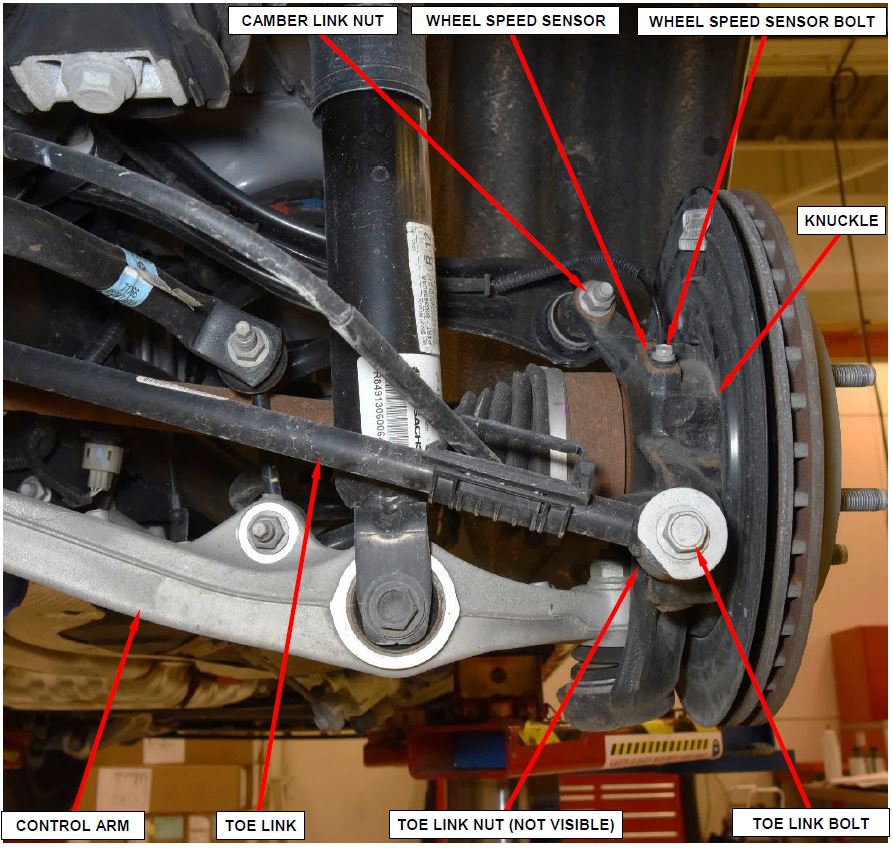
- Remove and save the wheel speed sensor bolt (Figure 5).
- Remove the wheel speed sensor from the knuckle (Figure 5).
- Remove the nut and bolt securing the toe link to the knuckle. Save the bolt and discard the nut (Figure 5).
Figure 5 – Rear Suspension Components and Wheel Speed Sensor
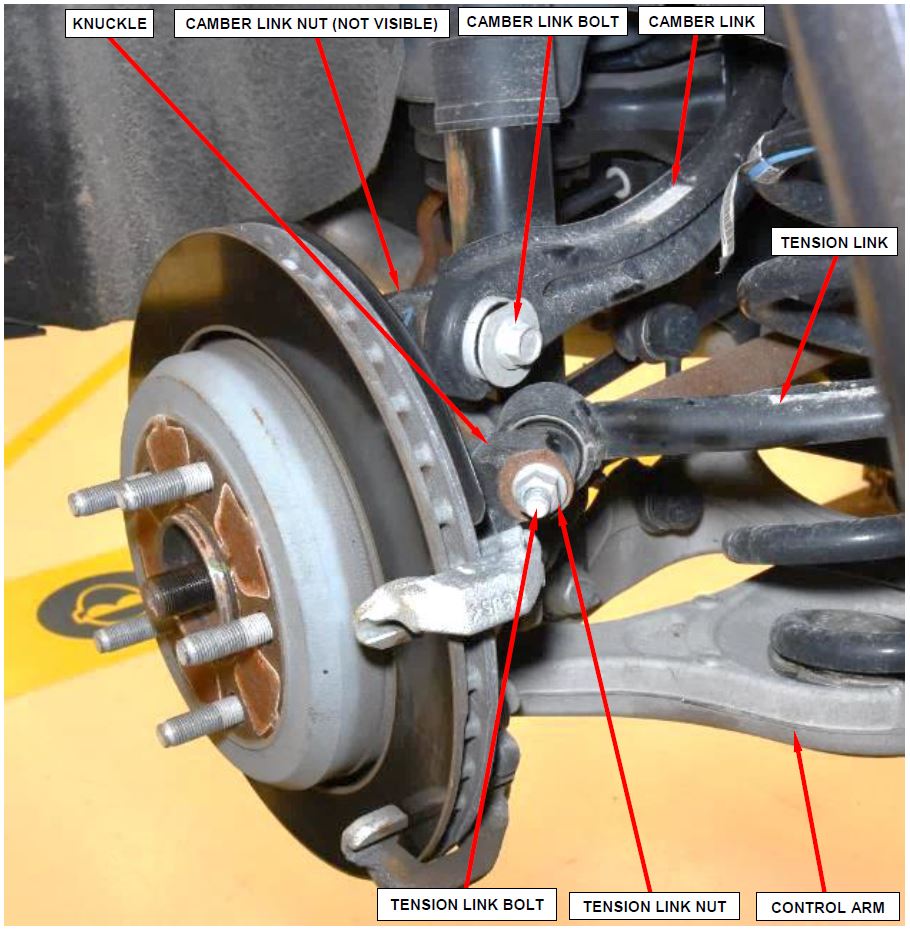
- Remove the tension link nut and bolt (Figure 6).
- Remove the camber link nut and bolt (Figure 6).
Figure 6 – Rear Suspension Components
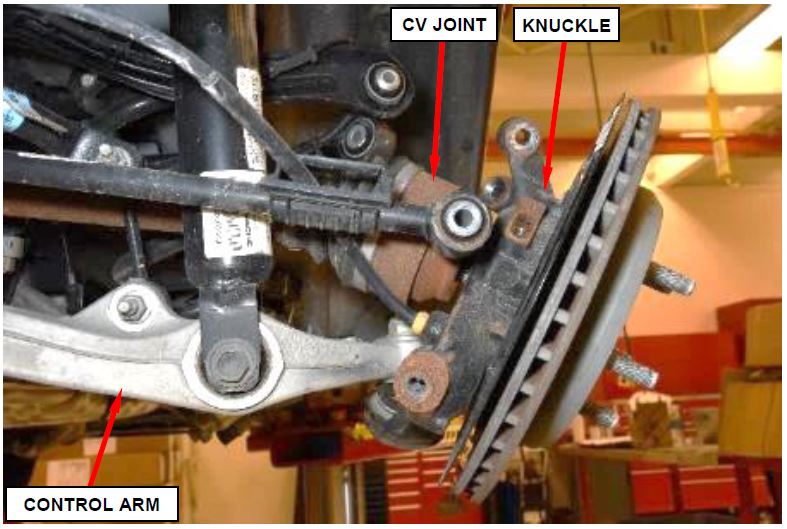
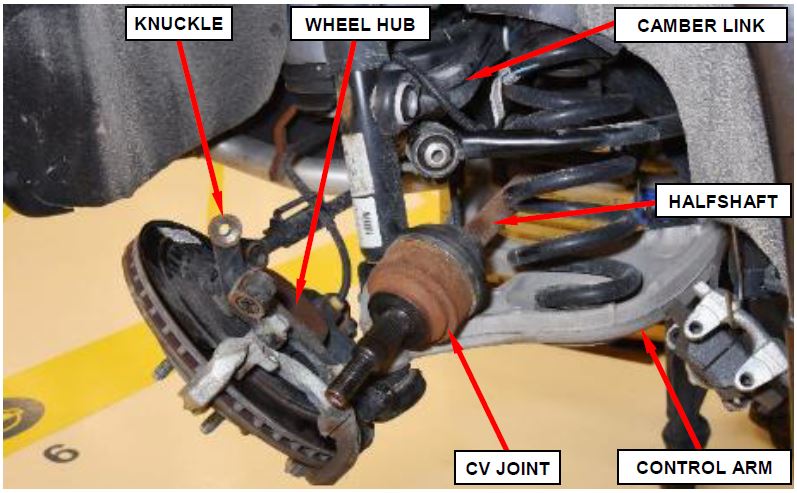
- Swing the rear knuckle outward as shown (Figure 7).
Figure 7 – Rear Knuckle
Figure 8 – Halfshaft Outer CV Joint
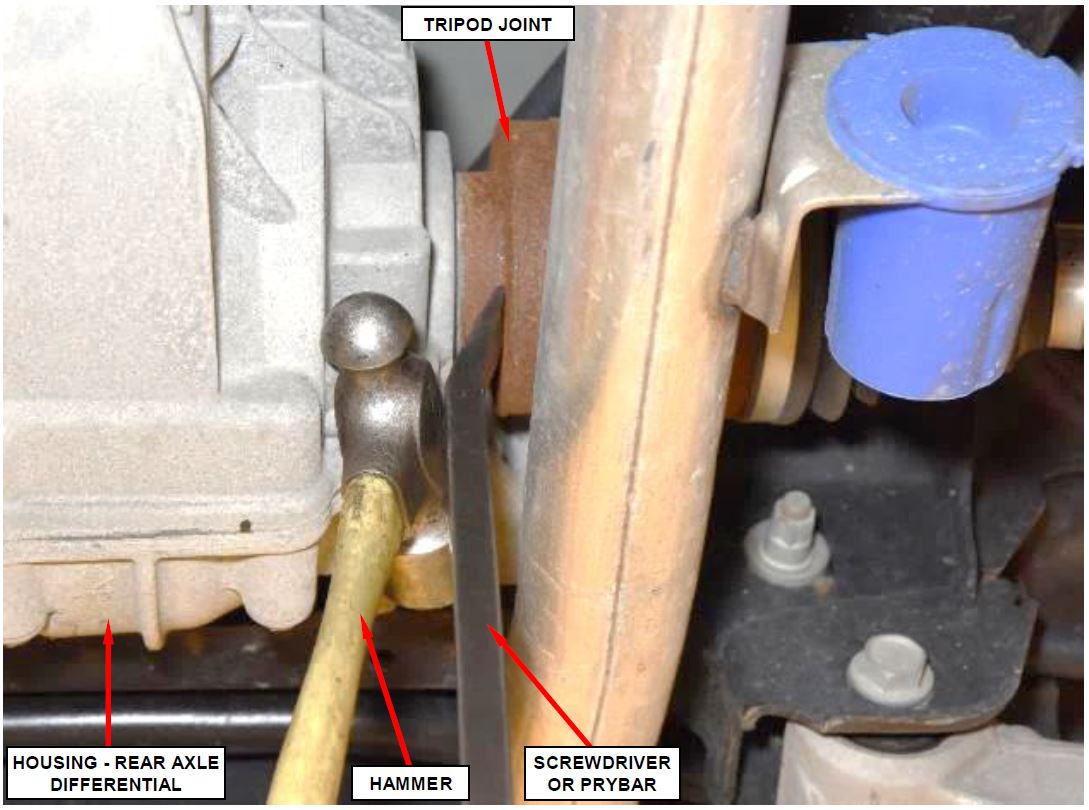
- Using a hammer or similar tool as a pivot point and a suitable screwdriver or prybar, carefully disengage the halfshaft inner tripod joint circlip from rear axle differential side gear (Figure 9).
- Carefully Remove the halfshaft tripod joint from the differential side gear. Use care to protect axle seal and journal.
NOTE: Never pull on the halfshaft, joint boot, or the outboard CV joint housing. Pull only from the inner tripod joint housing.
- Lift the camber link up to provide clearance from chassis components while navigating the halfshaft past the chassis components during halfshaft removal (Figure 8). Remove and discard the halfshaft.
Figure 9 – Halfshaft Inner Tripod Joint
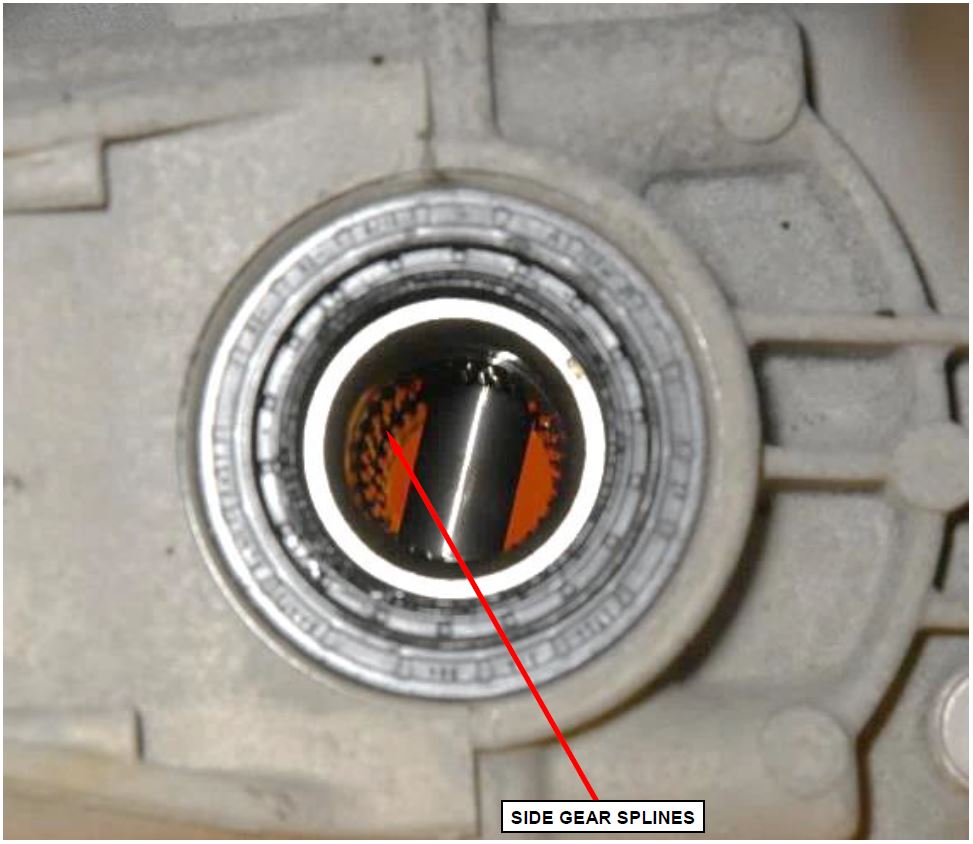
- Inspect the differential side gear splines for any damage that may have been caused by a halfshaft that disengaged from the differential side gear (Figure 10).
- No spline damage is observed, continue with Step 18 of Section Rear Axle Halfshaft Replacement.
- Yes, spline damage is observed, proceed now to Page 15, Section Differential Replacement to replace the rear axle differential before continuing with Step 18 of Section A. Rear Axle Halfshaft Replacement.
NOTE; Damage to the differential side gear splines is NOT anticipated for this campaign.
Figure 10 – Inspect Differential Side Gear Splines
- Lift the camber link up to provide clearance from chassis components while navigating the new halfshaft past the chassis components and into position (Figure 8).
CAUTION: Take care to not damage the halfshaft inner or outer boots while installing the new halfshaft.
CAUTION: Never handle the halfshaft assembly by the inner or outer boots. Doing so may cause the boot to pucker or crease, reducing the service life of the boot and joint. Avoid over angulating or stroking the C/V joints when handling the halfshaft.
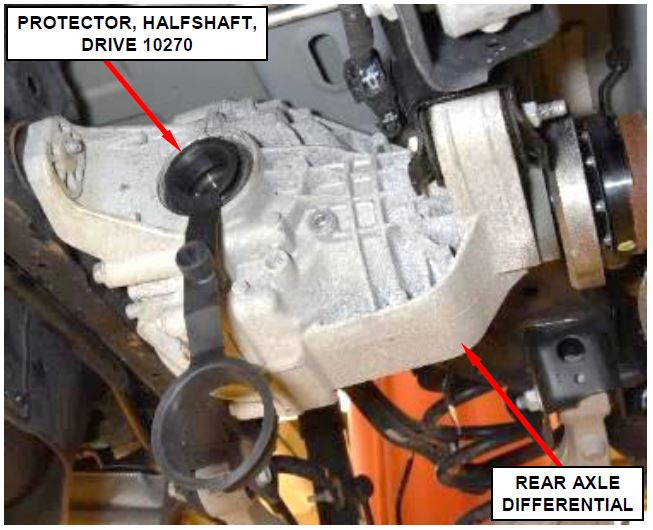
- Use Protector, Halfshaft, Drive 10270 to protect the axle seal while installing the halfshaft to the rear axle differential (Figure 11).
- Install the halfshaft inner tripod joint into the differential while lightly twisting until the halfshaft tripod joint slides all the way into the differential and the tripod joint circlip engages with the differential side gear.
Figure 11 – Protector, Halfshaft, Drive 10270
NOTE: If the circlip is fully engaged, the tripod joint will not be removable from differential by hand. Never pull on the halfshaft or outer CV joint.
- Carefully remove the seal protector to prevent damaging the seal (Figure 11).
NOTE: Use care when removing seal protector to prevent damaging the seal.
- Position the halfshaft outer CV joint end into the wheel hub (Figure 7).
- Swing the rear knuckle into position.
- Install the camber link to the knuckle using the saved bolt and a new Do not tighten the camber link fasteners at this time (Figure 6).
- Install the tension link to the knuckle using the saved bolt and a new Do not tighten the tension link fasteners at this time (Figure 6).
- Install the toe link to the knuckle using the saved bolt and a new Do not tighten the toe link fasteners at this time (Figure 5).
- Using an appropriate jack stand, raise the rear suspension assembly to curb height prior to tightening the suspension link to knuckle fasteners.
- Tighten the camber link fasteners to 110 N·m (81 Ft. Lbs.) (Figure 6).
- Tighten the tension link fasteners to 108 N·m (79 Ft. Lbs.) (Figure 6).
- Tighten the toe link fasteners to 108 N·m (79 Ft. Lbs.) (Figure 5).
- Remove the jack stand from under the rear suspension assembly.
- Install the wheel speed sensor to the knuckle (Figure 5).
- Install the wheel speed sensor bolt and tighten the bolt to 10.7 N·m (95 In. Lbs.) (Figure 5).
- Install the brake caliper to the brake caliper adapter.
CAUTION: Verify that the brake hose is not twisted or kinked.
- Tighten the brake caliper slide bolts (guide pins) to 27.5 N·m (20 ft. lbs.) (Figure 3).
- Install the rear brake caliper slide bolt (guide pin) dust shields (Figure 2).
- Install the brake caliper tension clip to the brake caliper (Figure 1).
- Pump brake pedal until caliper pistons and brake pads are seated and a firm brake pedal is obtained.
- Install a new axle nut and while a helper applies the brakes to keep the hub from rotating. Tighten the nut to 310 N·m (229 Ft. Lbs.) (Figure 1).
NOTE: Always install a new axle nut. The original axle nut is one-time use only and should be discarded when removed.
- Install the rear wheel and tire assemblies.
- Remove supports and lower vehicle.
- Tighten the wheel lug nuts to 176 N·m (130 Ft. Lbs.).
- Return the vehicle to the customer.
B. Differential Replacement
NOTE; Damage to the differential side gear splines is NOT anticipated for this campaign. Do not replace the rear axle differential unless differential side gear splines are damaged due to a halfshaft that disengaged from the differential side gear
- Place the transmission in Neutral position in order to allow rotation of the drive shaft.
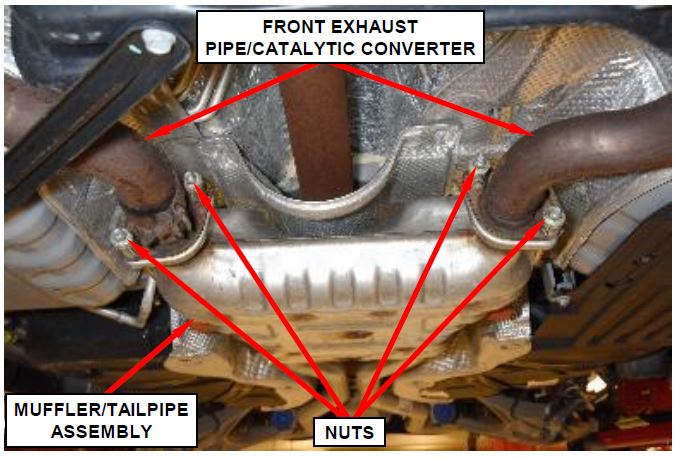
- Saturate the nuts with heat valve lubricant (Figure 12).
- Remove and save the front exhaust pipe/catalytic converter to muffler/tailpipe assembly flange nuts (Figure 12).
Figure 12 – Exhaust System Flange Nuts
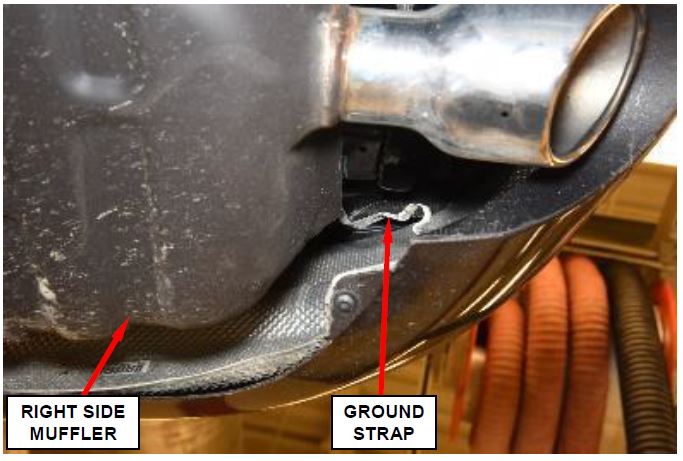
Figure 13 – Exhaust System Ground Strap
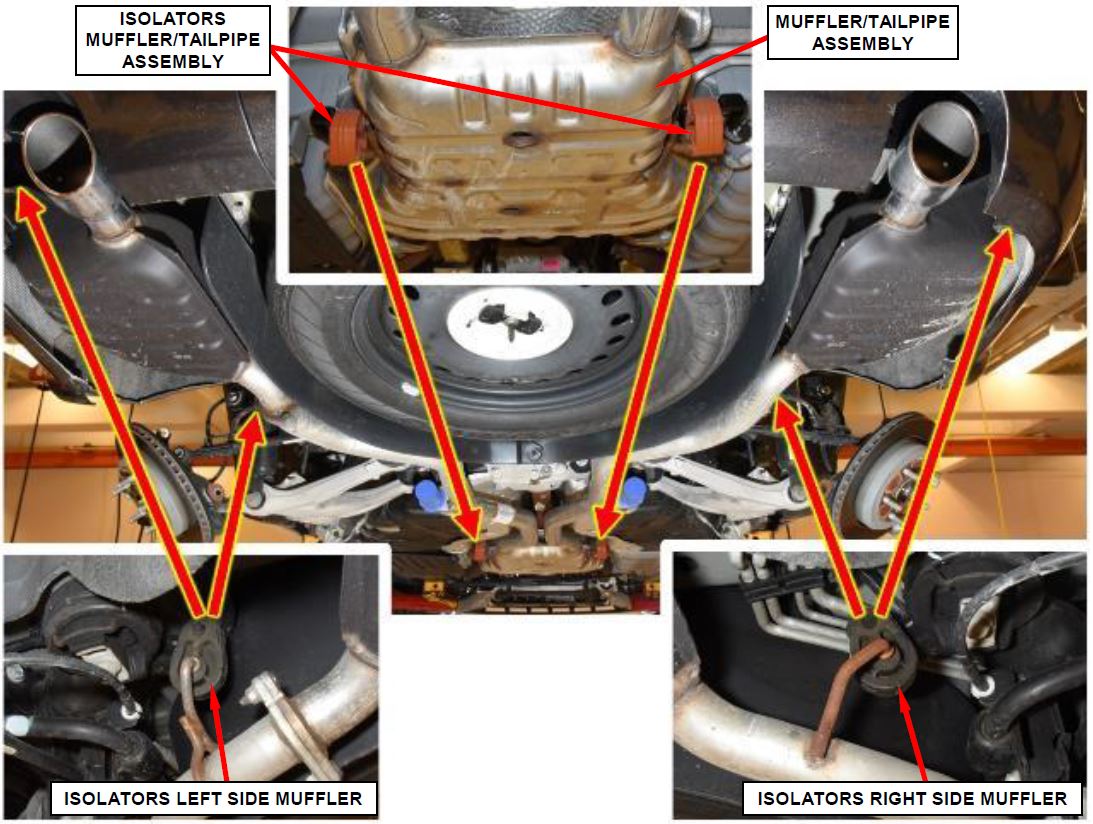
NOTE: Tailpipe/muffler assembly removal is a two-man operation. Never allow the muffler to hang from the isolators. A helper is required so no damage will come to the isolators or to the tailpipe/muffler assembly.
- Disconnect the isolators from the tailpipe/muffler assembly (Figure 14).
- Remove and save the muffler/tailpipe assembly.
Figure 14 – Exhaust System Isolator Locations
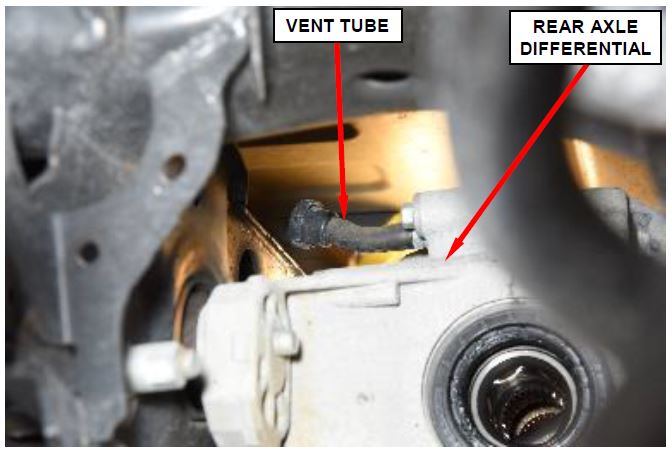
CAUTION: Remove axle vent tube prior to removing axle. Failure to remove vent tube will allow axle fluid to saturate the vent and cause reduced or improper axle venting resulting in axle damage.
- Remove rear axle differential vent tube (Figure 15).
Figure 15 – Rear Axle Vent Tube
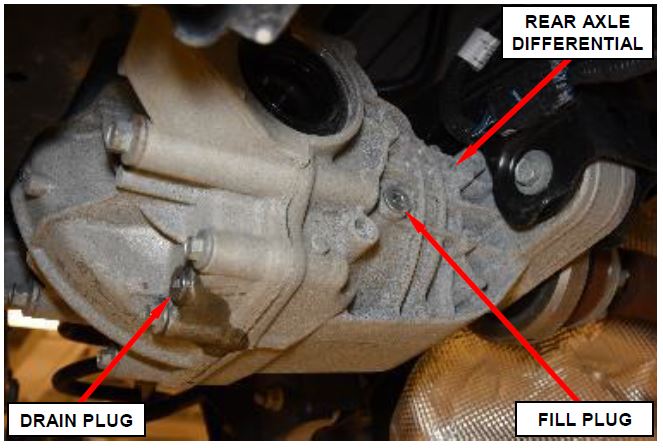
- Remove the axle fluid drain plug and drain the rear axle fluid into a suitable waste oil container (Figure 16).
- Install the axle fluid drain plug and tighten to prevent leakage (Figure 16).
Figure 16 – Drain Plugs
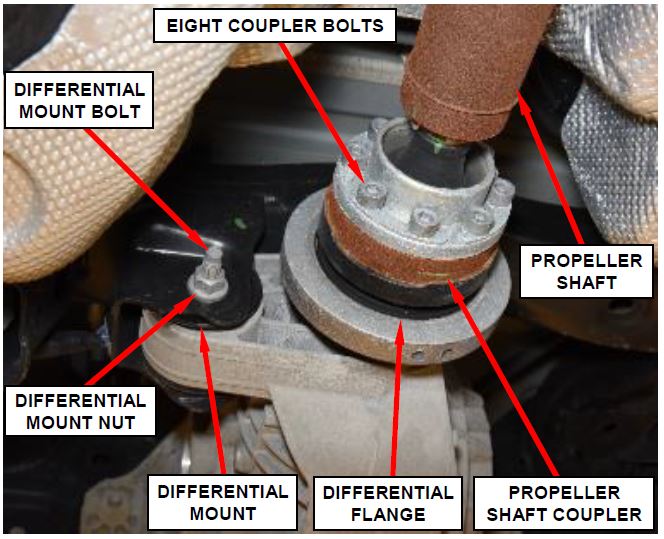
- Remove and discard the eight bolts securing the propeller shaft coupler to the differential flange (Figure 17).
- Position and secure a transmission jack to the rear axle differential.
- Remove and discard the bolt and nut from the rear axle differential mount (Figure 17).
Figure 17 – Propeller Shaft and Differential Mount
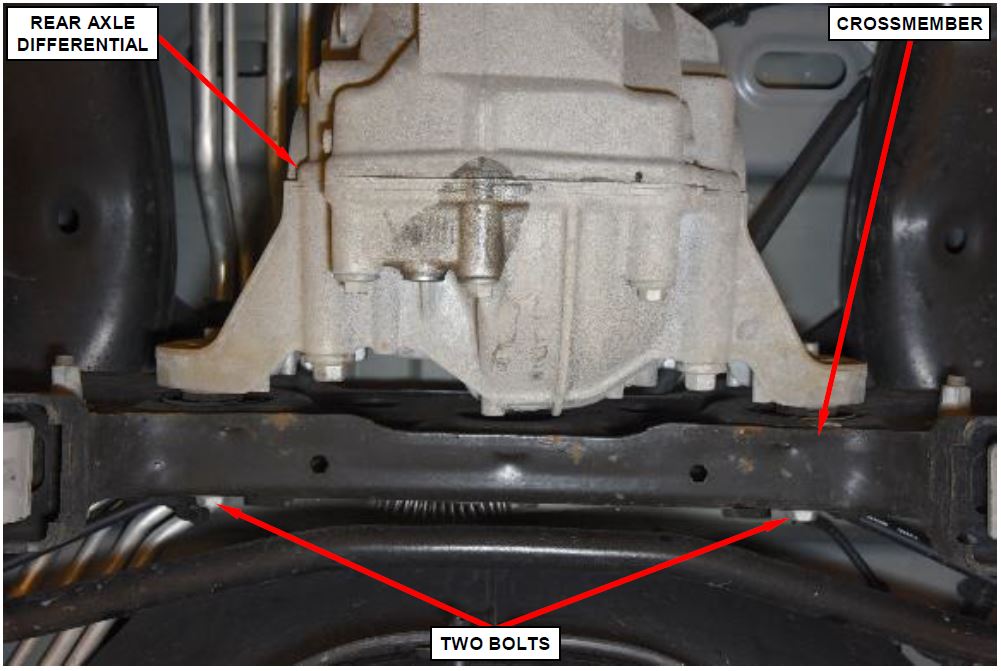
- Remove and discard the two bolts securing the rear axle differential to the crossmember (Figure 18).
Figure 18 – Rear Axle Differential-To-Crossmember Bolts
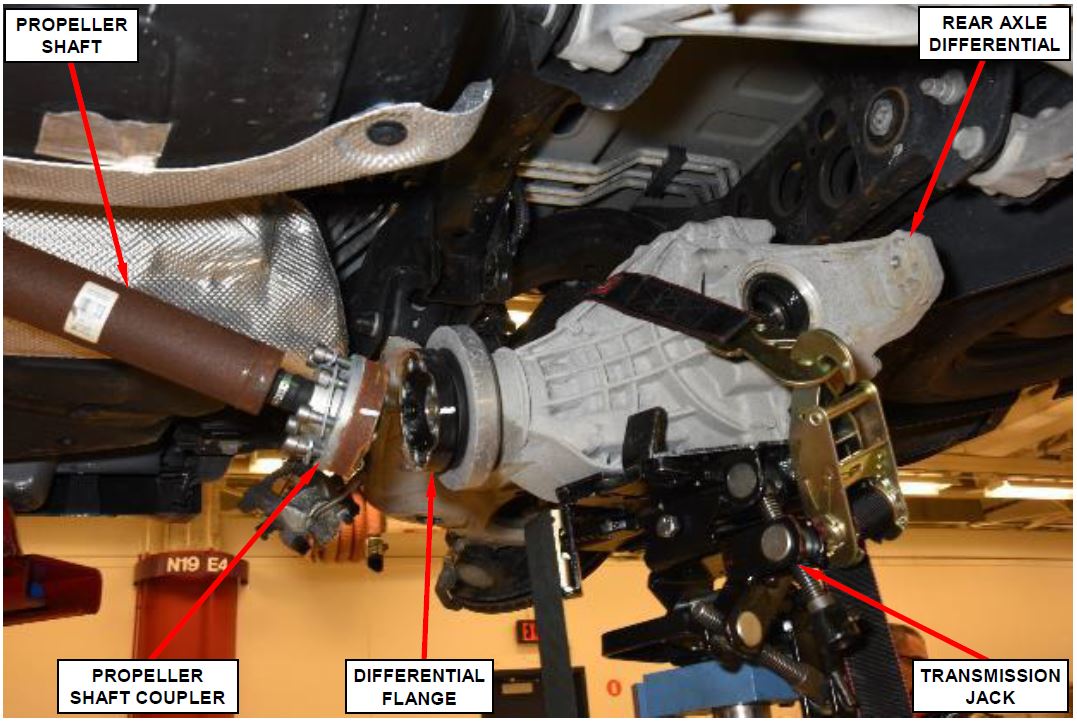
- Carefully lower rear axle differential. While lowering the differential, separate the propeller shaft from differential and support the propeller shaft with a suitable rope or wire (Figure 19).
- Remove the rear axle differential assembly from the transmission jack and transfer to a bench.
Figure 19 – Rear Axle Differential
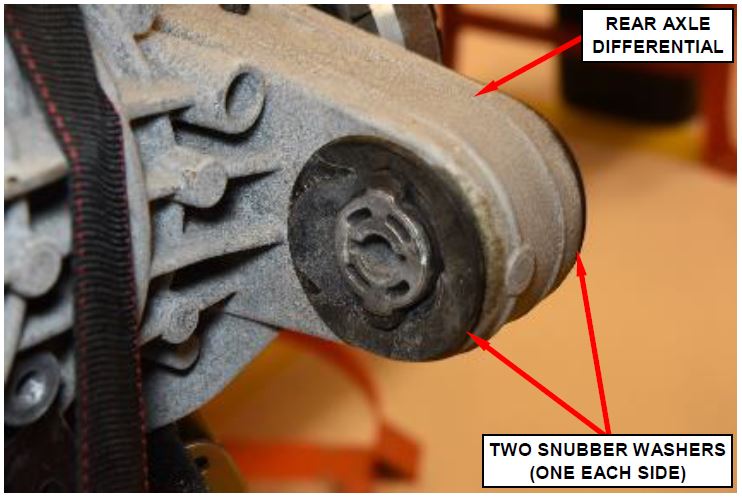
- Remove and save the two rubber snubber washers from the differential mount (Figure 20).
- Secure the new rear axle differential in a suitable holding fixture to prepare for mount installation.
Figure 20 – Snubber Washers
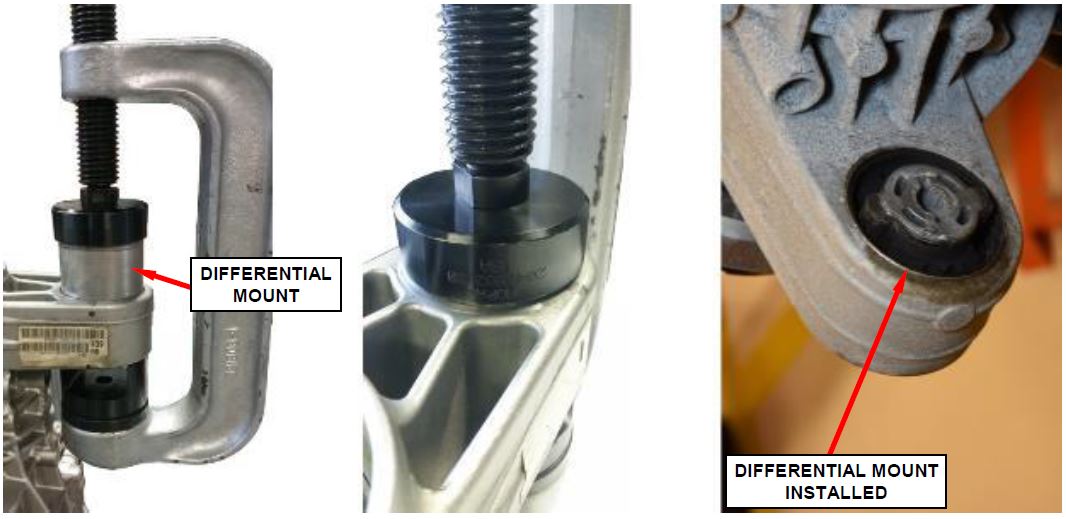
- Install the new differential mount in the new rear axle differential housing using; Ball Joint Press C-4212F, Center Screw Pin Adapter C-4212-7, Ball Joint Press Adapter C4212-6, Large Bushing Remover 2046502130 and Small Bushing Installer 2046507130 (Figure 21).
Figure 21 – Rear Axle Differential Mount Installation
- Install the rubber snubber washers to the differential mount (Figure 20).
- Position and secure the new rear axle differential onto the transmission jack (Figure 19).
- Attach the propeller shaft to the differential while raising the differential into position (Figure 19).
- Install the new bolts securing the rear axle differential to the crossmember. Tighten the bolts to 135 N·m (100 ft. lbs.) (Figure 18).
- Install the new bolt and new nut securing the rear axle differential forward mount to the vehicle frame. Tighten the bolt and nut to 135 N·m (100 ft. lbs.) (Figure 17).
- Remove the transmission support from under the rear axle differential.
- Install the new propeller shaft to the differential flange bolts. Tighten the bolts in a star pattern to 55 N·m (41 ft. lbs.) (Figure 17).
- Remove the axle fluid fill plug and fill rear axle differential to the bottom of the fill hole (Figure 16).
- Install axle fluid fill plug and tighten to 35 N·m (26 ft lbs) (Figure 16).
- Install the axle vent tube (Figure 15).
NOTE: Tailpipe/muffler assembly installation is a two-man operation. Never allow the muffler to hang from the isolators. A helper is required so no damage will come to the isolators or to the tailpipe/muffler assembly
- Position the muffler and tailpipe assembly to the vehicle.
- Connect the isolators to the tailpipe/muffler assembly (Figure 14).
- Connect the exhaust system ground strap to the right-side muffler (Figure 13).
- Install the front exhaust pipe/catalytic converter to muffler/tailpipe assembly flange nuts. Tighten the nuts to 47 N·m (35 ft. lbs.) (Figure 12).
- Place the transmission into the Park position.
- Return now to Page 12, Step 18, of Section Rear Axle Halfshaft Replacement.
Completion Reporting and Reimbursement
Claims for vehicles that have been serviced must be submitted on the DealerCONNECT Claim Entry Screen located on the Service tab. Claims paid will be used by FCA to record recall service completions and provide dealer payments.
Use one of the following labor operation numbers and time allowances:
| Labor Operation Number | Time Allowance | |
|---|---|---|
| Replace Both Rear Halfshafts | 03-T5-51-82 | 1.3 hours |
| Replace Both Rear Halfshafts And Differential | 03-T5-51-83 | 3.1 hours |
Add the cost of the recall parts package plus applicable dealer allowance to your claim.
NOTE: See the Warranty Administration Manual, Recall Claim Processing Section, for complete recall claim processing instructions.
Dealer Notification
To view this notification on DealerCONNECT, select “Global Recall System” on the Service tab, then click on the description of this notification.
Owner Notification and Service Scheduling
All involved vehicle owners known to FCA are being notified of the service requirement by first class mail. They are requested to schedule appointments for this service with their dealers. A generic copy of the owner letter is attached.
Vehicle Lists, Global Recall System, VIP and Dealer Follow Up
All involved vehicles have been entered into the DealerCONNECT Global Recall System (GRS) and Vehicle Information Plus (VIP) for dealer inquiry as needed.
GRS provides involved dealers with an updated VIN list of their incomplete vehicles. The owner’s name, address and phone number are listed if known. Completed vehicles are removed from GRS within several days of repair claim submission.
To use this system, click on the “Service” tab and then click on “Global Recall System.” Your dealer’s VIN list for each recall displayed can be sorted by: those vehicles that were unsold at recall launch, those with a phone number, city, zip code, or VIN sequence.
Dealers must perform this repair on all unsold vehicles before retail delivery. Dealers should also use the VIN list to follow up with all owners to schedule appointments for this repair.
Recall VIN lists may contain confidential, restricted owner name and address information that was obtained from the Department of Motor Vehicles of various states. Use of this information is permitted for this recall only and is strictly prohibited from all other use.
Additional Information
If you have any questions or need assistance in completing this action, please contact your Service and Parts District Manager.
Customer Services / Field Operations
FCA US LLC
This notice applies to your vehicle,
[Model Year and Model]
VIN XXXXXXXXXXXXXXXXX
T55/NHTSA 17V-541
LOGO
VEHICLE PICTURE
YOUR SCHEDULING OPTIONS
- RECOMMENDED OPTION Call your authorized Chrysler
 / Dodge
 / Jeep
 ® / RAM
 Dealership
 - Call the FCA Recall Assistance Center at 1-800-853-1403. An agent can confirm part availability and help schedule an appointment
- Visit our Recall Website, mopar.com or scan below.
QR Code
You can find your nearest dealer and review all your scheduling options from this website. You will be asked to provide your Vehicle Identification Number (VIN) to protect and verify your identity. The last eight characters of your VIN are provided above.
DEALERSHIP INSTRUCTIONS
Please reference Safety Recall T55.
IMPORTANT SAFETY RECALL
Dear [Name],
This notice is sent to you in accordance with the National Traffic and Motor Vehicle Safety Act.
FCA has decided that a defect, which relates to motor vehicle safety, exists in certain [2017 Model Year Dodge Durango] vehicles equipped with rear wheel drive (RWD) 4X2 and 230MM rear axle (sales code DR1).
WHY DOES MY VEHICLE NEED REPAIRS?
The rear axle halfshafts on your vehicle [1] may be too short for the intended application. A halfshaft that is too short could disengage from the rear axle differential. If a rear axle half shaft disengages from the rear axle differential, your vehicle may experience an unexpected loss of motive power. This can cause a vehicle crash without prior warning.
NOTE: To prevent any unintended vehicle movement, always fully apply the parking brake before exiting the vehicle. If the vehicle is parked without using the parking brake, the vehicle may roll, despite being in ‘Park.’
HOW DO I RESOLVE THIS IMPORTANT SAFETY ISSUE?
FCA will repair your vehicle [2] free of charge (parts and labor). To do this, your dealer will replace the rear axle half shafts. A limited number of vehicles may also require rear axle differential replacement if differential spline damage is determined. In addition, your dealer will require your vehicle for proper check-in, preparation, and check-out during your visit. Your time is important to us; please be aware that these steps may require more time. The estimated repair time is two hours. We recommend that you schedule a service appointment to minimize your inconvenience. Please bring this letter with you to your dealership.
TO SCHEDULE YOUR FREE REPAIR CALL 1-800-853-1403
OR YOUR CHRYSLER, DODGE, JEEP OR RAM
 DEALER TODAY
WHAT IF I ALREADY PAID TO HAVE THIS REPAIR COMPLETED?
If you have already experienced this specific condition and have paid to have it repaired, you may visit www.fcarecallreimbursement.com to submit your reimbursement request online. [3] Once we receive and verify the required documents, reimbursement will be sent to you within 60 days. If you have had previous repairs performed and/or already received reimbursement, you may still need to have the recall repair performed.
We apologize for any inconvenience, but are sincerely concerned about your safety. Thank you for your attention to this important matter.
Customer Assistance/Field Operations
Fiat Chrysler Automobiles US LLC
Mr. Mrs. Customer
1234 Main Street
Hometown, MI 48371
- If you no longer own this vehicle, please help us update our records. Call the FCA Recall Assistance Center at 1-800-853-1403 to update your information.
- If your dealer fails or is unable to remedy this defect without charge and within a reasonable time, you may submit a written complaint to the Administrator, National Highway Traffic Safety Administration, 1200 New Jersey Ave., S.E., Washington, DC 20590, or you can call the toll-free Vehicle Safety Hotline at 1-888-327-4236 (TTY 1-800-424-9153), or go to safercar.gov.
- You can also mail in your original receipts and proof of payment to the following address for reimbursement consideration: FCA Customer Assistance, P.O. Box 218004, Auburn Hills, MI 48321-8007, Attention: Recall Reimbursement.
Note to lessors receiving this recall notice: Federal regulation requires that you forward this recall notice to the lessee within 10 days.
 Loading...
 Loading...
 Loading...
 Loading...
