| “This site contains affiliate links for which OEMDTC may be compensated” |
NUMBER: 08-064-15
GROUP: Electrical
DATE: June 20, 2015
THIS SERVICE BULLETIN IS ALSO BEING RELEASED AS RAPID RESPONSE TRANSMITTAL (RRT) 15-070. ALL APPLICABLE SOLD AND UN-SOLD RRT VIN’s HAVE BEEN LOADED. TO VERIFY THAT THIS RRT SERVICE ACTION IS APPLICABLE TO THE VEHICLE, USE VIP OR PERFORM A VIN SEARCH IN TECHCONNECT. ALL REPAIRS ARE REIMBURSABLE WITHIN THE PROVISIONS OF WARRANTY.
SUBJECT:
Roof Clearance Lamp Has Moisture Inside
OVERVIEW:
This bulletin involves inspecting the cab roof clearance lamps for moisture inside the lamp.
MODELS:
| 2015 | (VF) | Ram Pro Master Pro Master(NAFTA And Latin America) |
NOTE: This bulletin applies to vehicles built on or after July 1, 2013 (MDH 0701XX) and on or before December 2, 2014 (MDH 1202XX) equipped with the Cab Roof Clearance Lamps (sales code LNC).
SYMPTOM/CONDITION:
The customer may describe moisture inside the front cab roof clearance lamp.
DIAGNOSIS:
If a customer’s VIN is listed in VIP or your RRT VIN list, perform the repair. For all other customers that describe the symptom/condition listed above, perform the Repair Procedure.
PARTS REQUIRED:
| Qty. | Part No. | Description |
|---|---|---|
| 1-5 (AR) | 68232472AB | Lamp Assy- Cab Roof Clearance & Identification / Short Harness. (H1 Low Roof) |
| 1-5 (AR) | 68232473AB | Lamp Assy- Cab Roof Clearance & Identification / Long Harness. (H2 High Roof) |
| 6 (AR) | 68073253AA | PIN, Headliner Attach (H2 High Roof) |
| 3 (AR) | 06107027AA | PUSH PIN, Absorber Attach (H2 High Roof) |
INSPECTION PROCESS:
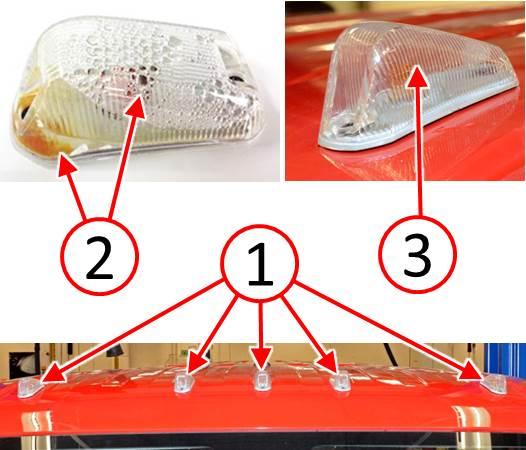
- Visually inspect all five front cab roof clearance lamps (1) for any signs of moisture (2) inside, lamps should be dry (3) inside (Fig. 1).
- Was moisture found in any of the five front cab roof clearance lamps?
- YES >>> Continue to Step #3.
- NO >>> This Bulletin does not apply, use LOP (08-50-80-91) to close the active RRT.
Fig. 1 Inspect Front Cab Roof Clearance Lamps For Moisture
1 – Front Roof Clearance Lamps
2 – Signs Of Moisture Inside
3 – Dry Inside
- Is the vehicle an H1 Low Roof or H2 High Roof body type?
- H1 Low Roof >>> Proceed to REPAIR PROCEDURE – H1 LOW ROOF – LAMP REPLACEMENT: Step #1.
- H2 High Roof >>> Continue with Step #4.
NOTE: Step #4 applies to H2 High Roof vehicles only.
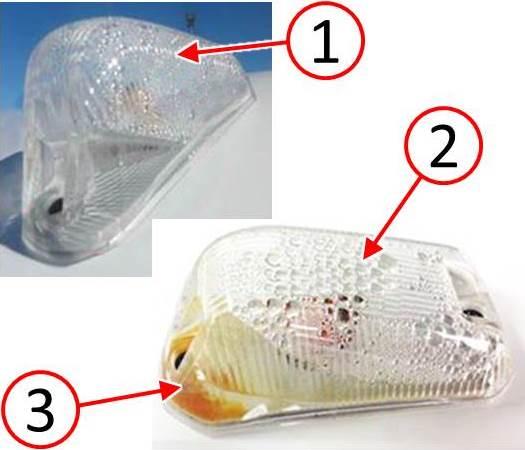
- As shown in (Fig. 2), note the observed moisture level in any of the front cab clearance lamps; (1) a light foggy mist with no large water droplets, (2) large water droplets, (3) water accumulation and/or discoloration. Also inspect if any of the lamps fail to illuminate when lamps are turned on.
- Choose the condition (a. or b.) that best represents the front cab roof clearance lamps moisture level as observed in Step #4.
- If all five roof clearance lamps illuminate when turned on and none of the lampshave more than a light foggy mist with no large water droplets (1) as shown in ( 2). Proceed to REPAIR PROCEDURE – H2 HIGH ROOF – LAMP LENS ONLY REPLACEMENT: Step #1.
- If any of the five roof clearance lamps fail to illuminate, and/or contain large water droplets (2) and/or water accumulation and/or discoloration (3) as shown in (Fig. 2). Proceed to REPAIR PROCEDURE – H2 HIGH ROOF – LAMP LENS AND HARNESS REPLACEMENT: Step #1.
Fig. 2 Moisture Condition Examples
1 – Light Foggy Mist With No Large Water Droplets
2 – Large Water Droplets
3 – Water Accumulation And/Or Discoloration
REPAIR PROCEDURE – H1 LOW ROOF – LAMP REPLACEMENT:
NOTE: Perform the H1 Low Roof – Lamp Replacement procedure ONLY if the vehicle is the H1 Low Roof body type.
NOTE: ONLY lamps showing signs of moisture must be replaced. If lamp is dry and illuminates when turned on, do not replace.
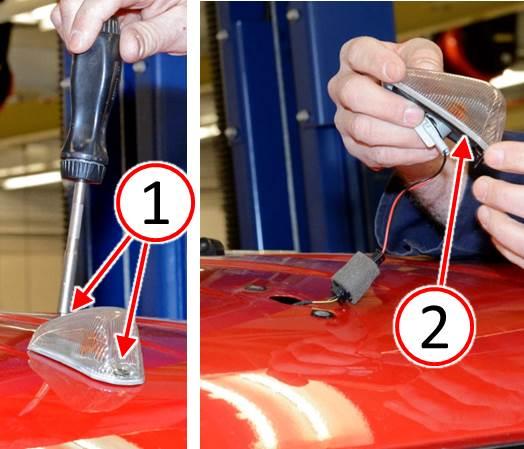
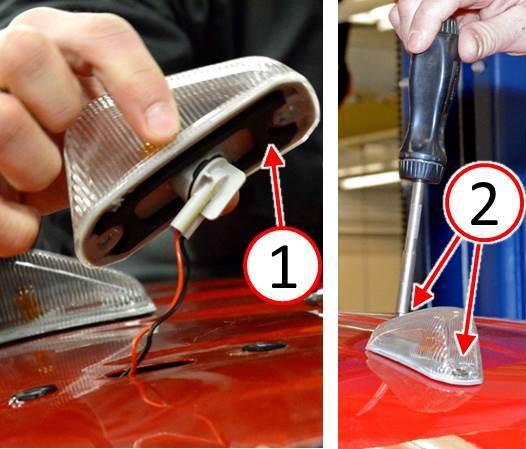
- Remove the screws (1) from the roof clearance lamp (Fig. 3). 2. Remove the roof clearance lamp (2) from the vehicle (Fig. 3).
Fig. 3 Remove Roof Clearance Lamp
1 – Roof Clearance Lamp Screws
2 – Roof Clearance Lamp
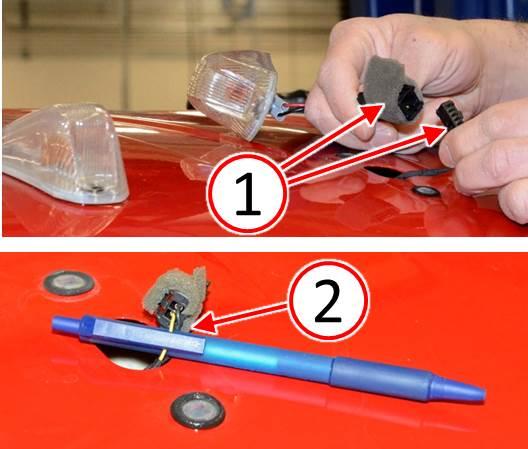
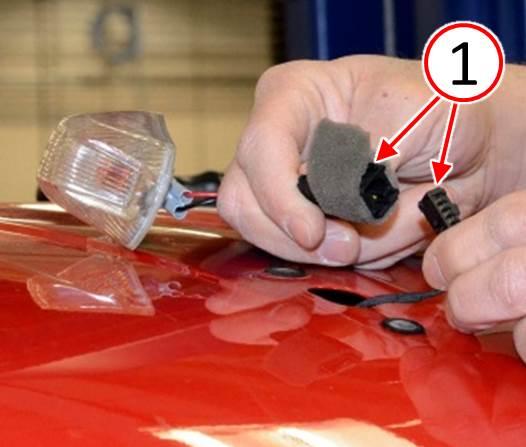
- Disconnect the electrical harness (1) from the roof clearance lamp and discard the lamp (Fig. 4).
- Using a plastic ink pen (2) or equivalent non-metallic object, temporally secure the wire harness connector to prevent it from falling into the roof opening while replacing the lamp assembly (Fig. 4).
Fig. 4 Disconnect Roof Clearance Lamp
1 – Roof Clearance Lamp Electrical Harness
2 – Plastic Ink Pen Or Equivalent
- Connect the electrical harness (1) to the NEW roof clearance lamp (Fig. 5).
Fig. 5 Connect Roof Clearance Lamp
1 – Roof Clearance Lamp Electrical Harness
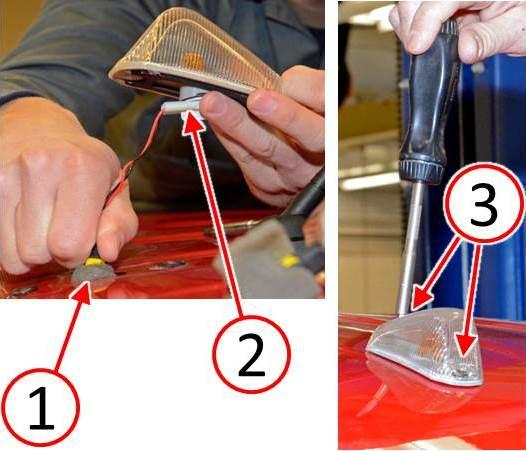
- Feed the electrical harness (1) into the roof opening (Fig. 6).
- Install the roof clearance lamp (2) to the vehicle (Fig. 6).
- Install the roof clearance lamp screws (3) and tighten to 2 N·m (18 in. lbs.) (Fig. 6).
Fig. 6 Install Roof Clearance Lamp
1 – Roof Clearance Lamp Electrical Harness
2 – Roof Clearance Lamp
3 – Roof Clearance Lamp Screws
- Repeat the H1 Low Roof – Lamp Replacement process for any front cab roof clearance lamps that show signs of moisture.
- Test the front clearance lamps to ensure that all five lamps illuminate when lamps areturned on.
- The H1 Low Roof front clearance lamp replacement process has been completed. Use LOP (08-50-80-92) to close the active RRT.
REPAIR PROCEDURE – H2 HIGH ROOF – LAMP LENS ONLY REPLACEMENT:
NOTE: Perform the H2 High Roof – Lamp Lens Only Replacement procedure ONLY if the vehicle is the H2 High Roof body type and the lamp bulb/socket is functioning properly with absolutely NO signs of water contamination/damage.
NOTE: ONLY lamps showing signs of moisture must be replaced. If lamp is dry and illuminates when turned on, do not replace.
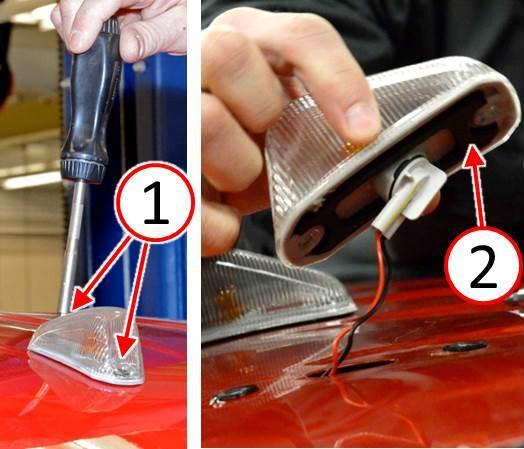
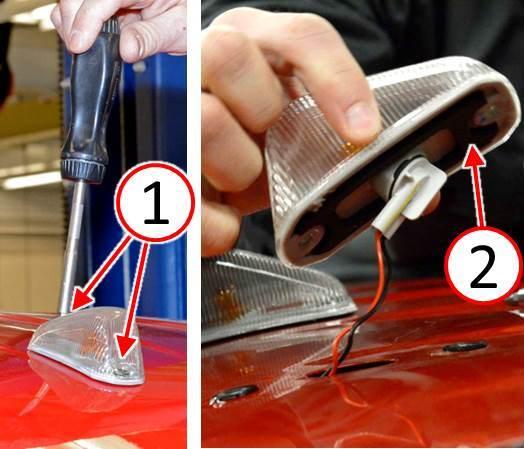
- Remove the screws (1) from the roof clearance lamp (Fig. 7).
- Lift up the roof clearance lamp (2) from the vehicle (Fig. 7).
Fig. 7 Remove Roof Clearance Lamp
1 – Roof Clearance Lamp Screws
2 – Roof Clearance Lamp
NOTE: Do Not touch the lamp bulb. Touching the bulb may cause contamination resulting in early lamp failure. Bulb may also be hot.
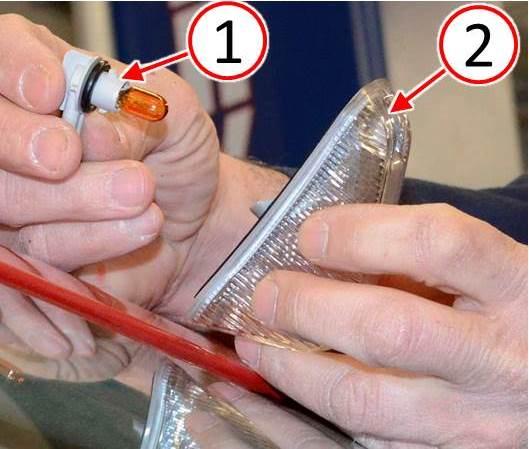
- Rotate the lamp bulb socket (1) 1/4 turn counter-clockwise then remove the bulb socket (1) from the lamp lens (2) (Fig. 8).
- Discard the lamp lens (2) (Fig. 8).
- Inspect the bulb and socket for any signs of moisture contamination.
- Are any signs of moisture contamination visible on bulb or socket?
- YES >>> STOP, do not continue lens only replacement process. Proceed directly to H2 HIGH ROOF – LAMP LENS AND HARNESS REPLACEMENT: Step #1.
- NO >>> Continue with the repair process Step #7.
- Remove and discard the bulb socket from a NEW lamp assembly.
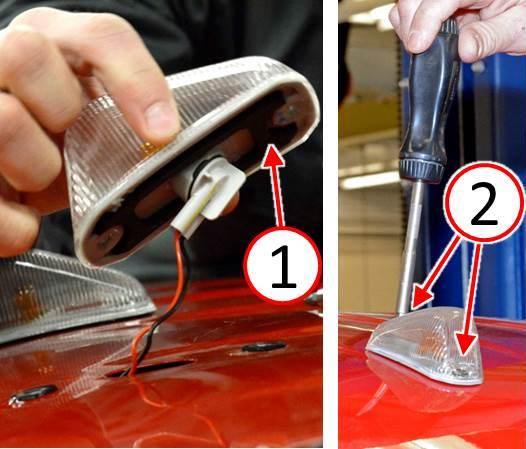
- Install the lamp bulb socket (1) on the vehicle roof to the NEW lamp lens (2) and rotate the bulb socket 1/4 turn clockwise to secure the bulb socket to the lens (Fig. 8).
Fig. 8 Replace Roof Clearance Lamp Lens
1 – Roof Clearance Lamp Bulb Socket
2 – Roof Clearance Lamp Lens
- Install the roof clearance lamp (1) to the vehicle (Fig. 9).
- Install the roof clearance lamp screws (2) and tighten to 2 N·m (18 in. lbs.) (Fig. 9).
Fig. 9 Install Roof Clearance Lamp
1 – Roof Clearance Lamp
2 – Roof Clearance Lamp Screws
- Repeat the H2 High Roof – Lamp Lens Only Replacement process for any front cab roof clearance lamps that show signs of moisture.
- Test the front clearance lamps to ensure that all five lamps illuminate when lamps areturned on.
- The H2 High Roof front clearance lamp lens replacement process has beencompleted. Use LOP (08-50-80-93) to close the active RRT.
REPAIR PROCEDURE – H2 HIGH ROOF – LAMP LENS AND HARNESS REPLACEMENT:
NOTE: Perform the H2 High Roof – Lamp Lens Only Replacement procedure ONLY if the vehicle is the H2 High Roof body type and lamp bulb/socket shows any signs of water contamination/damage.
NOTE: ONLY lamps showing signs of moisture must be replaced. If lamp is dry and illuminates when turned on, do not replace.
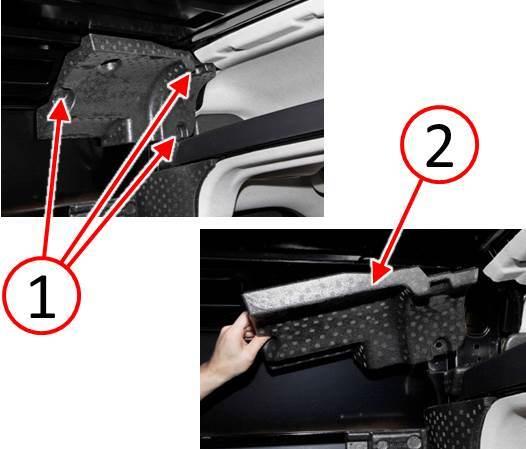
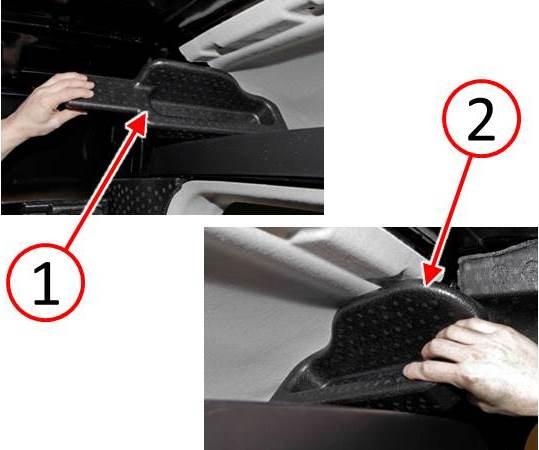
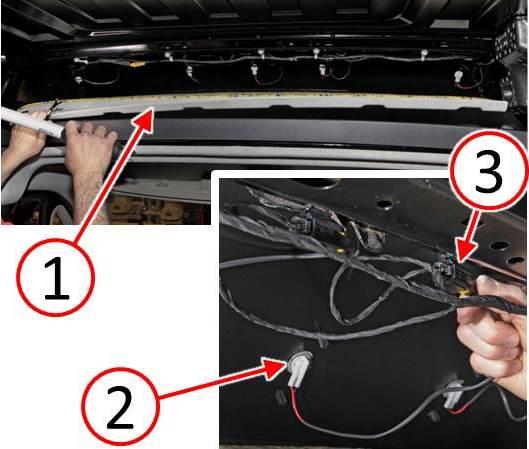
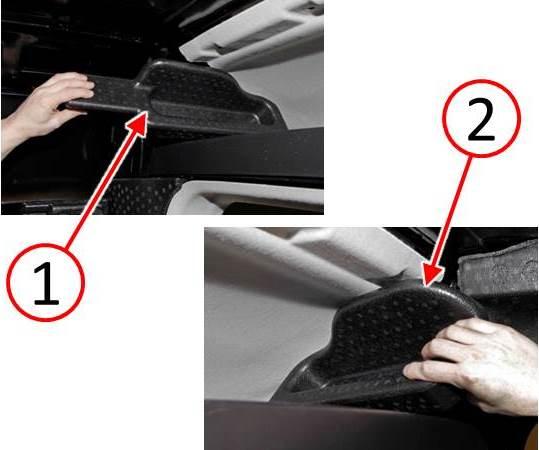
- Remove the push pins (1) from the left side roof absorber (Fig. 10).
- Remove the left side roof absorber (2) from the vehicle (Fig. 10).
Fig. 10 Remove Roof Absorber
1 – Push Pins
2 – Roof Absorber
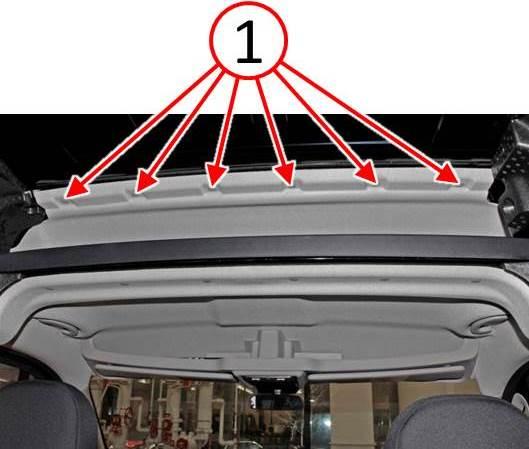
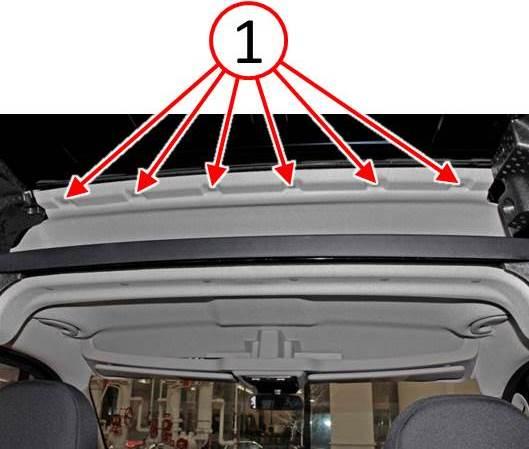
- Remove the push pins (1) from the upper compartment roof liner (Fig. 11).
Fig. 11 Remove Push Pins From Upper Compartment Roof Liner
1 – Push Pins
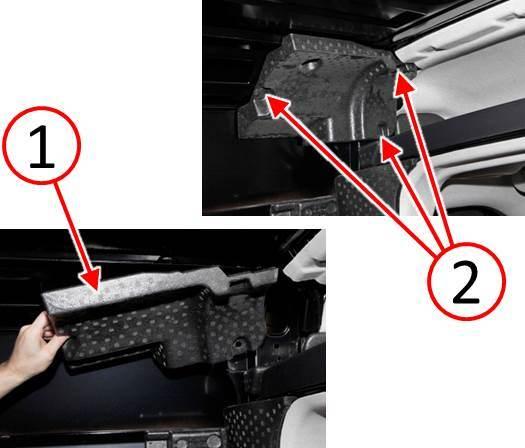
- Remove the left side roof absorber (1) from the upper compartment (Fig. 12).
- Remove the right side roof absorber (2) from the upper compartment (Fig. 12).
Fig. 12 Remove Roof Absorbers
1 – Left Side Upper Compartment Roof Absorber
2 – Right Side Upper Compartment Roof Absorber
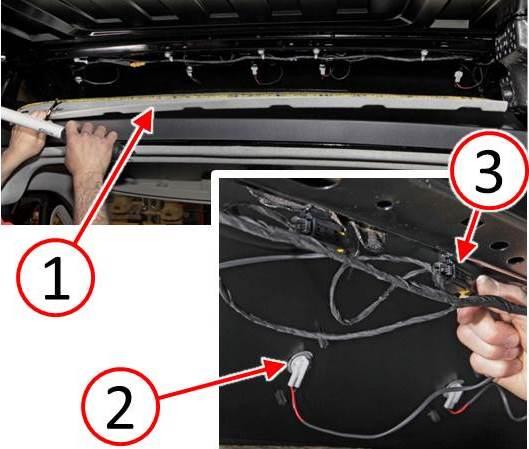
- Lower the upper compartment roof liner (1) to access the roof lamp wire harness (Fig. 13).
- Disconnect the electrical harness connector (3) from any front roof clearance lamps (2) that require replacement (Fig. 13).
Fig. 13 Roof Clearance Lamp Wire Harness
1 – Upper Compartment Roof Liner
2 – Front Roof Clearance Lamp
3 – Lamp Electrical Harness Connector
- Remove the screws (1) from the roof clearance lamp (Fig. 14).
- Remove the roof clearance lamp (2) from the vehicle and discard the lamp (Fig. 14).
Fig. 14 Remove Roof Clearance Lamp
1 – Roof Clearance Lamp Screws
2 – Roof Clearance Lamp
- Install the NEW roof clearance lamp (1) to the vehicle (Fig. 15).
- Install the roof clearance lamp screws (2) and tighten to 2 N·m (18 in. lbs.) (Fig. 15).
Fig. 15 Install Roof Clearance Lamp
1 – Roof Clearance Lamp
2 – Roof Clearance Lamp Screws
- Repeat the H2 High Roof – Lamp Lens And Harness Replacement process for any front cab roof clearance lamps that show signs of moisture.
- Connect the electrical harness connector (3) to any front roof clearance lamps (2) that were replaced (Fig. 16).
- Test the front clearance lamps to ensure that all five lamps illuminate when lamps areturned on.
- Raise the upper compartment roof liner (1) back to normal installed position (Fig. 16).
Fig. 16 Roof Clearance Lamp Wire Harness
1 – Upper Compartment Roof Liner
2 – Front Roof Clearance Lamp
3 – Lamp Electrical Harness Connector
- Install the left side roof absorber (1) to the upper compartment
- Install the right side roof absorber (2) to the upper compartment
Fig. 17 Install Roof Absorbers
1 – Left Side Upper Compartment Roof Absorber
2 – Right Side Upper Compartment Roof Absorber
- Install the push pins (1) to the upper compartment roof liner (Fig. 18).
Fig. 18 Install Push Pins To Upper Compartment Roof Liner
1 – Push Pins
- Install the left side roof absorber (1) to the vehicle (Fig. 19).
- Install the push pins (1) to the left side roof absorber (Fig. 19).
Fig. 19 Install Roof Absorber
1 – Roof Absorber 2 – Push Pins
- The H2 High Roof front clearance lamp replacement process has been completed.
Use LOP (08-50-80-94) to close the active RRT.
POLICY:
Reimbursable within the provisions of the warranty.
TIME ALLOWANCE:
| Labor Operation No: | Description | Skill Category | Amount |
|---|---|---|---|
| 08-50-80-91 | Lamps, Cabin Roof Clearance (H1 or H2) – Inspect for Moisture (0 – Introductory) | 6 – Electrical and Body Systems | 0.2 Hrs. |
| 08-50-80-92 | Lamps, Cabin Roof Clearance (H1 Only) – Inspect and Replace 1-5 Lamp Assemblies (0 – Introductory) | 6 – Electrical and Body Systems | 0.3 Hrs. |
| 08-50-80-93 | Lamps, Cabin Roof Clearance (H2 Only) – Inspect and Replace 1-5 Lamp Lenses (0 – Introductory) | 6 – Electrical and Body Systems | 0.2 Hrs. |
| 08-50-80-94 | Lamps, Cabin Roof Clearance (H2 Only) – Inspect and Replace 1-5 Lamp Assemblies (0 – Introductory) | 6 – Electrical and Body Systems | 0.6 Hrs. |
FAILURE CODE:
| ZZ | Service Action |
 Loading...
