| “This site contains affiliate links for which OEMDTC may be compensated” |
NHTSA Campaign Number: 17V670
Manufacturer Chrysler (FCA US LLC)
Components ENGINE AND ENGINE COOLING
Potential Number of Units Affected 357
Oil Pump Failure Causing Engine Stall
If the oil pump fails, the engine will stall, increasing the risk of a crash.
Summary
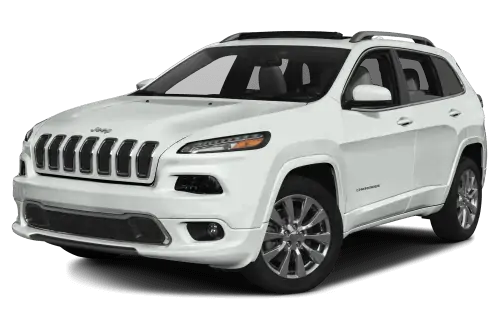
Chrysler (FCA US LLC) is recalling certain 2018 Jeep
 Cherokee and Compass vehicles equipped with 2.4L engines. The engines may have a cracked oil pump housing that can result in oil pump failure.
Remedy
Chrysler will notify owners, and dealers will inspect the oil pump, replacing it as necessary, free of charge. The recall began December 5, 2017. Owners may contact Chrysler
 customer service at 1-800-853-1403. Chrysler
 ’s number for this recall is T65.
Notes
Owners may also contact the National Highway Traffic Safety Administration Vehicle Safety Hotline at 1-888-327-4236 (TTY 1-800-424-9153), or go to www.safercar.gov.
Check if your Vehicle has a Recall
December 2017
Dealer Service Instructions for:
Safety Recall T65 / NHTSA 17V-670 Engine Oil Pump
Models
NOTE: This recall applies only to the above vehicles equipped with a 2.4L engine (Sales Code EDE, ED6, ED8) built from September 09, 2017 through September 28, 2017 (MDH 090912 through 092819).
| IMPORTANT: Some of the involved vehicles may be in dealer new vehicle inventory. Federal law requires you to complete this recall service on these vehicles before retail delivery. Dealers should also consider this requirement toapply to used vehicle inventory and should perform this recall on vehicles in forservice. Involved vehicles can be determined by using the VIP inquiry process. |
Subject
The engine oil pump on about 350 of the above vehicles may have been built with a cracked engine oil pump housing. A crack may propagate through the housing and cause the oil pump to fail. If the oil pump fails, it may cause the engine to stall. An engine stall could cause a crash without prior warning.
Repair
The engine oil pump on the involved vehicle must be inspected for the cavity number “KD.8” if this number is on the oil pump casting it must be replaced.
Parts Information
| Quantity | Description | Part Number |
|---|---|---|
| 1 | Balance Shaft Module | 05047992AC |
| 3 | Bolt, Splash Shield | 06511057AA |
| 4 | Bolt, Ladder Frame | 06509278AA |
| 2 | Bolt, Oil Pan | 06508985AA |
| 3 | Bolt, A/C Compressor Bracket | 06509285AA |
| 6 Quarts | Oil, Engine 0-20W (MS-12145) | 68218950AB |
| 1 | Sealant, RTV (MSGF44B) | 04883971AB |
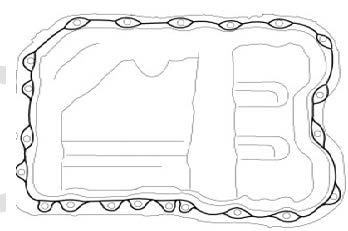
| 1 | Pan Assy, Engine Oil | 05047566AC |
| 16 | Bolt, Oil Pan | 06509140AA |
Parts Return
No parts return required for this campaign.
Special Tools
No special tools are required to perform this service procedure.
Service Procedure
A.Balance Shaft Module Inspection
- Open the hood.
- Remove and save the engine oil dipstick.
- Raise and support the vehicle.
- Remove and save the right front tire/wheel assembly.
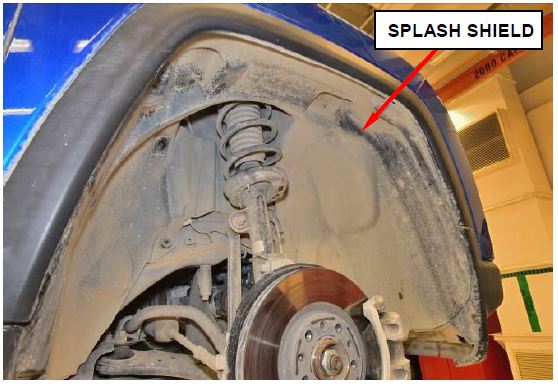
- Remove and save the right side wheel well splash shield (Figure 1).
Figure 1 – Right Splash Shield
- If equipped – remove the engine underbody belly pan or skid plates.
- Remove the engine oil pan drain plug and drain the oil from the engine crankcase.
- Install the engine oil pan drain plug.
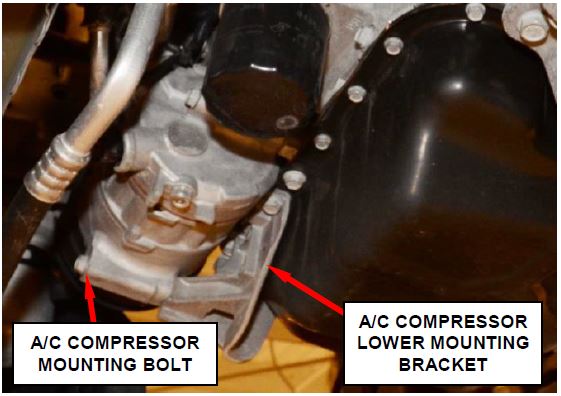
- If equipped – remove the lower A/C compressor mounting bolt (Figure 2).
Figure 2 – Air Conditioning Compressor Lower Mounting Bracket
- Remove the three A/C mounting bracket bolts; save the bracket discard the bolts (Figure 2).
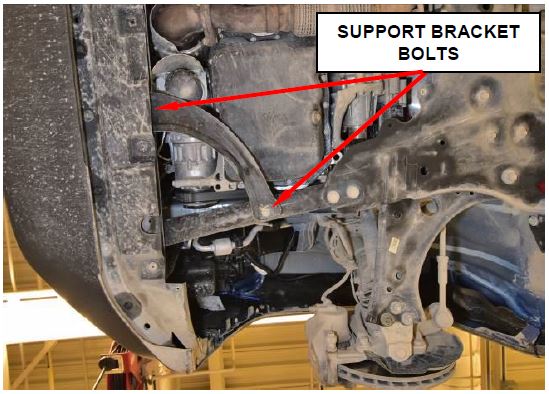
- (MP Model) remove the right side support bracket bolt and loosen the front bolt, move the bracket away enough to clear the oil pan obstruction (Figure 3).
Figure 3 – Support Bracket
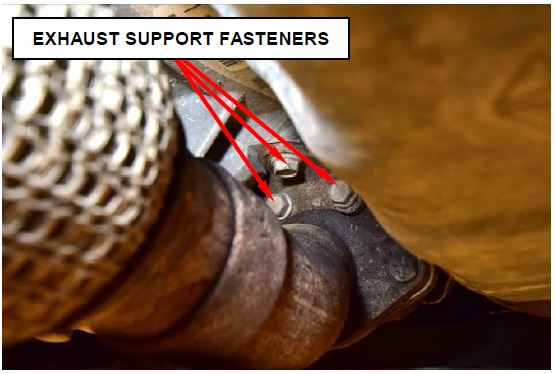
- Remove the three exhaust manifold support bolts and save (Figure 4).
Figure 4 – Exhaust Support Bracket
- Remove the oil pan bolts.
- Using a putty knife, loosen the seal around the oil pan.
NOTE: Do not use pry points on block to remove the oil pan
- Remove and discard the oil pan.
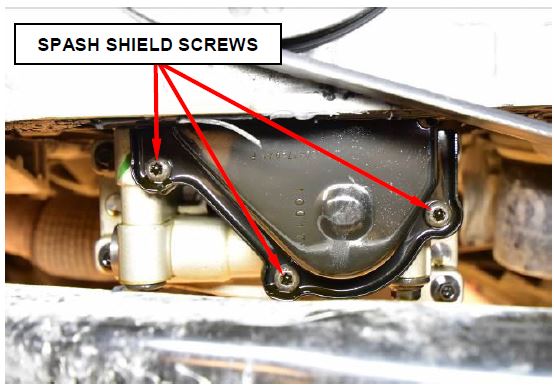
- Remove the three oil splash shield screws and discard the screws (Figure 5).
Figure 5 – Oil Pump Splash Shield
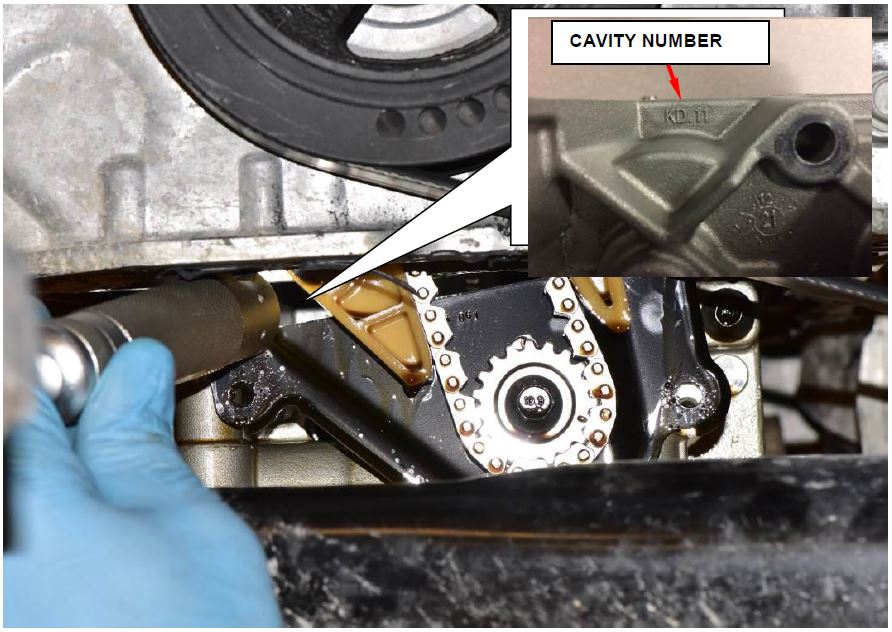
- Using a light, source look for the cavity number that’s on the left rear balance shaft casting (Figure 6).
Figure 6 – Cavity Number Location
a. If the casting cavity number is, “KD.8” proceed with section B Step 1.
b. If the casting cavity number is NOT “KD.8”, proceed with section C Step 10.
B. Balance shaft module removal procedure
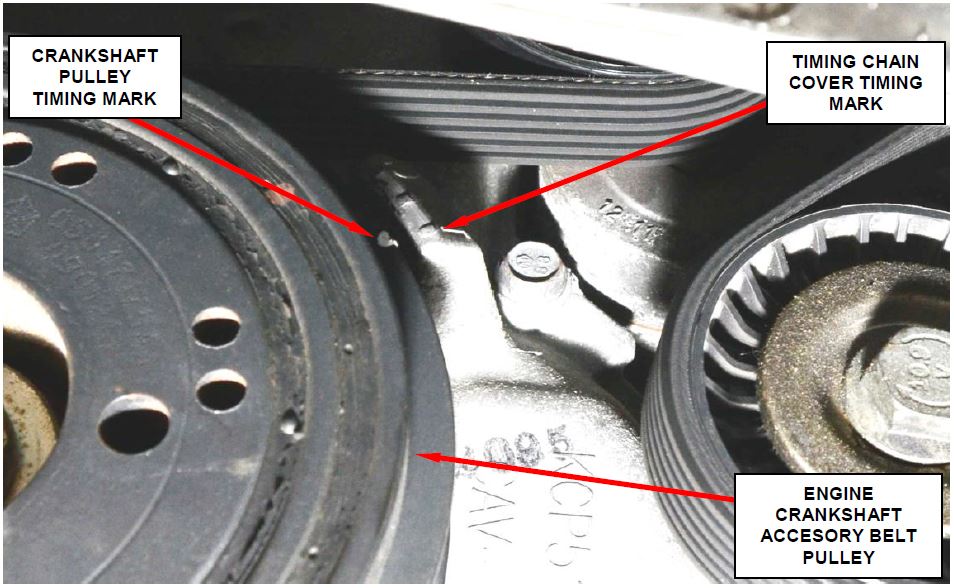
- Bar the engine over and align the timing mark on the crankshaft accessory belt pulley with the mark on the timing chain cover (Figure 7).
Figure 7 – Timing Chain Cover Timing Marks
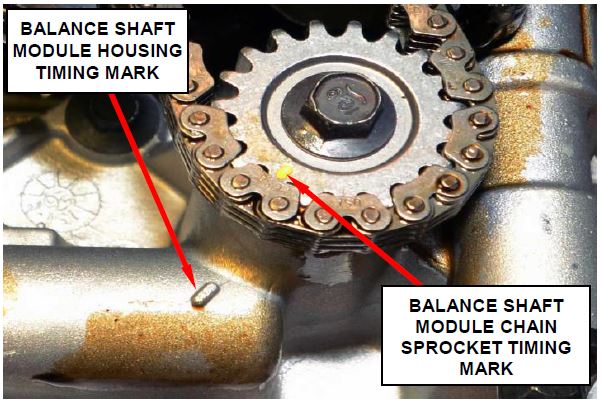
- Verify that the mark on the balance shaft module chain sprocket aligns with the mark on the balance shaft module housing (Figure 8).
NOTE: Oil Splash Shield removed for illustration of timing mark on module.
Figure 8 – Timing Marks
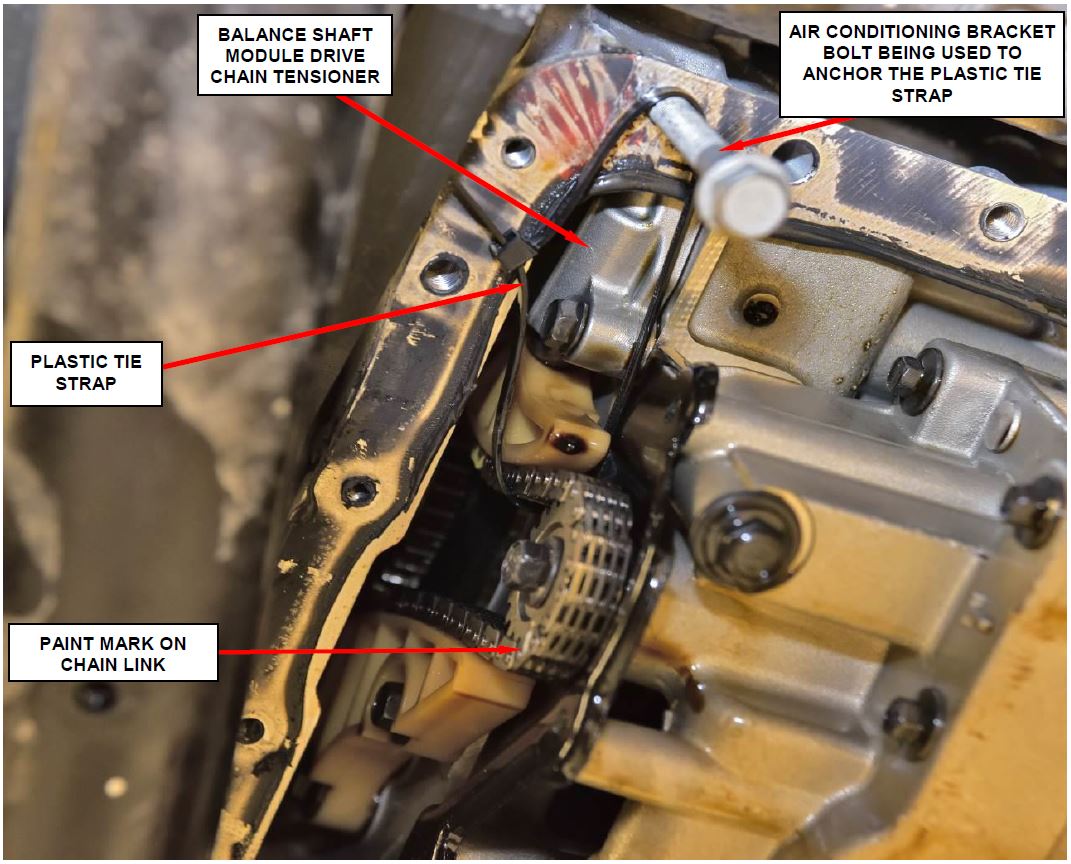
- Install one air-conditioning compressor bracket bolt into the right forward corner thread boss (Figure 9).
NOTE: The bolt will provide a sturdy point to secure a tie strap to hold the tensioner in the compressed position.
- Apply a paint mark on the chain link that is aligned with the drive sprocket mark (Figure 9).
Figure 9 – Relive Balance Shaft Drive Chain Tension
- Position a plastic tie strap around the chain, tensioner and bolt that was previously installed (Figure 9).
- Push the chain, guide and tensioner to the compressed position.
- Tighten the tie strap to hold the components together.
NOTE: The tighter the strap, the more room for removal and installation of the balance shaft module.
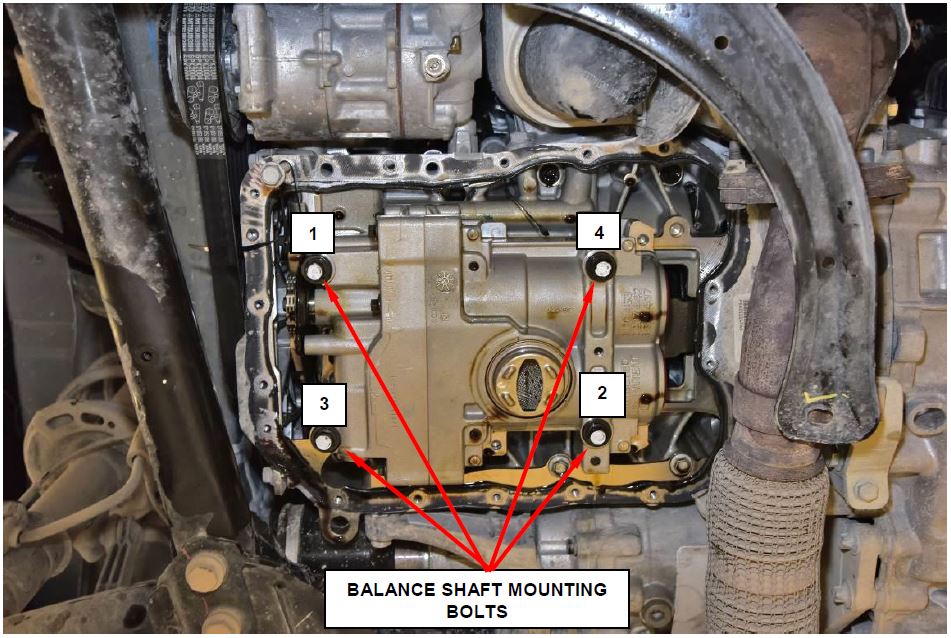
- Remove the four balance shaft module mounting bolts (Figure 10).
Figure 10 – Mounting Bolts
- Remove the balance shaft module from the engine by tilting the rear of the balance shaft module downward while lifting the drive gear out of the chain links.
- Clean the oil pan mounting surface and remove any residual sealant.
Caution: Do not use an aggressive abrasive to remove the sealant this may damage the mounting surface.
C. Balance Shaft Module Installation Procedure
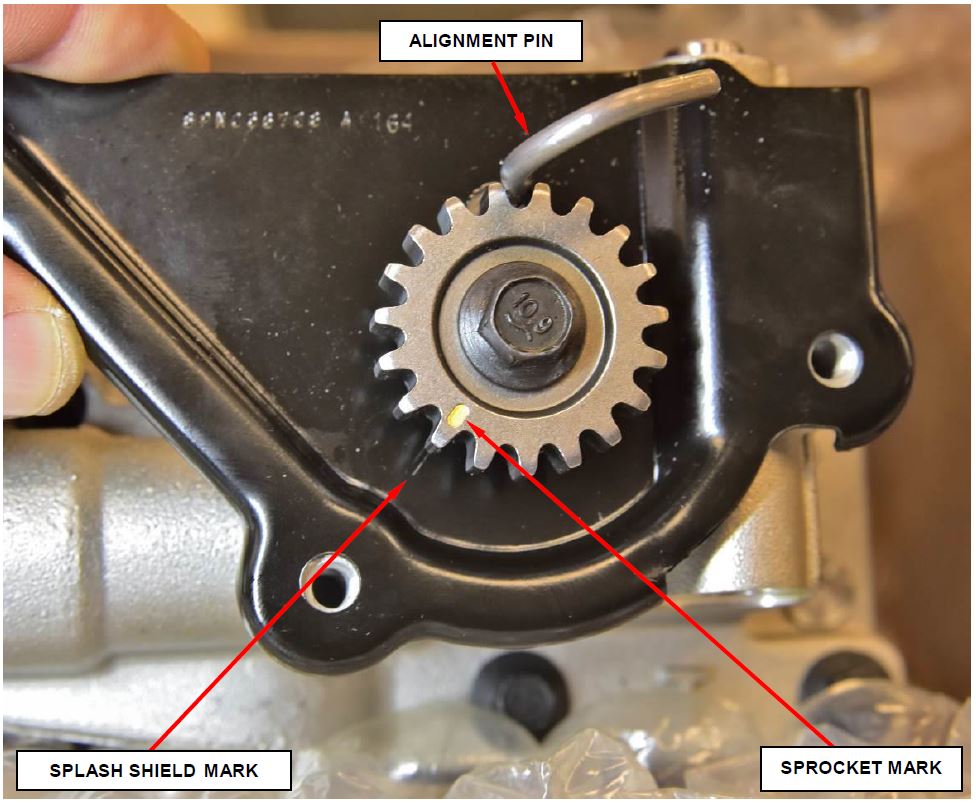
- Remove the NEW balance shaft module from the shipping box and verify the alignment pin is aligned with the drive sprocket mark and splash shield cover (Figure 11).
Figure 11 – Alignment Pin
- With the rear of the balance shaft module on a slight downward angle, position the gear into the chain links. Make sure the mark on the NEW balance shaft module and the paint mark on the chain link are aligned.
- Pivot balance shaft module upwards and position on ladder frame.
- Install the four NEW balance shaft module bolts finger tight.
NOTE: The balance shaft module bolts are tightened using a torque plus angle procedure. The bolts must be replaced.
- Tighten the NEW balance shaft module bolts in the sequence shown below, follow the three-step torque procedure, and crisscrossing tightening the opposite bolt 1-2-3-4 an ending with a torque angle method (Figure 10).
- Step 1: All to 15 N·m (11 ft. lbs.).
- Step 2: All to 29 N·m (22 ft. lbs.).
- Step 3: All an additional 90°. Do not use a torque wrench for this step
- Double check the alignment marks to ensure the gear indicator and balance shaft module assembly indicator are aligned (Figure 7 and 8).
- Remove the alignment pin from the balance shaft module.
- Remove the tie strap.
- Remove the A/C compressor-mounting bolt.
- Install the NEW splash shield bolts and tighten to 9 N·m (6 ft. lbs).
- Clean the oil pan sealing surfaces with isopropyl alcohol or equivalent in preparation for sealant application.
- Apply Mopar® Engine Sealant RTV Silicone Rubber Adhesive or equivalent at the front cover to the engine block parting lines.
- Apply a 2 mm bead of Mopar® Engine Sealant RTV Silicone Rubber Adhesive or equivalent around the NEW oil pan as shown (Figure 12).
Figure 12 – Oil Pan Sealant Application
- Install the NEW oil pan and NEW bolts tighten the bolts as indicated:
- 00×16.35 – 10N·m (7 ft. lbs.) Quantity of 16.
- 25X104 – 26 N·m (19 ft. lbs.) Quantity of 2.
- Install the AC compressor to engine block supporting bracket and tighten the NEW bolts as indicated:
- 25×30.00 – 30 N·m (22 ft. lbs.) Quantity of 3.
- Verify the oil drain plug on the NEW oil pan is tightened to 20 N·m (15ft. lbs.).
- Install the AC compressor mounting bolt and tighten to 28 N·m (21ft. lbs.).
- Install the exhaust support bracket and tighten the three bolts to 20N·m (15 ft. lbs).
- Install the right side support bracket bolt and tighten to 10 N·m (7 ft. lbs.).
- If equipped – install the underbody engine belly pan/skid plates and bolts and tighten to 20 N·m (15 ft. lbs.).
- Install the right wheel well splash shield.
- Install the right tire/wheel assembly tighten the lug nuts to 135 N·m (100 ft. lbs.).
- Lower the vehicle and fill the engine crankcase with the 0-20w engine oil to the correct level.
- Start the engine and check for an oil leak.
- Return the vehicle to the customer.
Complete Proof of Correction Form for California Residents
This recall is subject to the State of California Registration Renewal/Emissions Recall Enforcement Program. Complete a Vehicle Emission Recall Proof of Correction Form (Form No. 81-016-1053) and supply it to vehicle owners residing in the state of California for proof that this recall has been performed when they renew the vehicle registration.
Completion Reporting and Reimbursement
Claims for vehicles that have been serviced must be submitted on the DealerCONNECT Claim Entry Screen located on the Service tab. Claims paid will be used by FCA to record recall service completions and provide dealer payments.
Use the following labor operation numbers and time allowances:
| Labor Operation Number | Time Allowance | |
|---|---|---|
| Inspect balance shaft cavity number (KL, MP) | 09-T6-51-81 | 1.5 hours |
| Inspect and replace balance shaft module (MP) | 09-T6-51-82 | 1.7 hours |
| Inspect and replace balance shaft module (KL) | 09-T6-51-83 | 1.8 hours |
| Skid Plate Equipped (KL) | 09-T6-51-60 | 0.4 hours |
| Skid Plate Equipped (MP) | 09-T6-51-61 | 0.2 hours |
NOTE: See the Warranty Administration Manual, Recall Claim Processing Section, for complete recall claim processing instructions.
Dealer Notification
To view this notification on DealerCONNECT, select “Global Recall System” on the Service tab, then click on the description of this notification.
Owner Notification and Service Scheduling
All involved vehicle owners known to FCA are being notified of the service requirement by first class mail. They are requested to schedule appointments for this service with their dealers. A generic copy of the owner letter is attached.
Vehicle Lists, Global Recall System, VIP and Dealer Follow Up
All involved vehicles have been entered into the DealerCONNECT Global Recall System (GRS) and Vehicle Information Plus (VIP) for dealer inquiry as needed.
GRS provides involved dealers with an updated VIN list of their incomplete vehicles. The owner’s name, address and phone number are listed if known. Completed vehicles are removed from GRS within several days of repair claim submission.
To use this system, click on the “Service” tab and then click on “Global Recall System.” Your dealer’s VIN list for each recall displayed can be sorted by: those vehicles that were unsold at recall launch, those with a phone number, city, zip code, or VIN sequence.
Dealers must perform this repair on all unsold vehicles before retail delivery. Dealers should also use the VIN list to follow up with all owners to schedule appointments for this repair.
Recall VIN lists may contain confidential, restricted owner name and address information that was obtained from the Department of Motor Vehicles of various states. Use of this information is permitted for this recall only and is strictly prohibited from all other use.
Additional Information
If you have any questions or need assistance in completing this action, please contact your Service and Parts District Manager.
Customer Services / Field Operations
FCA US LLC
This notice applies to your vehicle,
[Model Year and Model] VIN XXXXXXXXXXXXXXXXX T65/NHTSA 17V-670
LOGO
VEHICLE PICTURE
YOUR SCHEDULING OPTIONS
- RECOMMENDED OPTION Call your authorized Chrysler
 / Dodge
 / Jeep
 ® / RAM
 / Jeep
 ® Dealership.
 - Call the FCA Recall Assistance Center at 1-800-853-1403. An agent can confirm part availability and help schedule an appointment
- Visit mopar.com, scan the QR code below, or download the Mopar Owner’s Companion App.
QR Code
Get access to recall notifications, locate your nearest dealer, and more through this website or Mopar Owner’s Companion App. You will be asked to provide your Vehicle Identification Number (VIN) to protect and verify your identity. The last eight characters of your VIN are provided above.
DEALERSHIP INSTRUCTIONS
Please reference Safety Recall T65.
IMPORTANT SAFETY RECALL
Engine Oil Pump
Dear [Name],
This notice is sent to you in accordance with the National Traffic and Motor Vehicle Safety Act.
FCA has decided that a defect, which relates to motor vehicle safety, exists in certain [2018 Jeep® Compass, Jeep® Cherokee] vehicles.
It is extremely important to take steps now to repair your vehicle to ensure the safety of you and your passengers.
WHY DOES MY VEHICLE NEED REPAIRS?
The engine in your vehicle [1] may have been built with a cracked engine oil pump housing. The crack may propagate through the housing and cause the oil pump to fail. If the oil pump fails, it may cause the engine to stall. An engine stall could cause a crash without prior warning.
HOW DO I RESOLVE THIS IMPORTANT SAFETY ISSUE?
FCA will repair your vehicle [2] free of charge (parts and labor). To do this, your dealer will inspect and replace the engine oil pump if needed. In addition, your dealer will require your vehicle for proper check-in, preparation, and check-out during your visit. Your time is important to us; please be aware that these steps may require more time. The estimated repair time is 2 hours. We recommend that you schedule a service appointment to minimize your inconvenience. Please bring this letter with you to your dealership.
TO SCHEDULE YOUR FREE REPAIR CALL 1-800-853-1403
OR YOUR CHRYSLER , DODGE
 , JEEP
 OR RAM
 DEALER TODAY
CALIFORNIA RESIDENTS
The State of California requires the completion of emission recall repairs prior to vehicle registration renewal. Your dealer will provide you with a Vehicle Emission Recall Proof of
Correction Form after the recall service is performed. Be sure to save this form since the California Department of Motor Vehicles may require that you supply it as proof that the recall has been performed.
WHAT IF I ALREADY PAID TO HAVE THIS REPAIR COMPLETED?
If you have already experienced this specific condition and have paid to have it repaired, you may visit www.fcarecallreimbursement.com to submit your reimbursement request online. [3] Once we receive and verify the required documents, reimbursement will be sent to you within 60 days. If you have had previous repairs performed and/or already received reimbursement, you may still need to have the recall repair performed.
We apologize for any inconvenience, but are sincerely concerned about your safety. Thank you for your attention to this important matter.
Customer Assistance/Field Operations
Fiat Chrysler
 Automobiles US LLC
Mr. Mrs. Customer
1234 Main Street
Hometown, MI 48371
[1] If you no longer own this vehicle, please help us update our records. Call the FCA Recall Assistance Center at 1-800-853-1403 to update your information.
[2] If your dealer fails or is unable to remedy this defect without charge and within a reasonable time, you may submit a written complaint to the Administrator, National Highway Traffic Safety Administration, 1200 New Jersey Ave., S.E., Washington, DC 20590, or you can call the toll-free Vehicle Safety Hotline at 1-888-327-4236 (TTY 1-800-4249153), or go to safercar.gov.
[3] You can also mail in your original receipts and proof of payment to the following address for reimbursement consideration: FCA Customer Assistance, P.O. Box 21-8004, Auburn Hills, MI 48321-8007, Attention: Recall Reimbursement.
Note to lessors receiving this recall notice: Federal regulation requires that you forward this recall notice to the lessee within 10 days.
Safety Recall T65 / NHTSA 17V-670 Engine Oil Pump
December 2017
 Loading...
Owner Notification Letter
 Loading...
Safety Recall Advanced Communication – T6510272017
10/27/2017
 Loading...
Renotification Notice
 Loading...
Recall Acknowledgement
November 20, 2017
 Loading...
- MaxLife Technology prevents engine breakdown with 40% better wear protection than the industry standard
- Includes seal conditioners to reduce oil consumption and oil leaks in high mileage engines.
- Added detergents reduce sludge, corrosion, rust and deposits to help keep motors clean inside and ensure a smooth-running engine.
- Advanced friction-fighting additives help maximize performance and improve fuel efficiency.
- Meets or exceeds all requirements of ILSAC GF-6A, API SP, API SN with SN Plus, API SN
- Full synthetic 5W-30 motor oil provides strong engine performance and protection against deposits between oil changes
- Ideal for use in modern turbocharged engines and high-performance vehicles like sports cars, SUVs, trucks, and minivans
- Designed to deliver more power and less friction, reducing friction to maximize horsepower (compared to Quaker State motor oil)
- Provides improved fuel economy (based on the latest industry standard)
- Excellent protection against formation of sludge and other harmful deposits (based on Sequence IIIH & VH tests on 0W-20 engine oil)
- Mobil 1 High Mileage full-synthetic motor oil 5W-30 is designed for engines with over 75,000 miles to go up to 10,000 miles between oil changes.*
- Utilizes Mobil 1’s signature Triple Action Formula to deliver outstanding engine performance, protection, and cleanliness
- Meets ILSAC GF-6 standards to help provide low-speed pre-ignition (LSPI) and timing chain wear protection while keeping your engine clean and helping to improve your fuel economy
- Provides excellent internal engine heat protection (up to 500 degrees F) and low temperature protection (to -30 degrees F)
- Helps extend engine life by working to prevent damaging deposits and sludge buildup
- Advanced protection against the four main causes of engine breakdown: wear friction heat and deposits
- Full synthetic formula offers 24X stronger protection against engine-killing contaminants than the leading full synthetic motor oil
- 40% better wear protection vs. industry standards as tested in the Sequence IVB engine test
- 25% better deposit protection with superior engine cleaning detergents as tested in the GMOD engine test
- Meets or exceeds all requirements of ILSAC GF-6A, API SP, API SN with SN Plus, API SN, GM dexos 1 Gen 3
- The first motor oil to actively restore engine cleanliness and protect against future damage
- With continuous use, Valvoline Active Clean Technology removes up to 100% of deposits while Liqui-Shield Technology helps prevent future deposits (*with regular oil changes. In Adapted Sequence IIIH Testing: Piston Deposit Removal)
- 79% stronger anti-wear protection than industry standards (vs. GF-6 qualified oil)
- Minimizes friction between metal surfaces in your engine to help improve fuel economy
- The best motor oil for any age vehicle, from your new car’s first oil change to high-mileage vehicles
- 3X Stronger than the leading full synthetic*
- 10X Better high stress performance**
- 20,000 miles between oil changes***
- Approved and Licensed Specifications: Exceeds API SP/SN PLUS/SN/SM | ILSAC GF-6 | GM dexos1 Gen 3 | Meets engine test requirements of Chrysler
 MS 6395 | Meets Ford WSS-M2C946-B1 | Meets Ford WSS-M2C961-A1|
 - Viscosity breakdown as measured in Kurt Orbahn test on 5W-30 grade |**As measured in Seq IX test under high load/torque conditions vs. API SP test limits | ***Or one year, whichever comes first
- Phosphorus Replacement Technology to help extend the life of the emission system
- Reduces leaks, oil burnoff and power robbing deposits
- 15,000 miles between oil changes*
- Meets or exceeds the following specifications: API SP/SN PLUS/SN/SM | ILSAC GF-6 | Meets engine test requirements of Chrysler MS 6395 | Meets Ford WSS-M2C946-B1 | Meets Ford WSS-M2C961-A3
- Or one year, whichever comes first
- 6X better wear protection on critical engine parts than industry standards**
- 1.3X better sludge protection than industry standards*
- 3X Stronger against viscosity breakdown than leading full synthetic^
- Protection for 10,000 miles between oil changes
- Meets or exceeds the following specifications: API SP/SN PLUS/SN | ILSAC GF-6 | GM dexos1 Gen 3 | Meets Ford WSS-M2C946-B1 | Meets Ford WSS-M2C961-A1 |
- Full synthetic 5W-30 engine oil designed for vehicles with more than 75,000 miles
- Backed by a 15,000-mile protection guarantee* to keep you covered between oil changes and for the long run
- Keeps pistons cleaner than required by the toughest industry standard (based on Sequence IIIH results)
- Proven to help stop leaks for engines with more than 75,000 miles
- Formulated to deliver less oil burn-off than high-mileage motor oils made from crude oil
- Full synthetic 5W-30 motor oil that is made with natural gas and designed to maximize engine protection
- Backed by a 15,000-mile protection guarantee* to protect your pursuit of every mile
- Provides better fuel economy (based on the latest industry standards)
- Keeps pistons cleaner than required by the toughest industry standard (based on Sequence IIIH results)
- Designed for high-performance engines
Last update on 2025-05-08 / Affiliate links / Images from Amazon Product Advertising API
This product presentation was made with AAWP plugin.
