| “This site contains affiliate links for which OEMDTC may be compensated” |
NUMBER: 23-029-15
GROUP: Body
DATE: July 21, 2015
SUBJECT:
Water In Right Front Floor Footwell
OVERVIEW:
This bulletin involves correcting a sealant void between the cowl plenum lower panel and dash crossmember.
MODELS:
| 2015 | (KL) | Jeep Cherokee Cherokee |
NOTE: This bulletin applies to vehicles within the following markets/countries: NAFTA, APAC.
NOTE: This bulletin applies to vehicles built on or after October 31, 2014 (MDH 1031XX) and on or before May 10, 2015 (MDH 0510XX).
SYMPTOM/CONDITION:
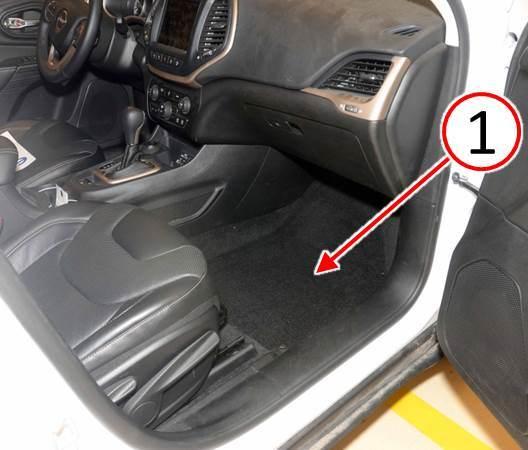
The customer may describe damp or wet carpet in the right front footwell (Fig. 1). This condition may be due to a sealant void between the cowl plenum lower panel and dash crossmember allowing water to enter the vehicle interior.
Fig. 1 Water In Right Side Front Footwell
1 – Right Front Footwell Carpet
DIAGNOSIS:
If the customer describes the symptom, perform the Repair Procedure.
PARTS REQUIRED:
| Qty. | Part No. | Description |
|---|---|---|
| 1 (AR) | NPN | Kent® Spray Leak Check Sealer P50087 (24 oz can) |
| 1 (AR) | NPN | Kent® Spray Leak Check 12 in. Extension Tubes P90175 (package of 12) |
NOTE: Each Kent® Spray Leak Check P50087 will service approximately 12 vehicles.
NOTE: Each package of Kent® Spray Can Extension Tubes P90175 will service approximately 12 vehicles.
SPECIAL TOOLS/EQUIPMENT REQUIRED:
| C-4755 | Trim Stick Or Equivalent |
NOTE: The Trim Stick is a non-reimbursable shop tool.
REPAIR PROCEDURE:
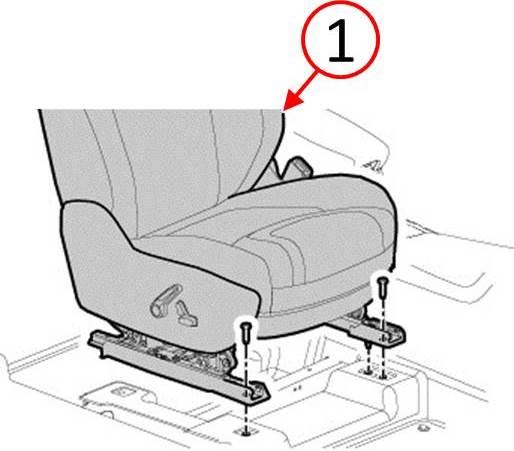
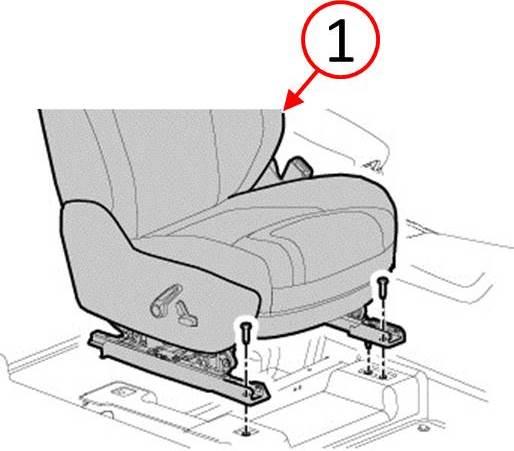
- Remove the right side front seat (1) in order to remove the carpet (Fig. 2). Refer to the detailed service procedures available in DealerCONNECT> TechCONNECT under: Service Info> 23 – Body> Seats, Front> SEAT> Removal.
Fig. 2 Remove Right Side Front Seat
1 – Right Front Seat
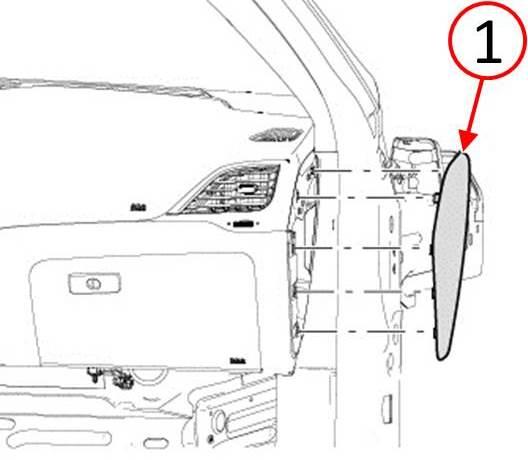
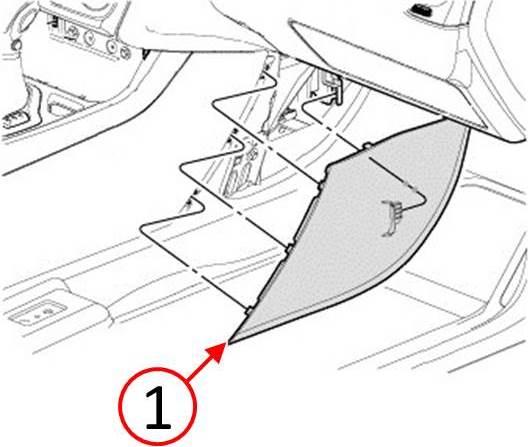
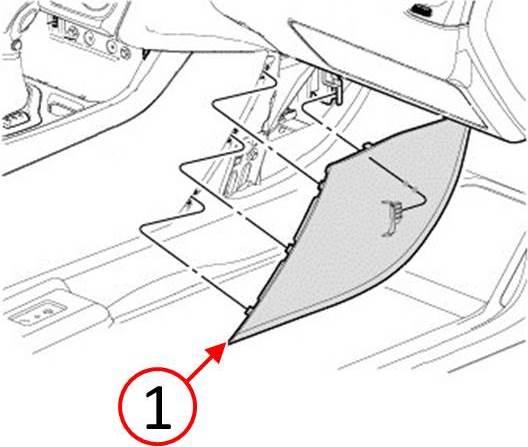
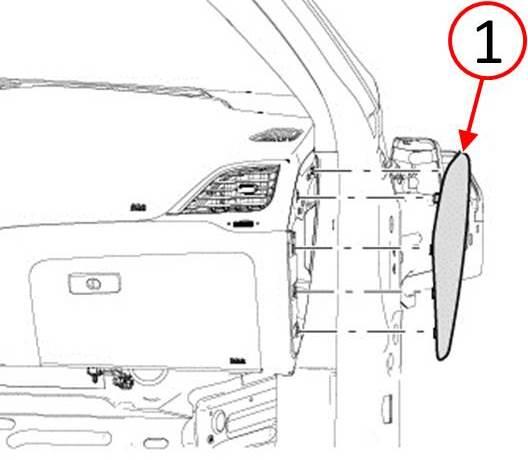
- Using a trim stick or equivalent, release the clips and remove the right side end cap (1) from the instrument panel (Fig. 3).
Fig. 3 Remove Right Side Instrument Panel End Cap
1 – Instrument Panel End Cap
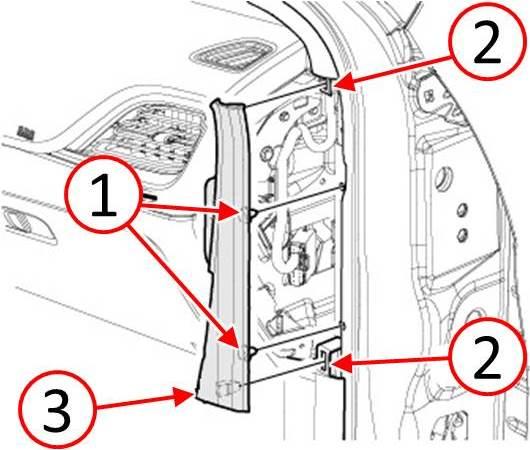
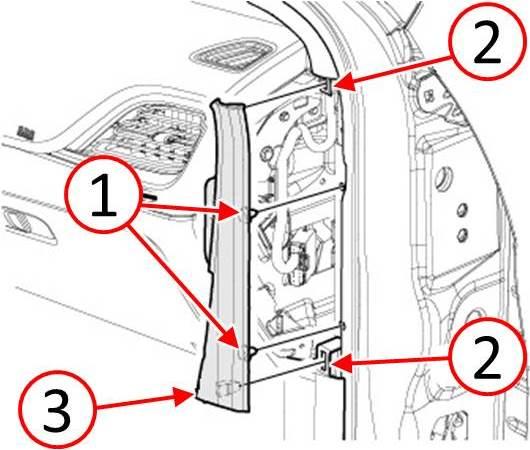
- Using a trim stick or equivalent, release the push pin fasteners (1) and the retaining tabs (2) then remove the right side A-pillar extension trim (3) from the door sill scuff plate (Fig. 4).
Fig. 4 Remove Right Side A-Pillar Extension Trim
1 – A-Pillar Extension Trim
2 – Retaining Tabs
3 – Push Pin Fasteners
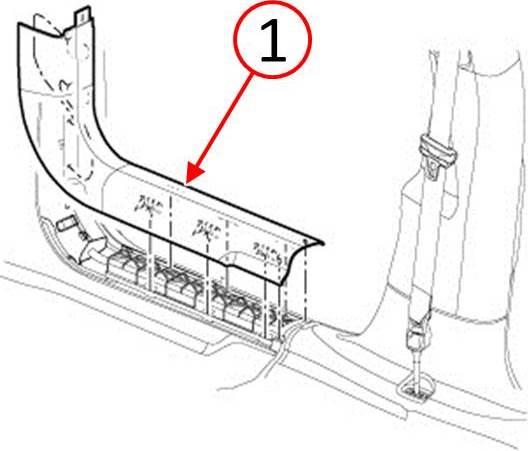
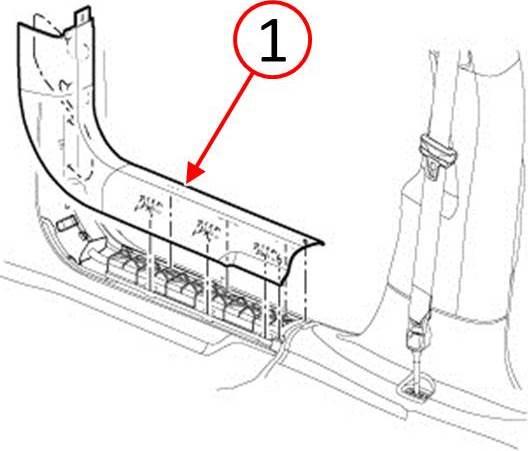
- Using a trim stick or equivalent, disengage the retaining clips and remove the front door sill scuff plate (1) from the door sill and lower B-pillar trim (Fig. 5).
Fig. 5 Remove Right Front Door Sill Scuff Plate
1 – Door Sill Scuff Plate
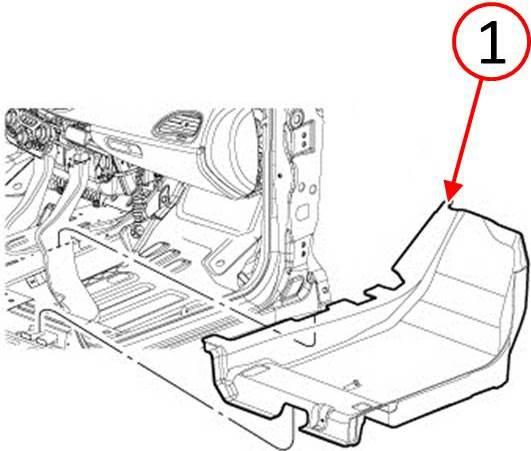
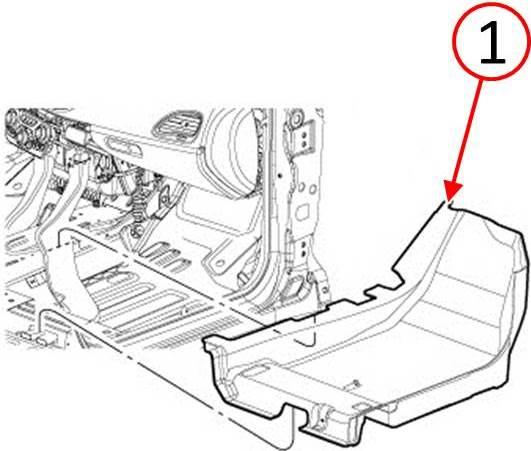
- Using a trim stick or equivalent, disengage the retaining tabs then remove the right side floor console panel (1) (Fig. 6).
Fig. 6 Remove Right Side Floor Console Panel
1 – Floor Console Panel
- Remove the carpet (1) from the vehicle through the passenger door opening (Fig. 7).
Fig. 7 Remove Right Side Front Footwell Carpet
1 – Carpet
- Begin drying the carpet.
- Remove the engine cover for access to the air inlet duct.
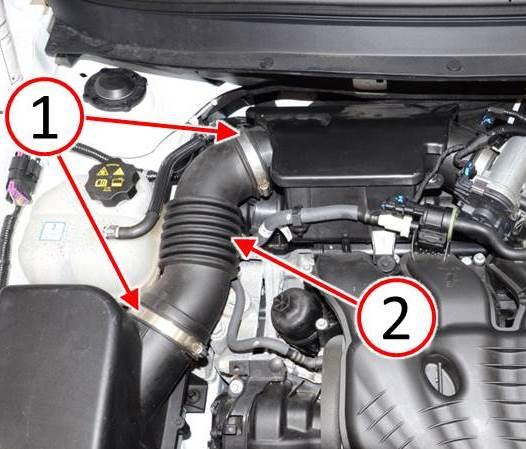
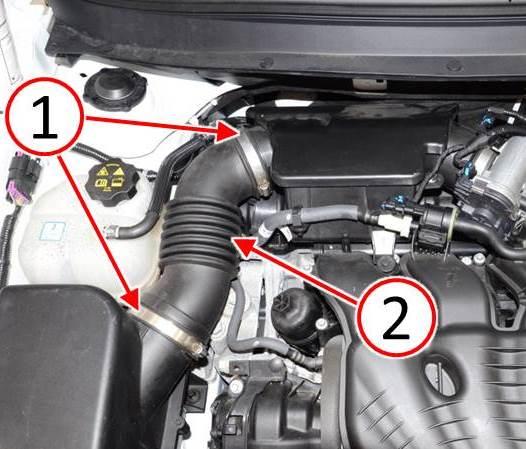
- Loosen the air inlet duct clamps (1) and remove the air inlet duct (2) to provide sealant spray can access clearance (Fig. 8).
Fig. 8 Remove Engine Air Inlet Duct
1 – Clamps
2 – Air Inlet Duct
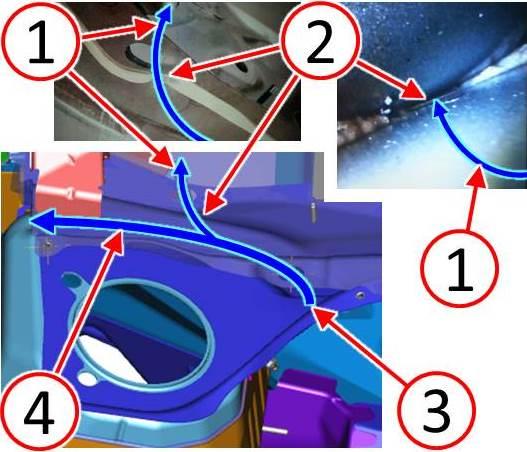
NOTE: Images in (Fig. 9) show the proper water path (4) across the dash crossmember water management trough and also shows the location of the sealant void area (2) between the cowl plenum lower panel and dash crossmember which allows water (1) to enter the vehicle interior right front footwell.
Fig. 9 Sealant Void And Water Path
1 – Water Leak Path To Vehicle Interior
2 – Seam Sealant Void Location
3 – Opening Into Water Management Trough
4 – Proper Water Path Along Water Management Trough
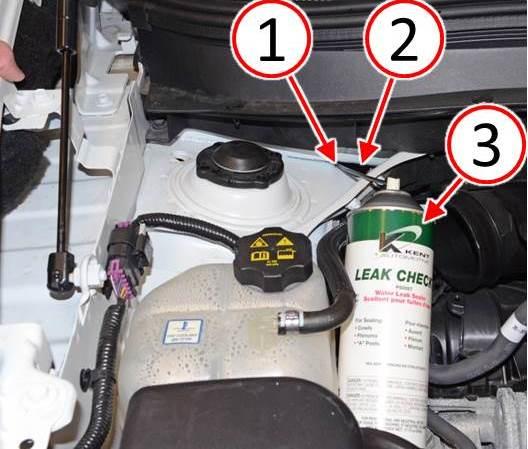
- Direct the Kent® spray leak check sealer extension tube (1) into the water entrance opening (2), between the cowl plenum lower panel and dash crossmember. Fully insert the extension tube (1) until it reaches the rearward seam in the approximate location of the sealant void area (Fig. 10).
- Spray the Kent® leak check sealer (3) continuously along the rearward seam for the full range allowed in the opening between the cowl plenum lower panel and dash crossmember (Fig. 10).
- Allow the Kent® spray leak check sealer to dry per the manufacturer’s directions;approximately 15 minutes. Then repeat the application process for the second coat of sealant.
Fig. 10 Apply Seam Sealant
1 – Extension Tube
2 – Water Entrance Opening Into Cowl Plenum
3 – Kent® Spray Leak Check Sealer
NOTE: Allow the Kent® spray leak check sealer to dry for one hour before performing the water test Step #13.
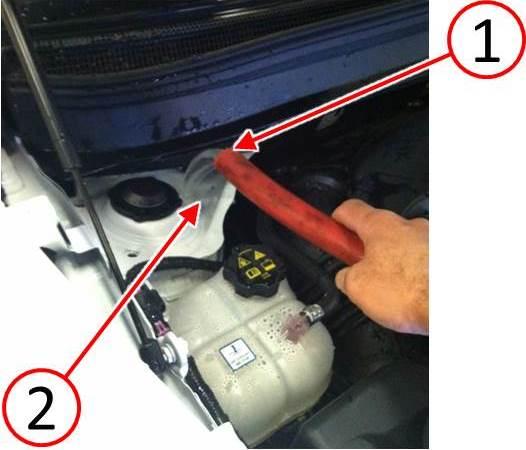
- After the sealant has been allowed to fully dry, flow water (1) into the opening (2) between the cowl plenum lower panel and dash crossmember for one full minute (Fig. 11). While water is flowing, inspect for any water leaks as described in Step #14.
Fig. 11 Water Test
1 – Water Hose Flowing Water
2 – Opening Into Water Management Trough
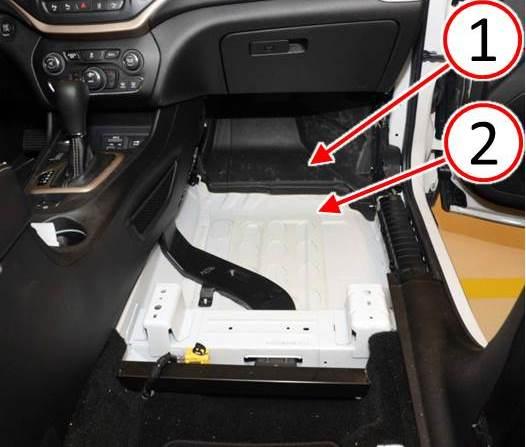
- Inspect for any trace of water coming from under the insulating material (1) and appearing in the right front footwell (2) (Fig. 12). If no water is found entering the vehicle interior during the water test then the sealant process is complete.
Fig. 12 Inspect For Water Leak
1 – Insulating Material
2 – Right Front Footwell
- Install the air inlet duct (2) and tighten the air inlet duct clamps (1) to 4 Nm (35 in. lbs.) (Fig. 13).
Fig. 13 Install Engine Air Inlet Duct
1 – Clamps
2 – Air Inlet Duct
- Install the engine cover.
- Install the carpet (1) to the right front footwell (Fig. 14).
Fig. 14 Install Right Side Front Footwell Carpet
1 – Carpet
- Align and position the right side floor console panel (1) then hand tap to engage the retaining tabs securing the panel to the console (Fig. 15).
Fig. 15 Install Right Side Floor Console Panel
1 – Floor Console Panel
- Position the front door sill scuff plate (1) then hand tap to engage the retaining clips securing it to the door sill and lower B-pillar trim (Fig. 16).
Fig. 16 Install Right Front Door Sill Scuff Plate
1 – Door Sill Scuff Plate
- Position the closeout trim panel (3) located between the A-pillar trim and the front scuff plate then seat the retaining clips (1 and 2) fully (Fig. 17).
Fig. 17 Install Right Side A-Pillar Extension Trim
1 – A-Pillar Extension Trim
2 – Retaining Tabs
3 – Push Pin Fasteners
- Position the instrument panel end cap (1) over retaining slots and firmly snap into place (Fig. 18).
Fig. 18 Install Right Side Instrument Panel End Cap
1 – Instrument Panel End Cap
NOTE: Configure the occupant classification module after seat installation.
- Install the right side front seat (1) (Fig. 19). Refer to the detailed service procedures available in DealerCONNECT> TechCONNECT under: Service Info> 23 – Body> Seats, Front> SEAT> Installation.
Fig. 19 Install Right Side Front Seat
1 – Right Front Seat
POLICY:
Reimbursable within the provisions of the warranty.
TIME ALLOWANCE:
| Labor Operation No: | Description | Skill Category | Amount |
|---|---|---|---|
| 23-50-01-9G | Seal The Cowl Plenum Lower Panel To Dash Crossmember Seam (2 – Skilled) | 6 – Electrical and Body Systems | 1.0 Hrs. |
FAILURE CODE:
| ZZ | Service Action |
PART REIMBURSEMENT DETAIL:
| Part No: | Description |
|---|---|
| NPN | 1/12 Of Kent® Spray Leak Check P50087 |
| NPN | 1/12 Of Kent® Spray Can Extension Tubes P90175 |
NOTE: This part number is for reimbursement only and will need to be claimed for 1/12 the value of Kent® Spray Leak Check P50087 or it will be rejected. If this is a non-MOPAR part or product, a copy of the invoice showing the purchase of the non-MOPAR part or product needs to be attached to the reimbursement claim.
NOTE: This part number is for reimbursement only and will need to be claimed for 1/12 the value of Kent® Spray Can Extension Tubes P90175 or it will be rejected. If this is a non-MOPAR part or product, a copy of the invoice showing the purchase of the non-MOPAR part or product needs to be attached to the reimbursement claim.
 Loading...



I have a 2017 Jeep Cherokee limited and the left (drivers side) footwell keeps getting water in it. We think that this is the problem!!