| “This site contains affiliate links for which OEMDTC may be compensated” |
NHTSA Campaign Number: 16V044
Component(s): VISIBILITY
Potential Number of Units Affected: 184
Manufacturer: Chrysler (FCA US LLC)
SUMMARY:
FCA US LLC (Chrysler ) is recalling certain model year 2015-2016 Chrysler
 Town and Country, and 2014-2015 Dodge
 Grand Caravan vehicles manufactured August 16, 2014, to December 5, 2015.
The windshield on the affected vehicles may have been installed using expired urethane primer, allowing the windshield to become displaced in the event of a crash.
As such, these vehicles fail to comply with the requirements of Federal Motor Vehicle Safety Standard (FMVSS) number 212, “Windshield Mounting.”
CONSEQUENCE:
If the windshield dislodges during a crash, there is an increased risk of occupant injury.
REMEDY:
Chrysler will notify owners, and dealers will replace the windshield, free of charge.
The recall began March 4, 2016.
Owners may contact Chrysler customer service at 1-800-853-1403.
Chrysler ’s number for this recall is S02.
NOTES:
Owners may also contact the National Highway Traffic Safety Administration Vehicle Safety Hotline at 1-888-327-4236 (TTY 1-800-424-9153), or go to www.safercar.gov.
Check if your Vehicle has a Recall
March 2016
Dealer Service Instructions for:
Safety Recall S02 / NHTSA 16V-044 Windshield Urethane Primer
Models
NOTE: This recall applies only to the above vehicles built from August 16, 2014 through December 05, 2015 (MDH 081600 through 120503).
| IMPORTANT: Some of the involved vehicles may be in dealer new vehicle inventory. Federal law requires you to complete this recall service on these vehicles before retail delivery. Dealers should also consider this requirement to apply to used vehicle inventory and should perform this recall on vehicles in for service. Involved vehicles can be determined by using the VIP inquiry process. |
Subject
The windshield on about 180 of the above vehicles may have been replaced at the assembly plant using expired windshield urethane primer. The use of expired primer may cause inadequate bonding of the windshield to the vehicle. If the windshield dislodges during a crash, there is an increased risk of occupant injury.
The condition above may not conform to Federal Motor Vehicle Safety Standard (FMVSS) 571 – Windshield Mounting.
Repair
The windshield must be replaced on all involved vehicles.
Alternate Transportation
Dealers should attempt to minimize customer inconvenience by placing the owner in a loaner vehicle if the vehicle must be held overnight.
Parts Information
| Part Number | Description |
|---|---|
| 68067653AB | Windshield (with Rain Sensitive Wipers) |
| 68067654AB | Windshield (without Rain Sensitive Wipers) |
| 04864015AC | Windshield Installation Kit |
| 05109468AE | Molding, Windshield (Right Side) |
| 05109469AE | Molding, Windshield (Left Side) |
| 83100051AC | Urethane, Windshield Glass or equivalent (MS-CD-929)* |
*NOTE: Use additional windshield glass urethane as required. Windshield glass urethane supplied in the windshield installation kit may not be sufficient to complete the bead around the perimeter of the windshield.
Parts Return
No parts return required for this campaign.
Special Tools
No special tools are required to perform this service procedure.
Service Procedure
Replace Windshield
NOTE: Read all instructions prior to starting this procedure.
NOTE: The windshield is attached to the window frame (fence) with urethane adhesive. The urethane adhesive is applied cold and seals the surface area between the window opening and the glass. The primer adheres the urethane adhesive to the windshield.
WARNING: Do not operate the vehicle within 4 hours of windshield installation. Allow at least 4 hours for the urethane adhesive to cure indoors prior to driving the vehicle. If it is not cured at least 4 hours, the windshield may not perform properly in an accident.
CAUTION: Open both front door windows before installing the window to avoid pressurizing the passenger compartment if a door is slammed before the urethane bonding is fully cured. Water leaks can result.
- Lower both front door windows.
- Open the hood and disconnect the battery negative cable.
- Use the following steps to remove and save the rear view mirror.
a. If equipped, disconnect the rear view mirror harness connector.
b. Loosen the rear view mirror base set screw.
c. Slide the rear view mirror base upward and off the bracket.
- Use the following steps to remove and save the Light Rain Sensor Module (LRSM), if equipped.
a. Remove the trim cover from over the LRSM mounting bracket on the inside of the windshield near the inside rear view mirror, place a thumb over the top of the cover on each side of the wiring clearance notch and hook both index fingers on the lower end of the cover. Push firmly and evenly downward with your thumbs while simultaneously pulling the bottom of the cover away from the glass with your fingers.
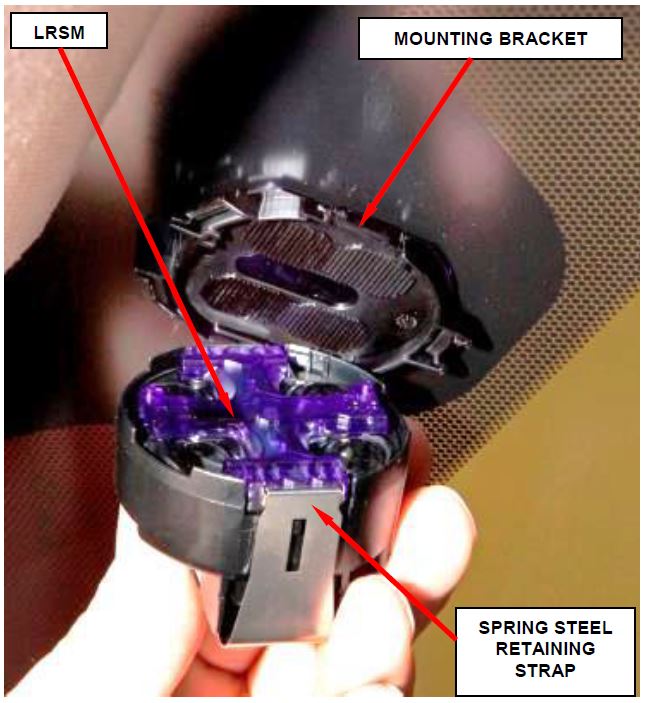
Figure 1 – Light Rain Sensor Module
b. Disconnect the wire harness connector from the LRSM.
c. Depress one side of the spring steel retaining strap on the LRSM towards the windshield while lightly prying the end of the strap closest to the glass away from the tab of the mounting bracket on the windshield. Now rotate the loose side of the LRSM away from the glass far enough to disengage the other side of the strap from the mounting bracket tabs (Figure 1).
d. Remove the LRSM from the mounting bracket.
- Use the following steps to remove the cowl grille.
a. Remove and save the windshield wiper arms.
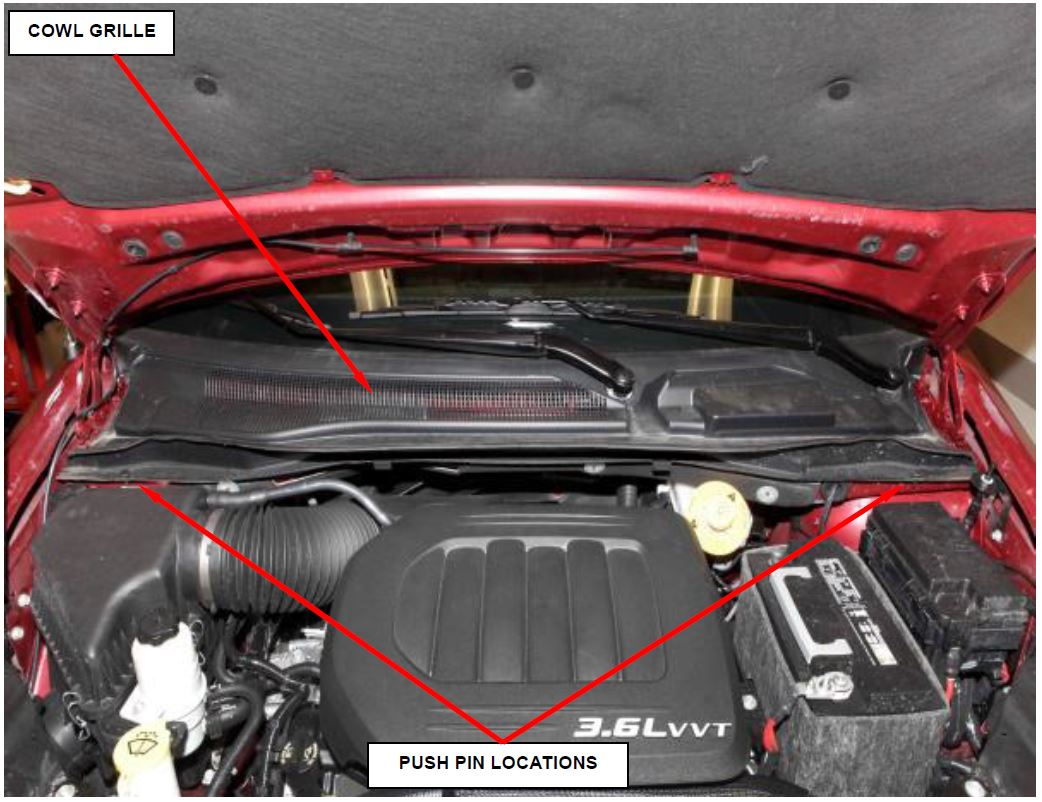
b. Remove and save the two push pins for the cowl grille and pull the cowl grille towards the front of the vehicle (Figure 2).
c. Remove and save the cowl grille.
Figure 2 – Cowl Grille
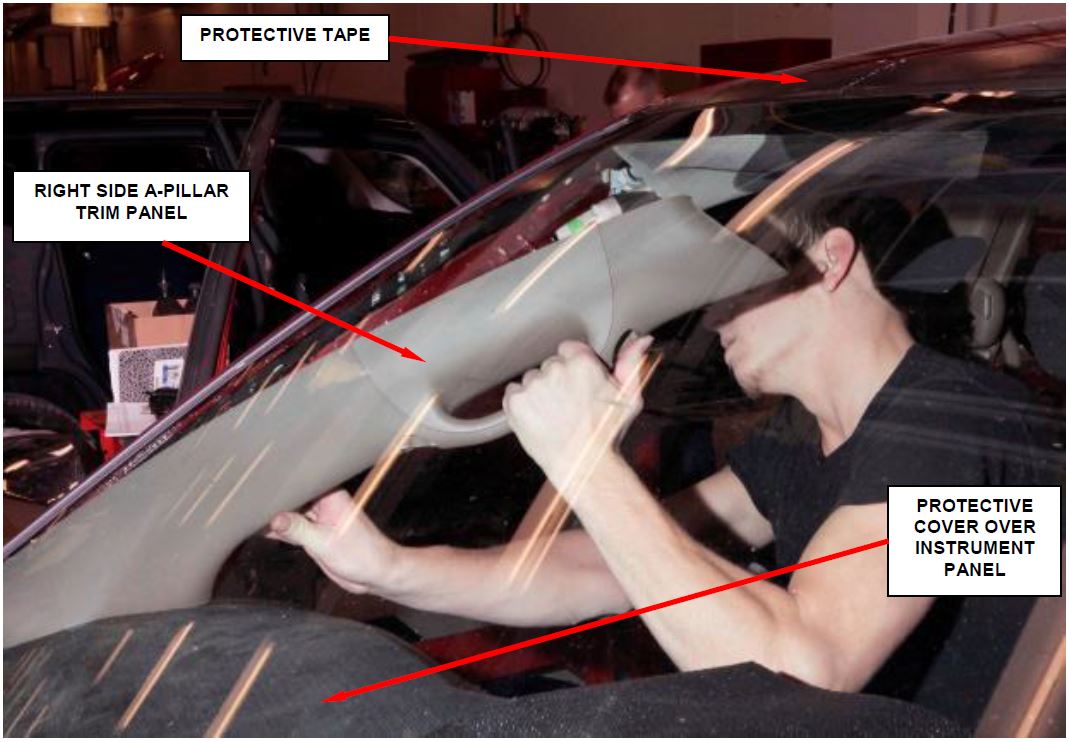
- Apply protective tape to the painted roof surface at the top of the windshield (Figure 3).
- Place an appropriate protective material over the instrument panel (Figure 3).
- Remove the right and left side A-pillar trim panels (Figure 3).
Figure 3 – Right A-Pillar Trim Panel
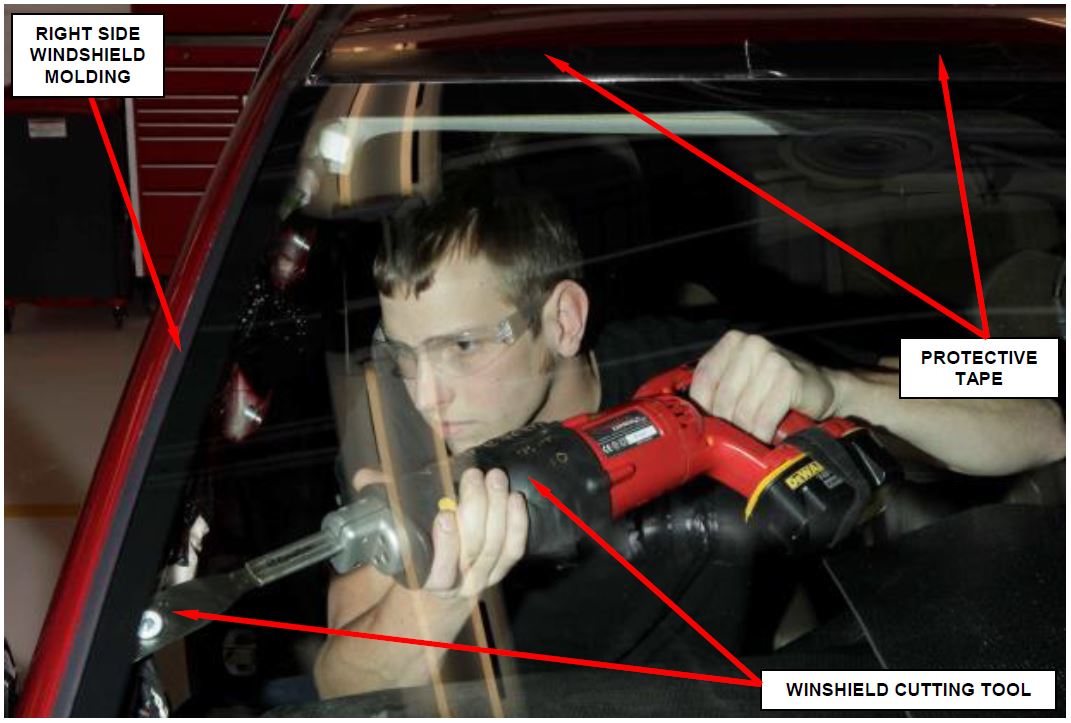
- Using an appropriate windshield cutting tool carefully cut and separate the urethane adhesive securing the windshield to the windshield fence (Figure 4).
- Remove and discard the windshield and windshield side moldings (Figure 4).
CAUTION: After windshield installation leave the left front door glass slightly open for at least 24 hours to avoid pressurizing the passenger compartment. If a door is slammed before the urethane bonding is fully cured water leaks can result.
Figure 4 – Windshield Cutting Tool
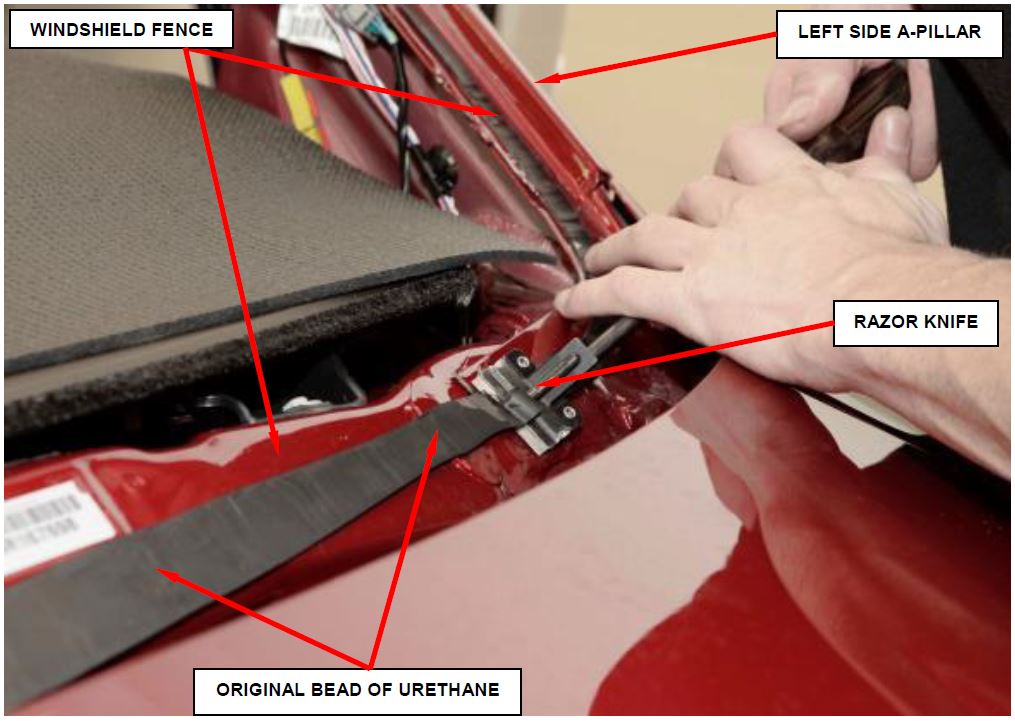
CAUTION: To prevent corrosion, do not damage paint on windshield fence when removing original urethane.
CAUTION: The windshield fence should be cleaned of most of its old urethane adhesive. A small amount of old urethane, approximately 0.04 in. (1 mm) in height should remain on the fence. Do not completely remove all old urethane from the fence, the paint finish and bonding strength will be adversely affected.
- Using a razor knife or equivalent, level the original bead of urethane on the windshield fence to a thickness of approximately 0.04 in. (1 mm) and remove any damaged adhesive backed spacers (Figure 5).
Figure 5 – Urethane on the Windshield Fence
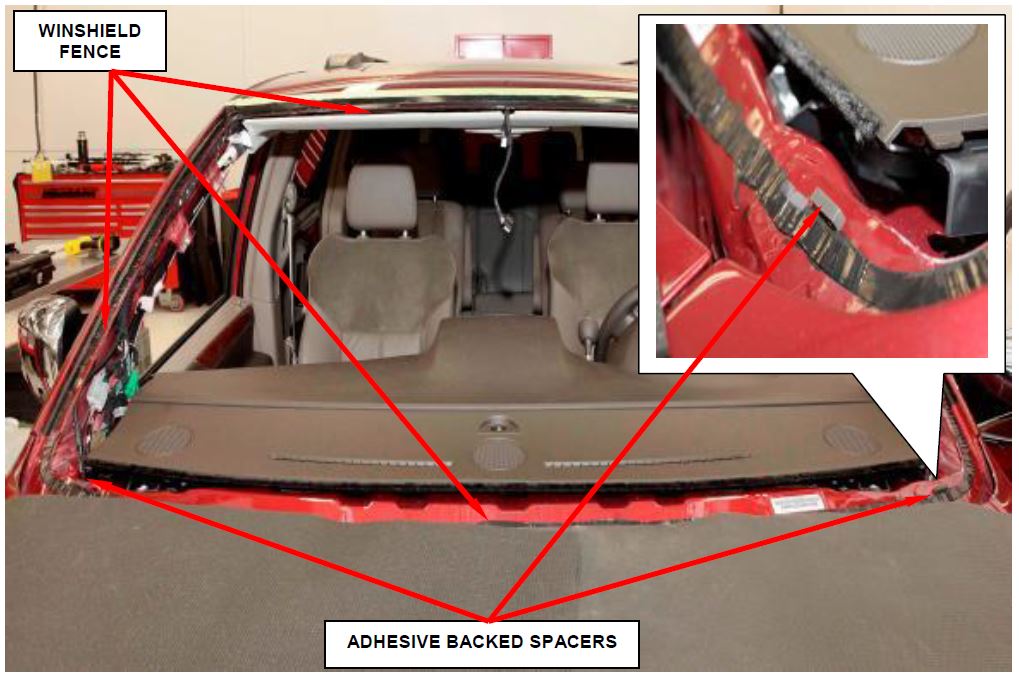
- Install NEW adhesive backed spacers along the windshield fence as required (Figure 6).
WARNING: Do not use solvent based glass cleaners to clean the windshield before applying glass prep and primer or poor glass adhesion may result.
- Clean the inside of the NEW windshield with an ammonia-based glass cleaner and a lint-free cloth.
Figure 6 – Adhesive Backed Spacers
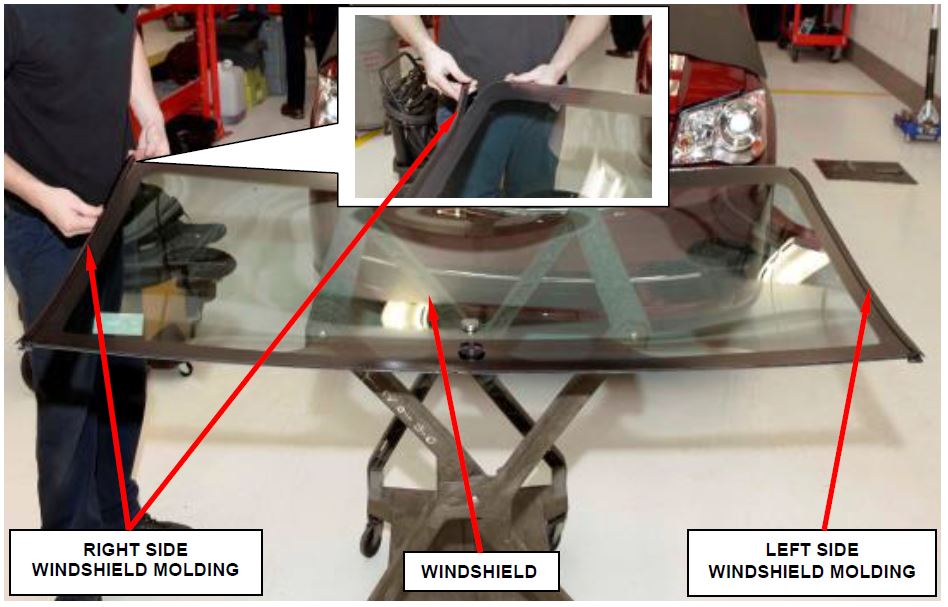
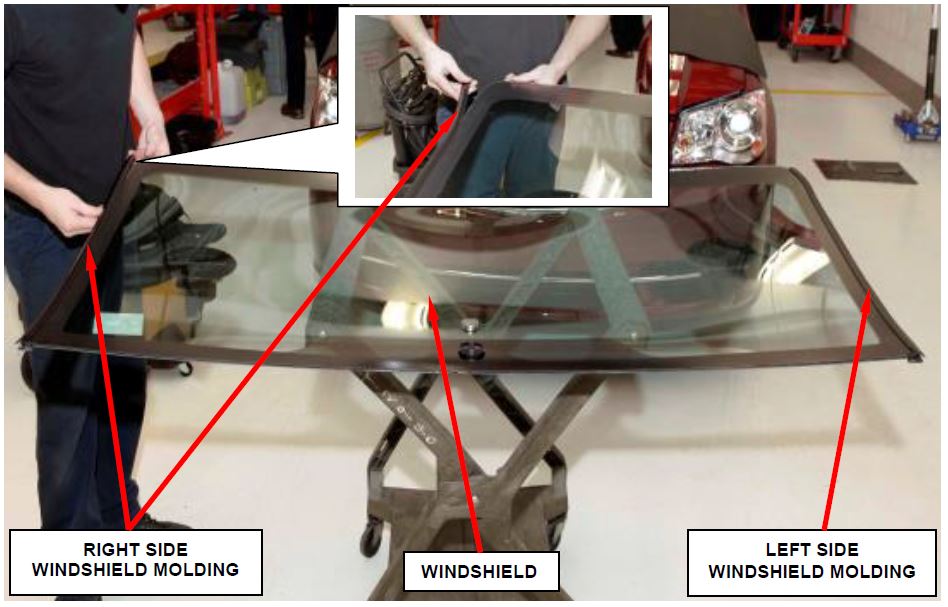
- Install two NEW windshield moldings along the right and left sides of the NEW windshield (Figure 7).
- Using an assistant, position the windshield into the windshield opening and against the windshield fence and spacers.
- Verify the windshield lays evenly against the fence at the top, bottom and sides of the opening. If not, the fence must be formed to the shape of the windshield.
- Mark the windshield and the windshield fence with a grease pencil or pieces of masking tape to use as a reference for installation.
- Using an assistant, remove the windshield from the windshield opening and place it on a suitable padded work surface.
Figure 7 – Windshield Side Moldings
- Apply glass prep adhesion promoter 1 in. (25 mm) wide around the perimeter of the windshield and 0.2 in. (5 mm) from the outside edge of the black border on the glass as shown and allow to air dry (Figure 8).
- Apply glass primer 1 in. (25 mm) wide around the perimeter of the windshield and 0.2 in. (5 mm) from the outside edge of the black border on the glass as shown. Allow at least three minutes drying time (Figure 8).
- Using a flashlight, verify that the primer is completely and evenly installed along the perimeter of the windshield.
- Re-prime any area that is not fully and evenly primed.
Figure 8 – Glass Prep and Primer
- Clean the windshield fence with an ammonia-based glass cleaner and a lint-free cloth.
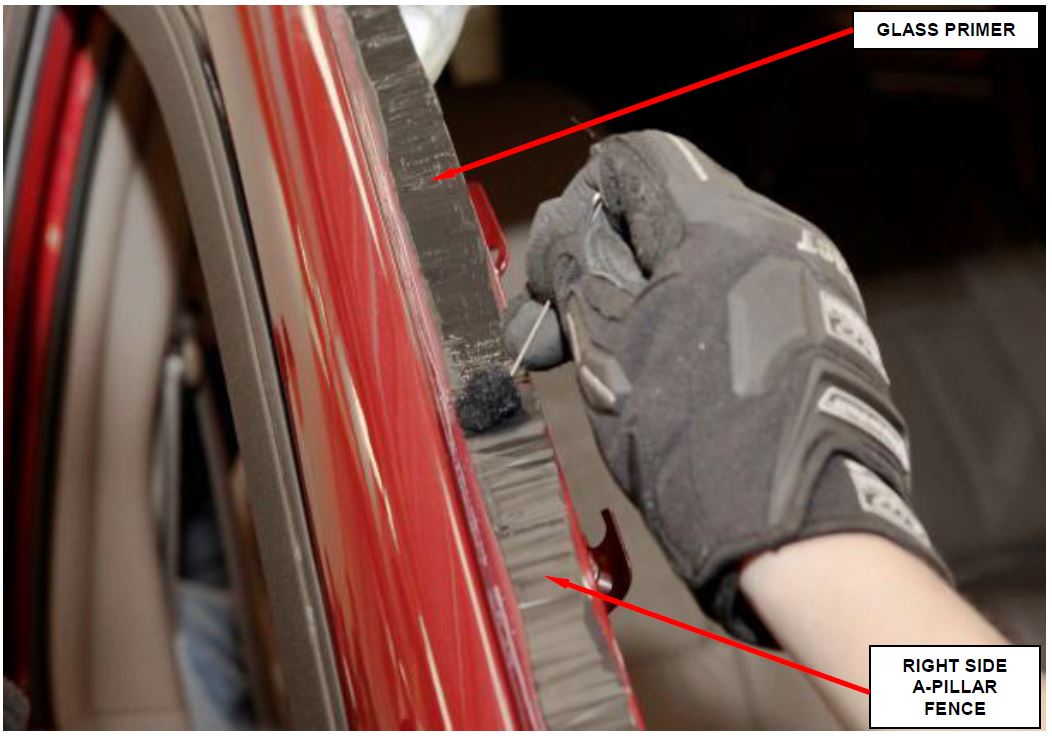
- Apply glass primer 0.75 in. (15 mm) wide around the windshield fence (Figure 9). Allow at least three minutes drying time.
- Using a flashlight, verify that the primer is completely and evenly installed along the windshield fence.
- Re-prime any area that is not fully and evenly primed.
Figure 9 – Windshield Fence Glass Primer
CAUTION: Always apply the bead of adhesive to the windshield. Always install the windshield within 5 minutes after applying the adhesive.
NOTE: If the original urethane adhesive has been exposed for more than 12 hours, the entire adhesive area will need to be re-primed prior to installing new adhesive.
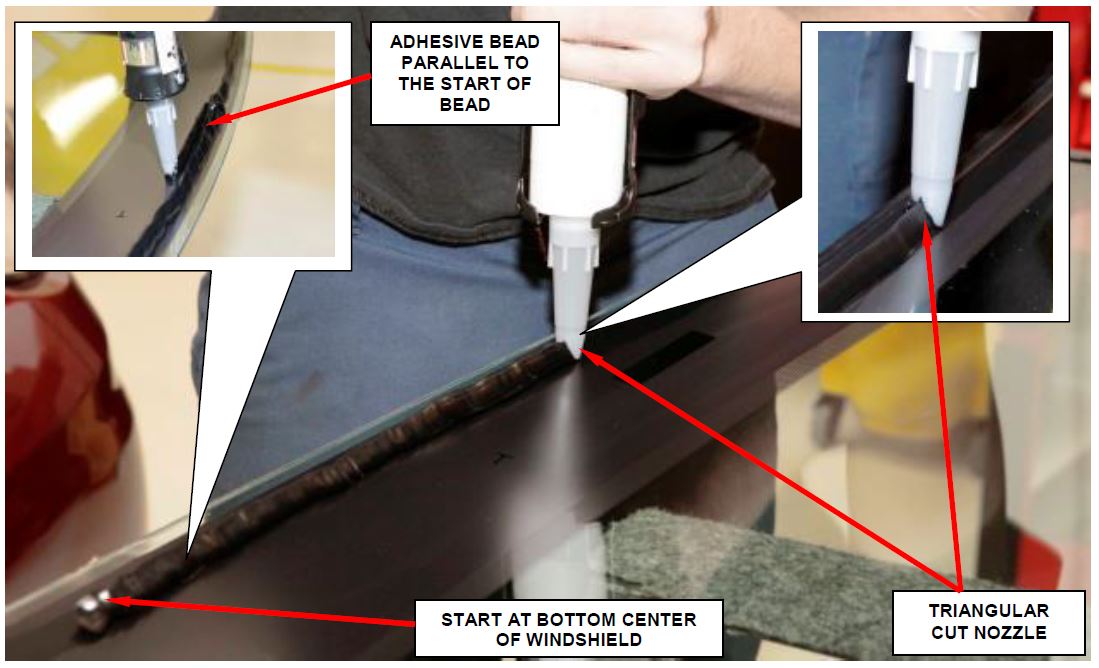
- Apply approximately a 0.4 in. (10 mm) wide bead of adhesive with a triangular nozzle approximately 0.25 in. (6 mm) from the edge of the glass starting at the bottom center of the windshield (Figure 10).
- Run the end of the adhesive bead on the windshield parallel to the start of the bead and smooth the ends flush (Figure 10).
- With the help of an assistant, position the windshield over the windshield opening.
Figure 10 – Apply Adhesive Bead
- Using the grease pencil marks or tape as reference points, align the windshield to the windshield opening.
- Carefully lower the windshield into the windshield opening. Guide the windshield into its proper location.
CAUTION: It is not possible to move the windshield after installation. The windshield should never be pressed into place by more than one person, because the windshield can break if pressed simultaneously on both sides.
- Push the windshield inward until the windshield comes into contact with the spacers located on each side and the bottom of the windshield fence.
- Tape the windshield in several places along the top and the sides to assure the windshield maintains its position while the urethane cures for 24 hours.
- Remove the protective tape from the roof and the instrument panel protective cover.
- Install the right and left side A-pillar trim panels.
- Install the cowl grill.
- Install the right and left wiper arms.
- Install the Light Rain Sensor Module (LRSM), if equipped.
- Install the LRSM trim cover, if equipped.
- Install the rear view mirror onto the windshield.
- Connect the battery negative cable and close the hood.
- Instruct the customer to leave the left front door glass slightly open for at least 24 hours to avoid pressurizing the passenger compartment. If a door is slammed before the urethane bonding is fully cured water leaks can result.
- Return the vehicle to the customer.
Completion Reporting and Reimbursement
Claims for vehicles that have been serviced must be submitted on the DealerCONNECT Claim Entry Screen located on the Service tab. Claims submitted will be used by FCA to record recall service completions and provide dealer payments.
Use the following labor operation number and time allowance:
| Labor Operation Number | Time Allowance | |
|---|---|---|
| Replace Windshield Glass | 23-S0-21-82 | 2.1 hours |
NOTE: See the Warranty Administration Manual, Recall Claim Processing Section, for complete recall claim processing instructions.
Dealer Notification
To view this notification on DealerCONNECT, select “Global Recall System” on the Service tab, then click on the description of this notification.
Owner Notification and Service Scheduling
All involved vehicle owners known to FCA are being notified of the service requirement by first class mail. They are requested to schedule appointments for this service with their dealers. A generic copy of the owner letter is attached.
Enclosed with each owner letter is an Owner Notification postcard to allow owners to update our records if applicable.
Vehicle Lists, Global Recall System, VIP and Dealer Follow Up
All involved vehicles have been entered into the DealerCONNECT Global Recall System (GRS) and Vehicle Information Plus (VIP) for dealer inquiry as needed.
GRS provides involved dealers with an updated VIN list of their incomplete vehicles. The owner’s name, address and phone number are listed if known. Completed vehicles are removed from GRS within several days of repair claim submission.
To use this system, click on the “Service” tab and then click on “Global Recall System.” Your dealer’s VIN list for each recall displayed can be sorted by: those vehicles that were unsold at recall launch, those with a phone number, city, zip code, or VIN sequence.
Dealers must perform this repair on all unsold vehicles before retail delivery. Dealers should also use the VIN list to follow up with all owners to schedule appointments for this repair.
Recall VIN lists may contain confidential, restricted owner name and address information that was obtained from the Department of Motor Vehicles of various states. Use of this information is permitted for this recall only and is strictly prohibited from all other use.
Additional Information
If you have any questions or need assistance in completing this action, please contact your Service and Parts District Manager.
Customer Services / Field Operations
FCA US LLC
IMPORTANT SAFETY RECALL
S02 / NHTSA 16V-044
This notice applies to your vehicle (VIN: xxxxxxxxxxxxxxxxx).
This notice is sent to you in accordance with the National Traffic and Motor Vehicle Safety Act.
Dear: (Name)
FCA has decided that certain 2015 through 2016 model year Dodge Grand Caravan and Chrysler
 Town & Country vehicles fail to conform to Federal Motor Vehicle Safety Standard (FMVSS) No. 571 – Windshield Mounting.
| The problem is… | The windshield on your vehicle may have been replaced at the assembly plant using expired windshield urethane primer. The use of expired primer may cause inadequate bonding of the windshield to the vehicle. If the windshield dislodges during a crash, there is an increased risk of occupant injury.
|
| What your dealer will do… | FCA will repair your vehicle free of charge. To do this, your dealer will replace your windshield. The work will take about 2 ½ hours to complete although an additional 4 hours is required to allow the urethane to cure prior to operating the vehicle. However, additional time may be necessary depending on service schedules.
|
| What you must do to ensure your safety… | Simply contact your Chrysler , Jeep , Jeep , Dodge , Dodge or RAM or RAM dealer right away to schedule a service appointment. Ask the dealer to hold the parts for your vehicle or to order them before your appointment. Please bring this letter with you to your dealer. dealer right away to schedule a service appointment. Ask the dealer to hold the parts for your vehicle or to order them before your appointment. Please bring this letter with you to your dealer.
|
| If you need help…
| If you have questions or concerns which your dealer is unable to resolve, please contact the FCA Group Recall Assistance Center at either fcarecalls.com or 1-800-853-1403. |
Please help us update our records by filling out the attached prepaid postcard if any of the conditions listed on the card apply to you or your vehicle. If you have further questions go to fcarecalls.com.
If you have already experienced this specific condition and have paid to have it repaired, you may visit www.fcarecallreimbursement.com to submit your reimbursement request online or you can mail your original receipts and proof of payment to the following address for reimbursement consideration: FCA Customer Assistance, P.O. Box 21-8004, Auburn Hills, MI 48321-8007, Attention: Recall Reimbursement. Once we receive and verify the required documents, reimbursement will be sent to you within 60 days. If you’ve had previous repairs and/or reimbursement you may still need to have the recall repair performed on your vehicle.
If your dealer fails or is unable to remedy this defect without charge and within a reasonable time, you may submit a written complaint to the Administrator, National Highway Traffic Safety Administration, 1200 New Jersey Ave., S.E., Washington, DC 20590, or you can call the toll-free Vehicle Safety Hotline at 1-888-327-4236 (TTY 1-800-424-9153), or go to safercar.gov.
We’re sorry for any inconvenience, but we are sincerely concerned about your safety. Thank you for your attention to this important matter.
Customer Services / Field Operations
FCA US LLC
Note to lessors receiving this recall: Federal regulation requires that you forward this recall notice to the lessee within 10 days.
 Loading...
