| “This site contains affiliate links for which OEMDTC may be compensated” |
NUMBER: 05-002-03
GROUP: Brakes
DATE: June 13, 2003
SUBJECT:
Front Brake Sound While Driving in Reverse
OVERVIEW:
This bulletin involves installing revised front brake caliper adapters and new front disc pads.
MODELS:
| 2004 | (CS) | Pacifica |
NOTE: THIS BULLETIN APPLIES TO VEHICLES EQUIPPED WITH ALL WHEEL DRIVE AND BUILT ON OR BEFORE JUNE 9, 2003 (MDH 0609XX).
SYMPTOM/CONDITION:
A vehicle, after an extended soak (usually more than 8 hours) at ambient temperatures below 7.2C (45F), may exhibit a front brake squeak or squeal like sound when driving in reverse at slow speeds and with light brake application.
DIAGNOSIS:
If the vehicle operator describes the Symptom/Condition, perform the Repair Procedure.
PARTS REQUIRED:
| Qty. | Part No. | Description |
|---|---|---|
| 1 | 05134356AA | Adapter, Right Side |
| 1 | 05134357AA | Adapter, Left Side |
| 1 | 05134358AA | Disc Brake Pad Kit |
REPAIR PROCEDURE:
NOTE: PERFORM STEPS 1 THROUGH 14 ON EACH SIDE OF THE VEHICLE.
- Access and remove the front brake caliper and shoes. Refer to the service information available in TechCONNECT/MDS2 or the 2004 Pacifica Service Manual (Publication No. 81-270-04035) page 5-9.
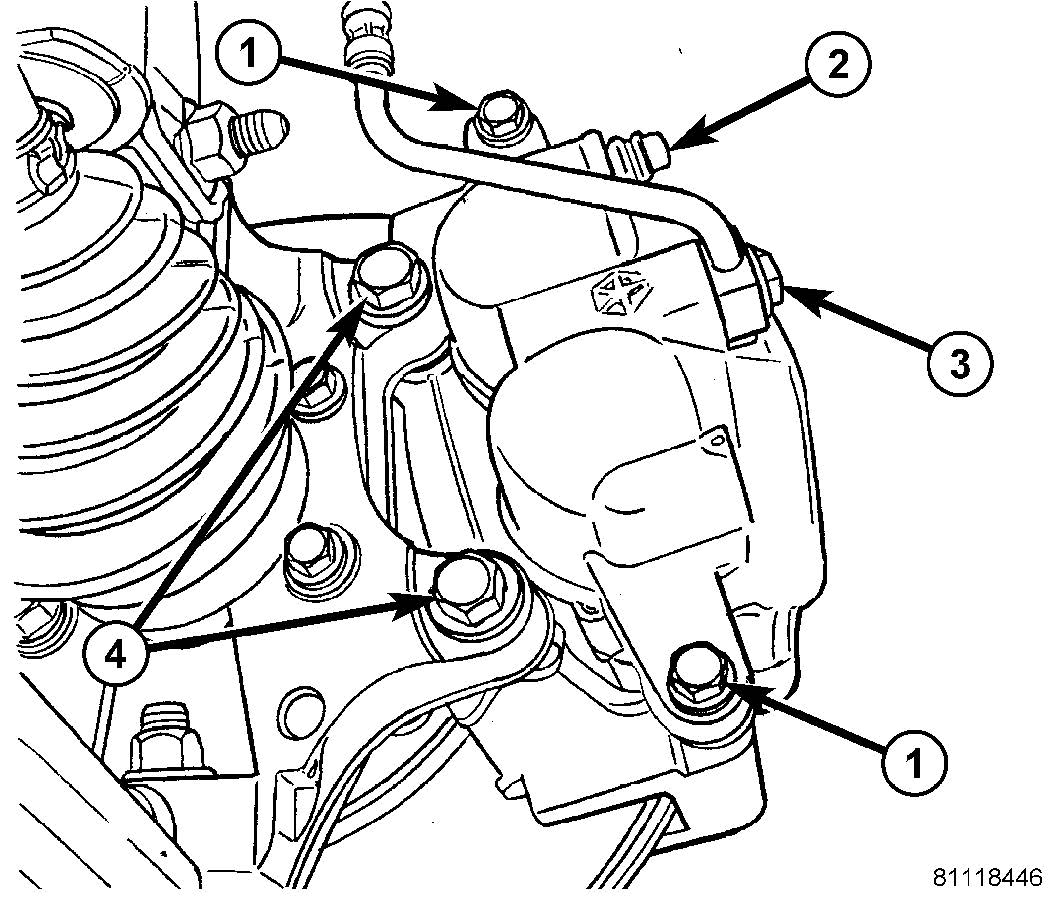
- Remove the two bolts securing the caliper adapter to the steering knuckle (Fig. 1).
- Remove the caliper adapter.
- Install the new disc brake caliper adapter on the steering knuckle (p/n 05134356AA – right side and 05134357AA – left side).
- Install the two bolts securing the caliper adapter to the steering knuckle (Fig. 1). Tighten both bolts to 169 N·m (125 ft. lbs.).
Fig. 1 Front Caliper And Adapter Mounting
1 – CALIPER GUIDE PIN BOLTS
2 – BLEEDER SCREW
3 – BRAKE HOSE BANJO BOLT
4 – CALIPER ADAPTER MOUNTING BOLTS
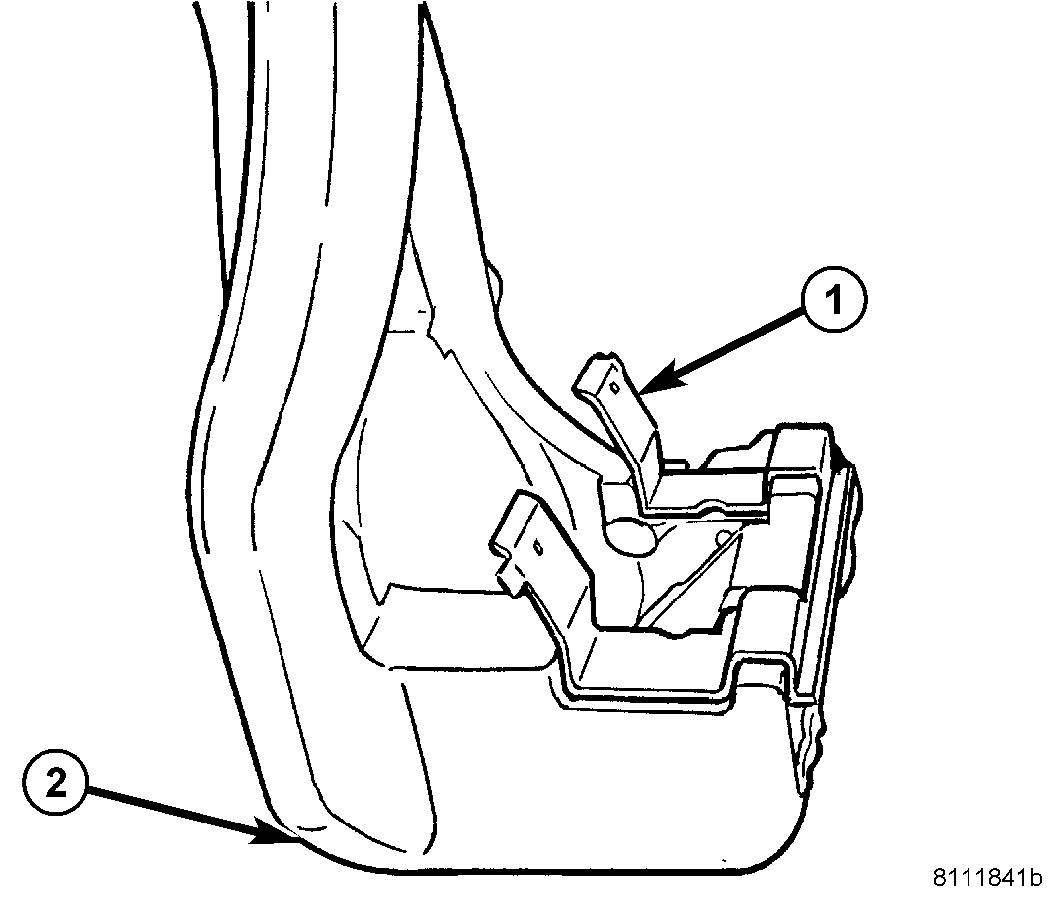
- Make sure the anti rattle clips are properly installed on the disc brake caliper adapter (Fig. 2).
Fig. 2 Anti-Rattle Clip-Lower (Upper-Typical)
1 – ANTI-RATTLE CLIP
2 – CALIPER ADAPTER
- Remove the protective paper from the noise suppression gasket on the back side of both inner and outer brake shoes.
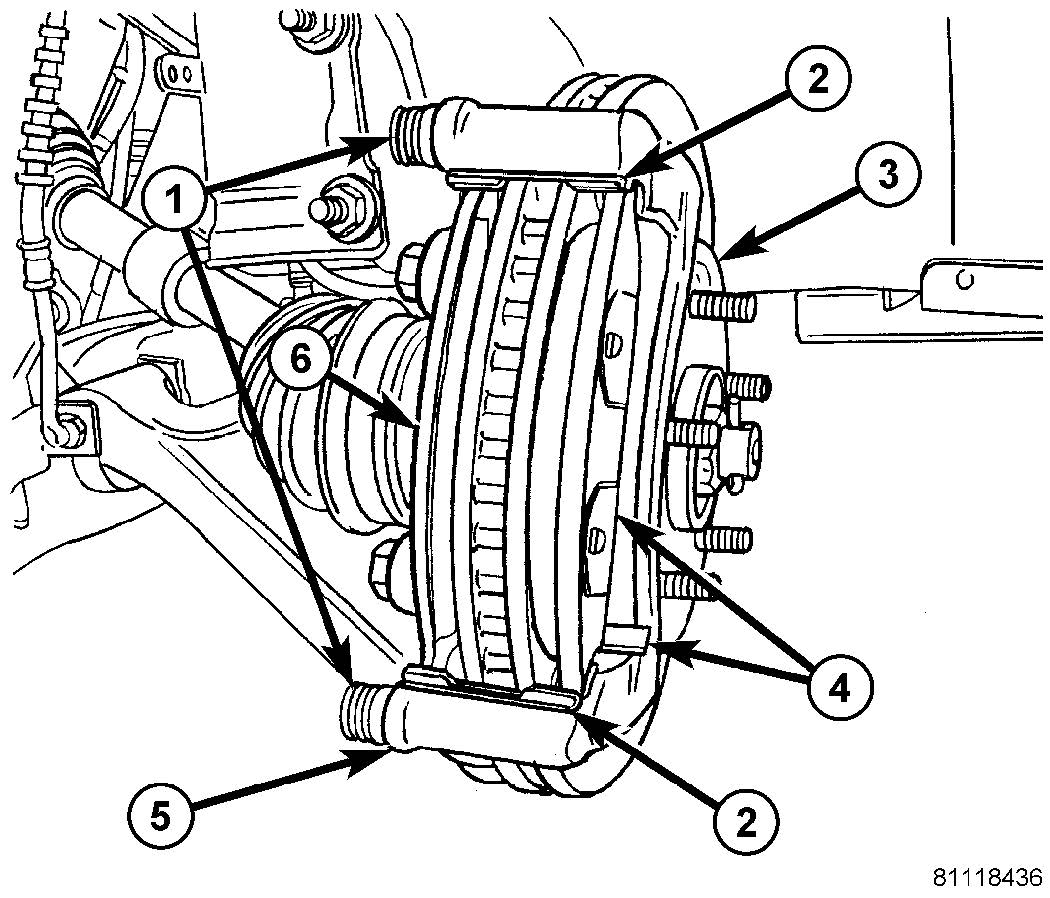
- Place the new brake shoes (p/n 05134358AA) in the anti-rattle clips on the adapter (Fig. 3).
Fig. 3 Front Brake Shoes Installed
1 – CALIPER GUIDE PINS AND BOOTS
2 – ANTI-RATTLE CLIPS
3 – BRAKE ROTOR
4 – OUTBOARD SHOE (PAD) WITH AUDIBLE WEAR INDICATOR
5 – CALIPER ADAPTER
6 – INBOARD BRAKE SHOE (PAD)
CAUTION: USE CARE WHEN INSTALLING THE CALIPER ONTO THE DISC BRAKE ADAPTER TO AVOID DAMAGING THE BOOTS ON THE CALIPER GUIDE PINS.
- Install the disc brake caliper over the brake shoes on the brake caliper adapter.
- Align the caliper guide pin bolt holes with the guide pins.
- Loosely install both caliper guide pin bolts.
- Tighten the caliper guide pin bolt closest to the bleeder screw to 43 N·m (32 ft. lbs.) (Fig. 1)
- Tighten the caliper guide pin bolt farthest from the bleeder screw to 43 N·m (32 ft. lbs.) (Fig. 1).
- Install the tire and wheel assembly. Refer to the service information available in TechCONNECT/MDS2 or the 2004 Pacifica Service Manual (Publication No. 81-270-04035) page 22-7. Tighten the wheel mounting nuts to 135 N·m (100 ft. lbs.).
- Lower the vehicle.
- Pump the brake pedal several times to set the shoes to the caliper and brake rotor.
- Check and adjust the brake fluid level as necessary.
- Road test the vehicle making several stops to wear off any foreign material on the brakes and to seat the brake shoes.
POLICY:
Reimbursable within the provisions of the warranty.
TIME ALLOWANCE:
| Labor Operation No: | Description | Amount | |
|---|---|---|---|
| 05-85-05-91 | Adapter/Support, Disc Brake – Replace Both Front | 1.0 Hrs. | |
FAILURE CODE:
| P8 | New Part |
 Loading...


