| “This site contains affiliate links for which OEMDTC may be compensated” |
NUMBER: 23-018-15
GROUP: Body
DATE: May 22, 2015
SUBJECT:
Rattle Or Buzzing Noise In Rear Shelf Area With Radio On Or While Driving On Bumpy Roads
OVERVIEW:
This bulletin involves modification or replacement of the backlite rear shelf.
MODELS:
NOTE: This bulletin applies to vehicles on or before February 2, 2015 (MDH 0202XX) equipped with the Harman Kardon Audio Group (sales code AY1).
SYMPTOM/CONDITION:
The customer may describe a rattle or buzz noise coming from the rear of the vehicle with the radio on or while driving on bumpy roads. This may be caused by the rear shelf moving relative to the backlite.
DIAGNOSIS:
If the customer describes the symptom/condition listed above, perform the Repair Procedure.
PARTS REQUIRED:
| Qty. | Part No. | Description |
|---|---|---|
| 1 | 68141657AB | SEAL, Windshield |
| AR | 1VV91DX9AA | COVER, Anchor (Black) |
| AR | 1VV91HL1AA | COVER, Anchor (Frost Beige) |
REPAIR PROCEDURE:
- Verify the rattle or buzz noise is coming from the rear shelf panel by playing audio with heavy bass tones while lightly pressing on the rear edge of the rear shelf panel.
- Was the rattle or buzz noise eliminated by pressing on the rear shelf panel?
- YES>>> Continue with the Repair Procedure.
- NO>>> This Bulletin does not apply. Normal diagnosis should be performed.
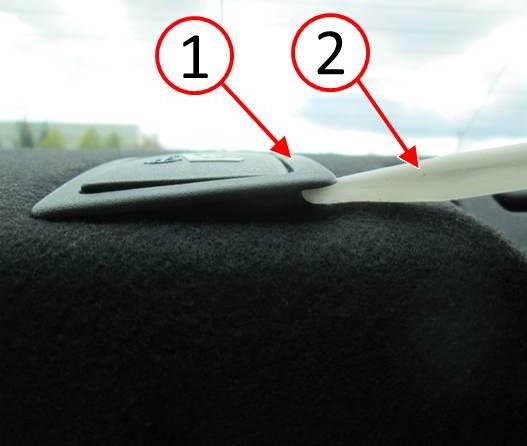
- Using a trim stick or equivalent tool (2), carefully remove the three anchor covers (1) by carefully prying the anchor covers on the sides near the forward edge (Fig. 1).
Fig. 1 Anchor Cover Removal
1 – Anchor Cover
2 – Trim Stick
- Remove the rear shelf panel. Refer to the detailed procedures available in DealerCONNECT > TechCONNECT> under: Service Info> 23 – Body> Interior> PANEL, Rear Shelf> Removal.
- Inspect all wiring and components for looseness. If necessary, secure wiring and components. Remove any loose stock found on the rear shelf support.
- Confirm that all module, speaker and seatbelt retractor fasteners are secured properly. Refer to DealerCONNECT> TechCONNECT for torque specifications.
- With the shelf panel removed, play the audio system to verify that the audio system is performing as expected.
- What type of vehicle is being serviced?
- (LD) Charger >>> Proceed to Step #9.
- (LX) 300 >>> Proceed to Step #14.
NOTE: Step #9 through Step #13 apply to (LD) Dodge Charger vehicles only.
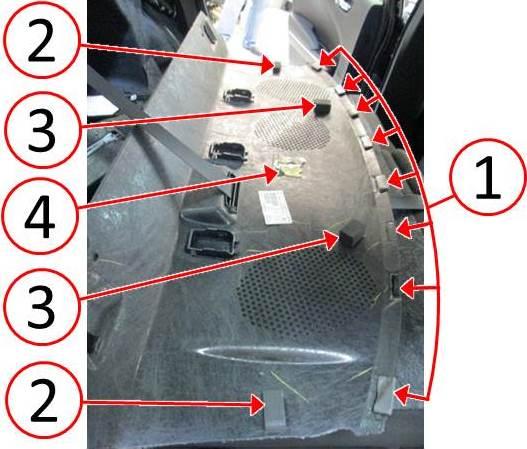
- Inspect the underside of the rear shelf for two 45 x 25 mm foam blocks (2) on outboard edges, two 45 x 30 mm foam blocks (3) in the center, and one retaining clip (4) in the center of the shelf (Fig. 2). If any of these items are missing, replace the rear shelf panel with a NEW shelf panel.
- Remove the eight 50 x 20 mm foam pieces (1) along the rear edge of the shelf panel.For SRT vehicles built prior to January 1, 2012 the eight foam pieces (1) will not be present (Fig. 2).
- Remove any loose part tags that may be adhered to the rear shelf panel.
Fig. 2 Rear Shelf Panel Underside
1 – Foam 50 x 20 mm
2 – Foam 45 x 25 mm
3 – Foam 45 x 30 mm
4 – Clip
- Cut the windshield seal to 1079.5 mm (42.5 in.) length.
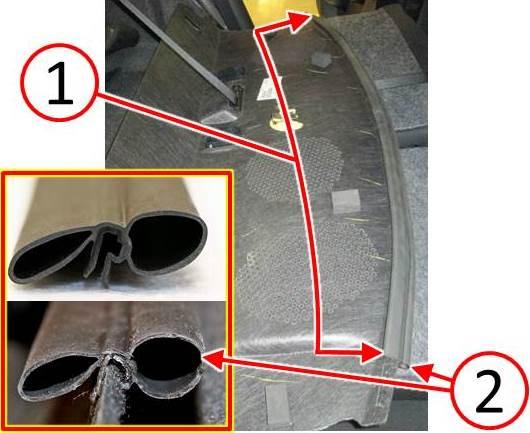
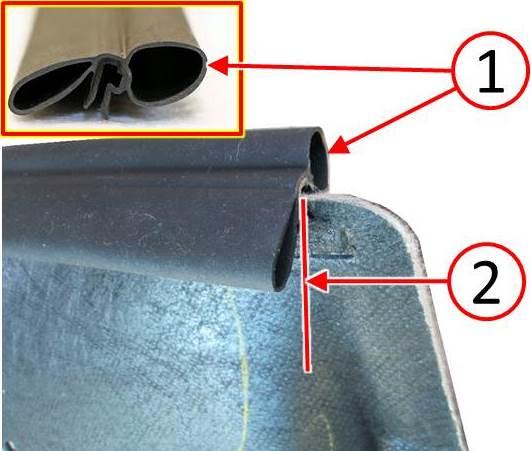
- Install the seal to the rear edge of the rear shelf panel (1) with the round bulb of the seal (2) facing toward the top visible side of the shelf when installed. Position the seal in the center of the shelf panel (1) using the first indent on the underside of the shelf panel where the foam was previously installed as a guide (Fig. 3).
Fig. 3 Seal Installed On Rear Shelf Panel
1 – Seal Location
2 – Seal Bulb
NOTE: For (LD) Dodge Charger vehicles, proceed to Step #19.
NOTE: Step #14 through Step #18 apply to (LX) Chrysler 300 vehicles only.
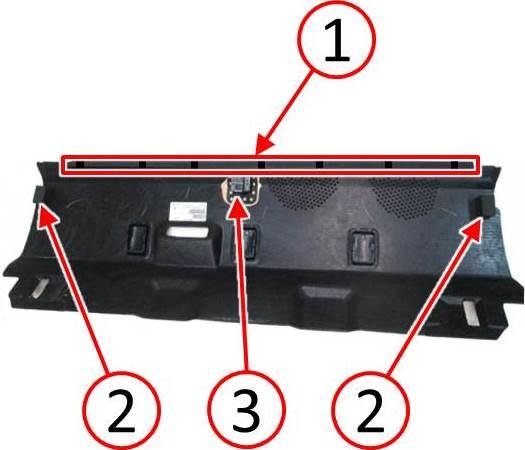
- Inspect the underside of the rear shelf for two 25 x 45 x 50 mm foam blocks (2) on outboard edges and one retaining clip (3) in the center of the shelf (Fig. 4). If any of these items are missing, replace the rear shelf panel with a NEW shelf panel.
- Remove the seven 50 x 20 mm foam pieces (1) along the rear edge of the shelf panel (Fig. 4).
- Remove any loose part tags that may be adhered to the rear shelf panel.
Fig. 4 Underside Of The Rear Shelf Panel
1 – Foam 50 x 20 mm
2 – Foam 25 x 45 x 50 mm
3 – Clip
- Cut windshield seal to 1244.6 mm (49 in.) length.
- Install the seal to the rear edge of the rear shelf panel with the round bulb of the seal(1) facing toward the top visible side of the shelf when installed. Position the seal in the center of the shelf panel using the center of the first indent (2) on the underside of the shelf panel where the foam was previously installed as a guide (Fig. 5).
Fig. 5 Seal Installed On The Rear Edge Of The Rear Shelf Panel
1 – Seal Bulb
2 – Indent Center
NOTE: Step #19 through Step #22 apply to both (LD) Dodge Charger and (LX) Chrysler
 300 vehicles.
- Replace the rear shelf panel. Refer to the detailed procedures available inDealerCONNECT > TechCONNECT> under: Service Info> 23 – Body> Interior> PANEL, Rear Shelf> Installation.
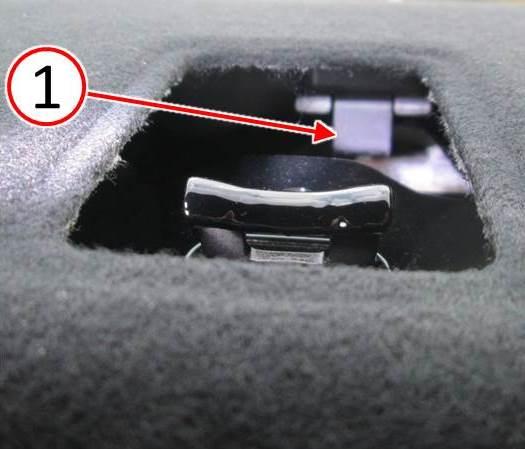
- Take care to ensure the metal clip (1) in the center of the rear shelf panel is attached properly to the rear shelf. By looking through the opening for the center anchor cover, it is possible to verify that the clip (1) is engaged (Fig. 6).
Fig. 6 Shelf Panel Clip Engagement
1 – Clip
- Install the new anchor covers.
- Refer to and perform if applicable, all Audio Enhancement related Service Bulletins.
VERIFICATION:
Play audio with heavy bass tones to verify that the noise has been eliminated.
POLICY:
Reimbursable within the provisions of the warranty.
TIME ALLOWANCE:
| Labor Operation No: | Description | Skill Category | Amount |
|---|---|---|---|
| 23-20-72-95 | Inspect Buzz or Rattle Noise at Rear Shelf (1 – Semi-Skilled) | 6 – Electrical and Body Systems | 0.2 Hrs. |
| 23-20-72-96 | Inspect and Repair Rear Shelf Trim Panel (1 – Semi-Skilled) | 6 – Electrical and Body Systems | 0.5 Hrs. |
FAILURE CODE:
| ZZ | Service Action |
 Loading...
