| “This site contains affiliate links for which OEMDTC may be compensated” |
NHTSA Campaign Number: 16V114
Component(s): AIR BAGS , SEATS
Potential Number of Units Affected: 78
Manufacturer: Chrysler (FCA US LLC)
SUMMARY:
Chrysler (FCA US LLC) is recalling certain model year 2015 Chrysler 200 vehicles manufactured April 7, 2014, to August 3, 2015.
During service work, the affected vehicles may have had either the Occupant Classification Module (OCM) or the Seat Cushion Foam (SCF) of the front passenger seat replaced instead of the both pieces together, which make up a complete calibrated set.
CONSEQUENCE:
If both pieces were not replaced together, the occupant detection and classification system may not be properly calibrated and the passenger air bag may improperly deploy in the event of a crash, increasing the risk of injury.
REMEDY:
Chrysler will notify owners, and dealers will install a new OCM-SCF seat service kit, free of charge.
The recall began on May 27, 2016.
Owners may contact Chrysler customer service at 1-800-853-1403.
Chrysler’s number for this recall is S09.
NOTES:
Owners may also contact the National Highway Traffic Safety Administration Vehicle Safety Hotline at 1-888-327-4236 (TTY 1-800-424-9153), or go to www.safercar.gov.
Check if your Vehicle has a Recall
Revised June 2016
Dealer Service Instructions for:
Safety Recall S09 / NHTSA 16V-114 Occupant Classification Module
NOTE: Revised procedure to include vehicles without Comfort Seat and Wheel Module (CSWM). Revised the CSWM part numbers.
Models
| 2015 | (UF) | Chrysler 200 |
NOTE: This recall applies only to the above vehicles with Occupant Classification System (Sales Code XCA) built from April 07, 2014 through August 03, 2015 (MDH 040712 through 080307).
| IMPORTANT: Some of the involved vehicles may be in dealer new vehicle inventory. Federal law requires you to complete this recall service on these vehicles before retail delivery. Dealers should also consider this requirement to apply to used vehicle inventory and should perform this recall on vehicles in for service. Involved vehicles can be determined by using the VIP inquiry process. |
Subject
The Occupant Classification Module (OCM) / Seat Cushion Foam (SCF) on about 50 of the above vehicles may have been serviced with a kit that may not have been calibrated correctly. The OCM and SCF are calibrated together during the manufacturing process as a matched set. An improperly calibrated OCM/SCF service kit has the potential to not deploy a passenger seat airbag at the proper stage for the passenger seat occupant. This could increase the risk of passenger seat occupant injury during a crash.
Repair
The OCM/SCF must be replaced with a matched set on all involved vehicles.
Parts Information
| Part Number | Description |
|---|---|
| For vehicles with sales codes *A5 and *BL use the following parts: | |
| 68260866AD | Module Kit – Occupant Classification |
| 68189208AC | Mat, Heated Seat (2 per vehicle if driver side is required) |
| 68137149AE | Cushion, Driver Side (w/o MWX) (if required) |
| 68223678AE |
Module, Comfort Seat and Wheel (with heated steering wheel) (if required) |
| 68223675AE | Module, Comfort Seat and Wheel (without heated steering wheel) (if required) |
| 68289253AA | Clip, U-Retainer – Trim Cover (MSQ 4) (one package services one seat) |
| 68248876AA | Hog Ring, Seat (MSQ 10) (requires two packages to service one seat) |
| Part Number | Description |
|---|---|
| For vehicles with sales code *RL use the following parts: | |
| 68260868AC | Module Kit – Occupant Classification |
| 55057328AC | Mat, Heated Seat (2 per vehicle if driver side is required) |
| 68137151AE | Cushion, Driver Side (w/ MWX) (if required) |
| 68223678AE |
Module, Comfort Seat and Wheel (with heated steering wheel) (if required) |
| 68289253AA | Clip, U-Retainer – Trim Cover (MSQ 4) (one package services one seat) |
| 68248876AA | Hog Ring, Seat (MSQ 10) (requires one package to service one seat) |
| Part Number | Description |
|---|---|
| For vehicles with sales code *DL use the following parts: | |
| 68260867AC | Module Kit – Occupant Classification |
| 55057363AA | Mat, Seat Ventilation Passenger Side |
| 68189211AA | Mat, Seat Ventilation Driver Side (if required) |
| 55057364AD | Mat, Heated Seat (2 per vehicle if driver side is required) |
| 68137153AE | Cushion, Driver Side (w/o MWX) (if required) |
| 68223680AE |
Module, Comfort Seat and Wheel (with heated steering wheel) (if required) |
| 68289253AA | Clip, U-Retainer – Trim Cover (MSQ 4) (one package services one seat) |
| 68248876AA | Hog Ring, Seat (MSQ 10) (requires two packages to service one seat) |
| Part Number | Description |
|---|---|
| For vehicles with sales code *SL use the following parts: | |
| 68260869AC | Module Kit – Occupant Classification |
| 68242282AA | Mat, Seat Ventilation Passenger Side |
| 68242281AA | Mat, Seat Ventilation Driver Side (if required) |
| 68249584AB | Mat, Heated Seat (2 per vehicle if driver side is required) |
| 68223895AF | Cushion, Driver Side (w/ MWX) (if required) |
| 68223680AE |
Module, Comfort Seat and Wheel (with heated steering wheel) (if required) |
| 68289253AA | Clip, U-Retainer – Trim Cover (MSQ 4) (one package services one seat) |
| 68248876AA | Hog Ring, Seat (MSQ 10) (requires one package to service one seat) |
Each Module Kit contains the following components:
| Quantity | Description |
|---|---|
| 1 | Seat Cushion Foam |
| 1 | OCM Assembly |
Parts Return
No parts return required for this campaign.
Special Tools
The following special tools are required to perform this repair:
|
wiTECH micro pod II |
|
Laptop Computer |
|
wiTECH Software |
Service Procedure
A. Inspect Comfort Seat and Wheel Module (CSWM)
NOTE: The wiTECH scan tool must be used to perform this recall. The wiTECH software is required to be at the latest release level before performing this procedure. If the reprogramming flash for the PCM is aborted or interrupted, repeat the procedure.
- Open the hood. Install a battery charger
 and verify that the charging rate provides 13.0 to 13.5 volts. Do not allow the charger to time out during the flash process. Set the battery charger timer (if so equipped) to continuous charge.
NOTE: Use an accurate stand-alone voltmeter. The battery charger volt meter may not be sufficiently accurate. Voltages outside of the specified range will cause an unsuccessful flash. If voltage reading is too high, apply an electrical load by activating the park or headlamps and/or CSWM blower motor to lower the voltage.
- Connect the wiTECH micro pod II to the vehicle data link connector.
- Place the ignition in the “RUN” position.
- Open the wiTECH Diagnostic application.
- Starting at the “Select Tool” screen, highlight the row/tool for the wiPOD device you are using. Then select “Next” at bottom right side of the screen.
- Enter your “User id” and “Password”, then select “Finish” at the bottom of the screen.
- From the “CSWM View” screen, select the “flash tab” then read the “Current CSWM Flash Number”.
- If the “Current CSWM Flash Number” ends in “AE” the CSWM does not need replacement, continue to Section B. Replace Occupant Classification Module (OCM) / Seat Cushion Foam (SCF).
- If the “Current CSWM Flash Number” ends in “AD” or older, the CSWM must be replaced, continue to Section B. Replace Occupant Classification Module (OCM) / Seat Cushion Foam (SCF).
- If the vehicle is not equipped with a CSWM, continue to Section B. Replace Occupant Classification Module (OCM) / Seat Cushion Foam (SCF).
NOTE: Vehicles that have the CSWM replaced will also require replacement of the driver side Heated Seat Mat and Seat Cushion Foam.
B. Replace Occupant Classification Module (OCM) / Seat Cushion Foam (SCF)
WARNING: To avoid serious or fatal injury on vehicles equipped with airbags, disable the Supplemental Restraint System (SRS) before attempting Occupant Classification System (OCS) diagnosis or service. Disconnect and isolate the battery negative (ground) cable, then wait two minutes for the system capacitor to discharge before performing further diagnosis or service. This is the only sure way to disable the SRS. Failure to follow these instructions may result in accidental airbag deployment.
NOTE: The Occupant Classification System (OCS) is used only in the passenger side front seat of vehicles manufactured for domestic markets. Vehicles manufactured for export markets use the Occupant Detection Sensor (ODS) instead of the OCS on the passenger side front seat.
WARNING: All of the components of the Occupant Classification System (OCS) including the Occupant Classification Module (OCM), the Seat Weight Sensor (SWS), the jute-like SWS pad, the passenger seat cushion foam, the electronic pressure sensor and the OCS pressure hose are serviced only as a factory-calibrated and assembled unit. Any time any one of these components requires replacement for any reason, the ENTIRE CALIBRATED OCS MUST BE REPLACED and then re-zeroed using a wiTECH diagnostic scan tool. Refer to the appropriate diagnostic information.
- Use the following steps to remove the front seat(s) from the vehicle.
NOTE: The bolts may be a Mortorq bolt and require a Mortorq tool bit for removal and installation.
a. Move the passenger front seat to the full forward position.
b. Remove the passenger front seat rear bolts (Figure 1).
c. Move the passenger front seat to the full rearward position.
d. Remove the passenger front seat front bolts (Figure 2).
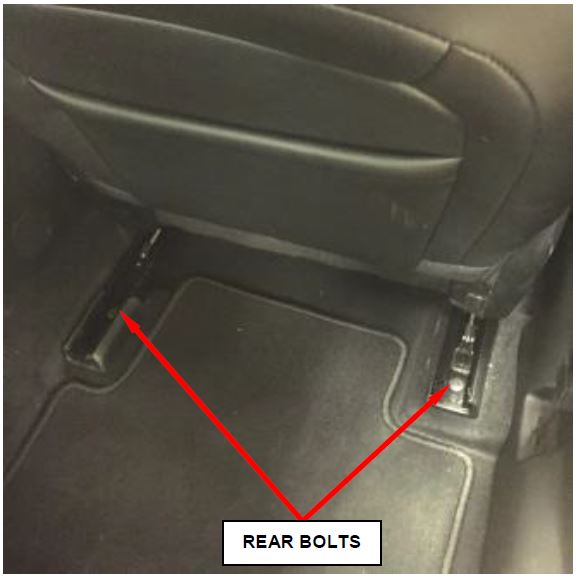 Figure 1 – Seat Rear Bolts
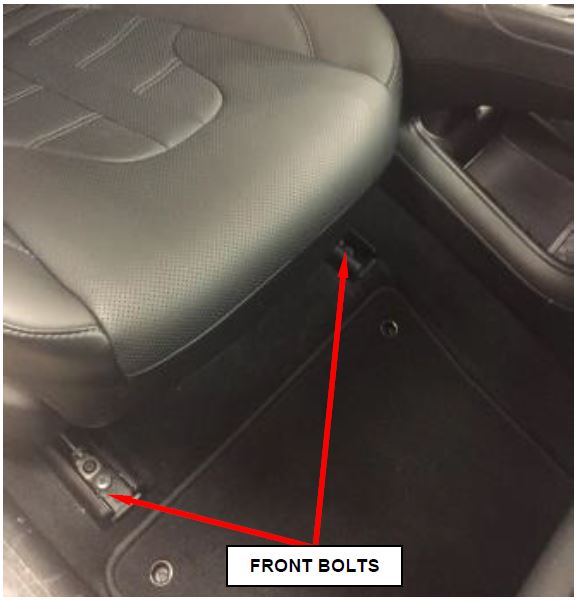 Figure 2 – Seat Front Bolts
NOTE: Vehicles that require CSWM replacement will also require replacement of driver side Heated Seat Mat and Seat Cushion Foam.
e. Repeat steps a through d to remove the driver front seat, if the CSWM requires replacement.
f. Disconnect and isolate the negative battery cable. If equipped with an Intelligent Battery Sensor (IBS), disconnect the IBS connector first before disconnecting the negative battery cable. Wait two minutes for the system capacitor to discharge before further service.
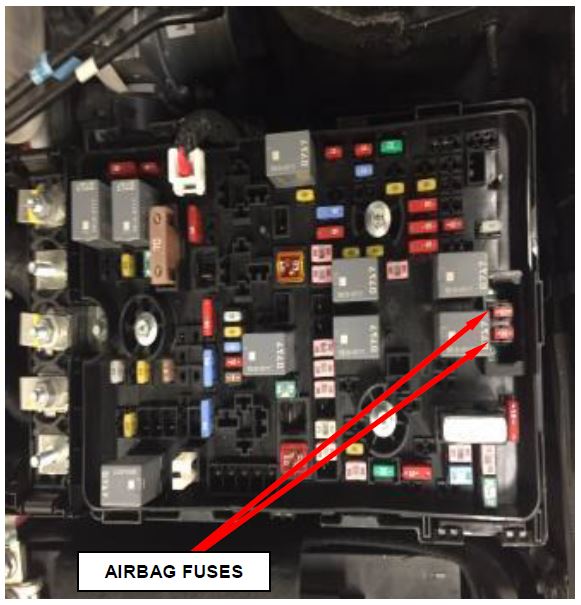
g. Remove airbag fuses F96 and F97 from the power distribution center (Figure 3).
h. Disconnect all seat electrical connectors from the body harness.
CAUTION: Do not use the adjuster release bar as a handle when removing or installing the front seat(s).
i. Remove the front seat(s) from the vehicle.
- In Section A., if the CSWM part number ended in “AE” the CSWM does not need replacement, continue with Step 2.
- In Section A., if the CSWM part number ended in “AD” or older, replace the CSWM and continue with Step 2 (Figure 4).
- If the vehicle is not equipped with a CSWM, continue with Step 2.
- Disconnect the wire harness electrical connector from the Occupant Classification Module (OCM) beneath the inboard front corner of the passenger seat cushion pan (Figure 4).
- Using a small flat-bladed screwdriver or a small pick tool, carefully pry the latch tab integral to the OCM mount to release it from the blade of the mounting bracket beneath the inboard front corner of the passenger seat cushion (Figure 4).
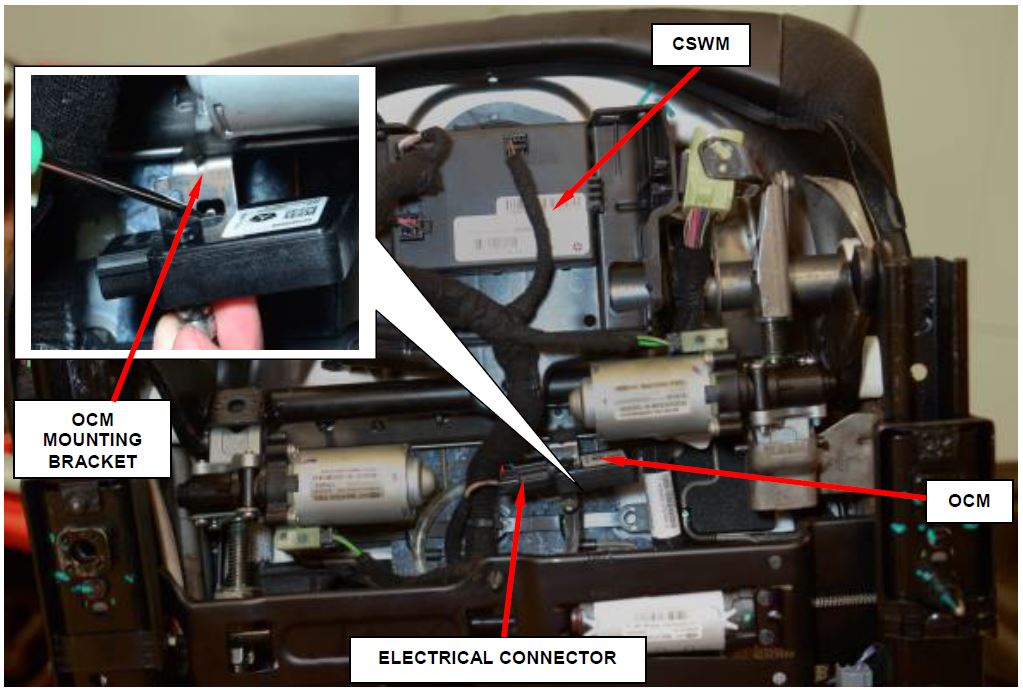 Figure 4 – Occupant Classification Module (OCM)
- Using a small flat bladed tool or equivalent, remove the lift handle trim cap, if equipped.
- Remove the screws and the lift handle, if equipped.
- Using a small hook tool or equivalent, remove the clip and the recliner handle, if equipped.
- Remove the screw covers and the two screws at the back of the inboard and outboard side shields (Figure 5).
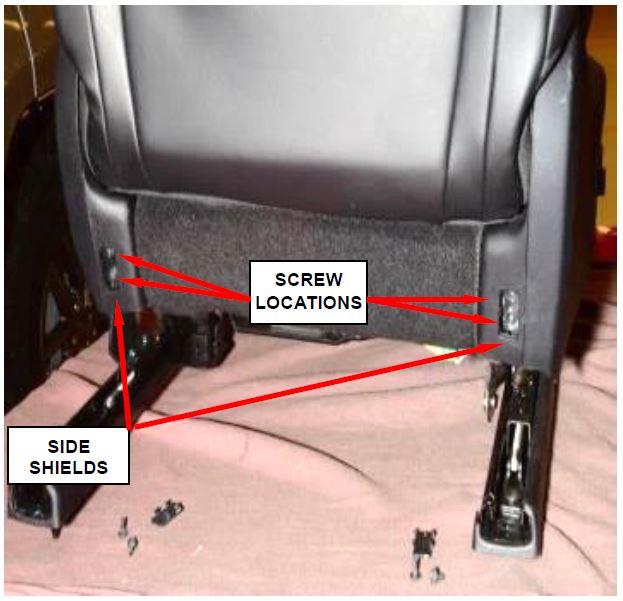 Figure 5 – Rear Screw Locations
- Remove the screw securing the inboard side shield (Figure 6).
- Pull out at the bottom to release the retaining clips then remove and save the inboard side shield.
- Lift up at the rear of the outboard side shield slightly to release the retaining hook.
- Push forward on the outboard side shield and remove from the retaining hook.
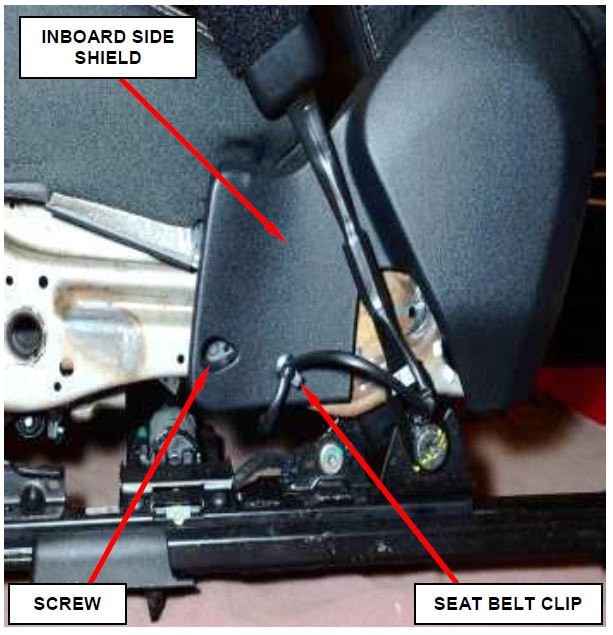 Figure 6 – Inboard Side Shield
- Disconnect the electrical connector from the outboard side shield, if equipped (Figure 7).
- Release the power seat harness clip from the outboard side shield, if equipped (Figure 7).
- Remove and save the outboard side shield.
- Release the three clip retainers at the rear of the passenger seat cushion (Figure 8).
- Disconnect the heated seat electrical connector (Figure 8).
- Release the heated seat harness retaining clip.
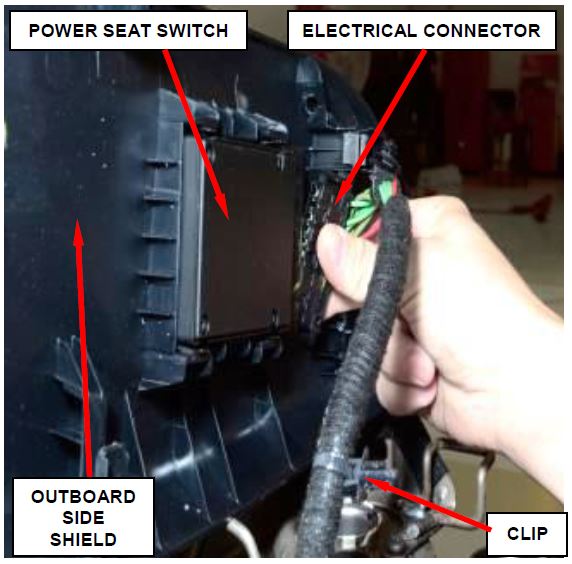 Figure 7 – Electrical Connector
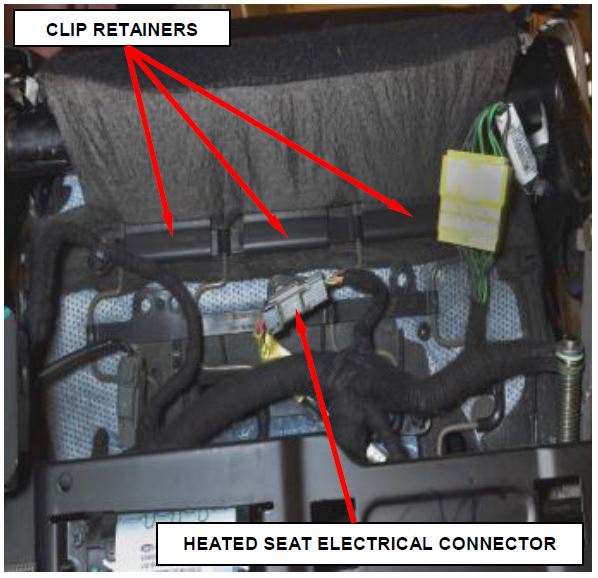 Figure 8 – Rear Clip Retainers
- Release both side clip retainers and the strap (Figure 9).
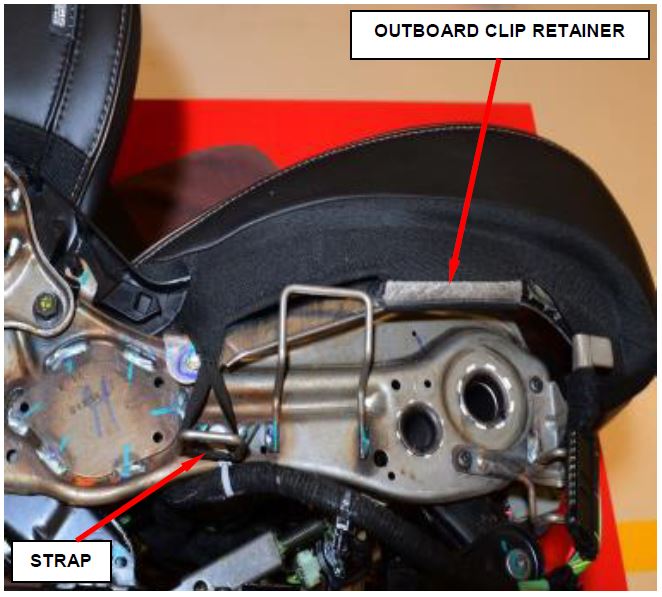 Figure 9 – Side Clip Retainers (Outboard Side Shown)
- Release the three clip retainers at the front of the seat cushion (Figure 10).
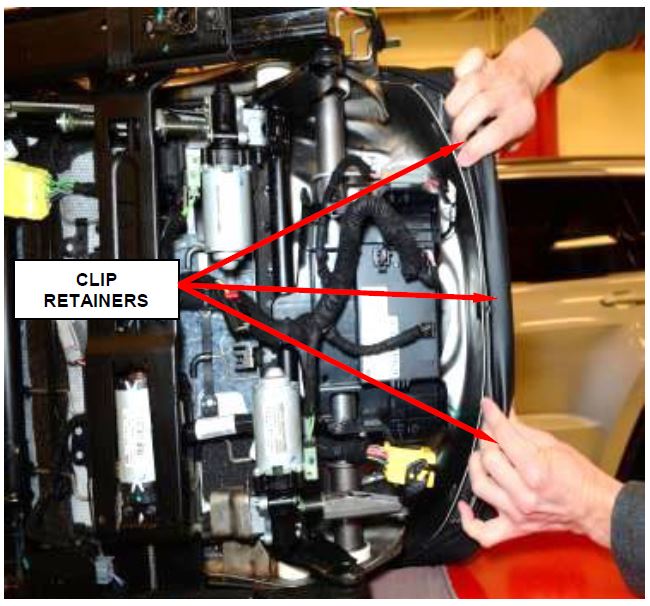 Figure 10 – Front Clip Retainers
- If equipped with a ventilated seat, carefully unwrap the cover and foam at the front of the passenger seat cushion. Using a suitable tool, pry the seat cushion ventilation mat from the seat cushion blower (Figure 11).
- Remove the passenger seat cover and the seat cushion foam as an assembly, from the seat cushion frame.
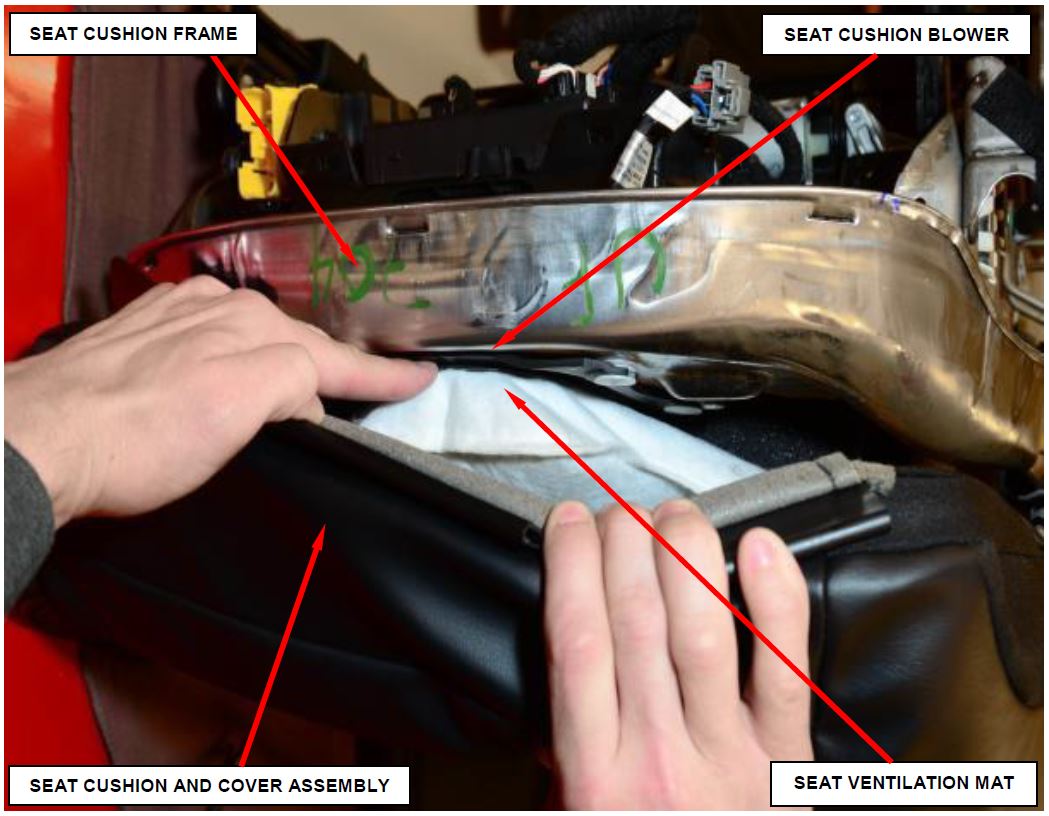 Figure 11 – Seat Cushion Ventilation Mat
- Cut and remove the hog rings that secure the passenger seat cover to the seat cushion foam, and remove the seat cover (Figure 12).
- Remove and discard the passenger seat cushion foam, the heated seat mat (if equipped) and the seat ventilation mat (if equipped) as an assembly.
- Release the two push-in plastic fasteners that secure the Occupant Classification Module (OCM) assembly to the passenger seat cushion frame (Figure 13).
- Remove and discard the OCM assembly.
CAUTION: The OCM assembly MUST BE REPLACED WITH THE ENTIRE CONTENTS of the factory-calibrated service replacement package, which includes an OCM with integral and internal electronic pressure sensor, a pressure hose, the SWS, the jute-like SWS pad and the seat cushion foam.
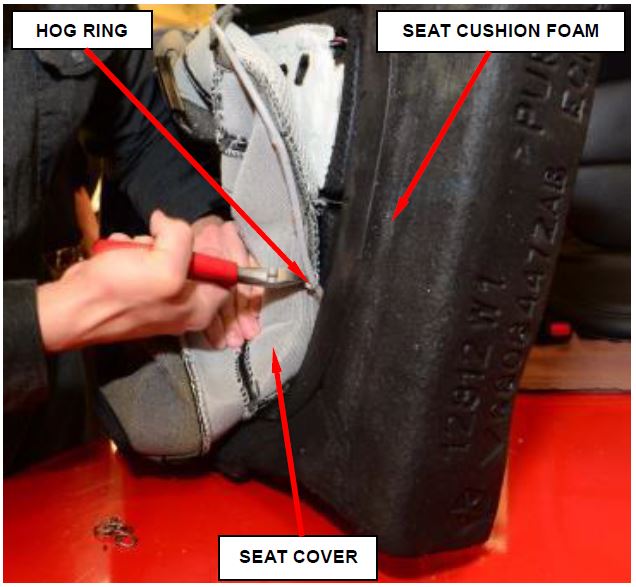 Figure 12 – Hog Rings
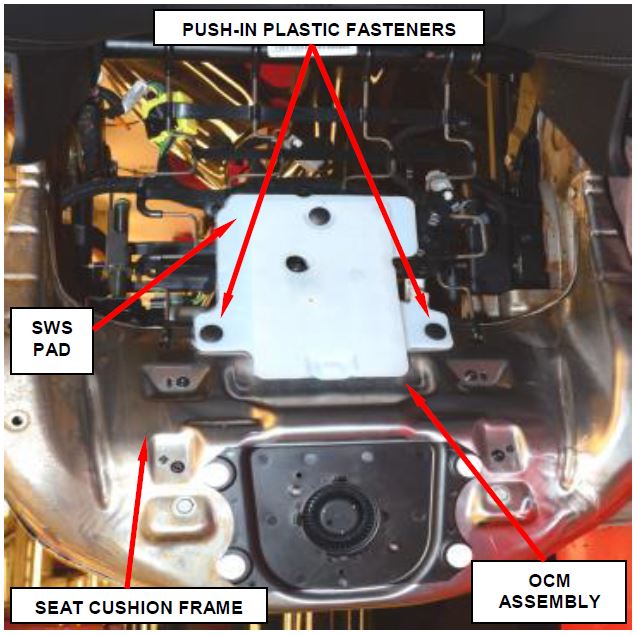 Figure 13 – OCM Assembly
- Position the NEW Occupant Classification Module (OCM) assembly to the top of the passenger seat cushion frame as a unit. Lift the back of the SWS and pad far enough to access and insert the OCM and pressure hose between the seat cushion springs to the underside of the seat cushion frame. Be certain the pressure hose is not pinched or kinked (Figure 13).
- Install the two push-in plastic fasteners that secure the OCM assembly to the passenger seat cushion pan (Figure 13).
- Route the pressure hose away from sharp or moving objects and be certain the hose is not kinked (Figure 4).
- From the underside of the passenger seat cushion, snap the OCM onto the blade of the mounting bracket beneath the inboard front corner of the seat cushion (Figure 4).
- Connect the OCM electrical connector (Figure 4).
- Remove the label from the NEW seat cushion foam.
- If equipped with a ventilated seat, remove the adhesive backing strips from the NEW seat ventilation mat.
- Position the passenger seat ventilation mat to the bottom of the seat cushion foam and press the seat ventilation mat into place (Figure 14).
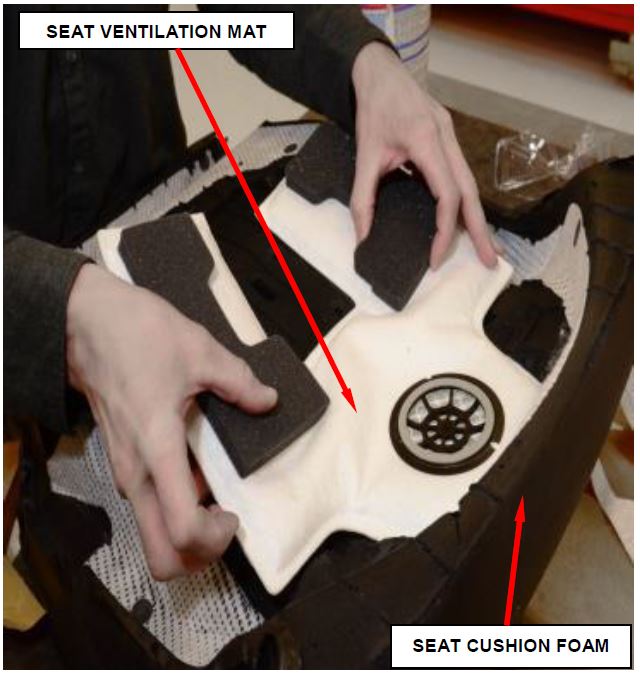 Figure 14 – Seat Ventilation Mat
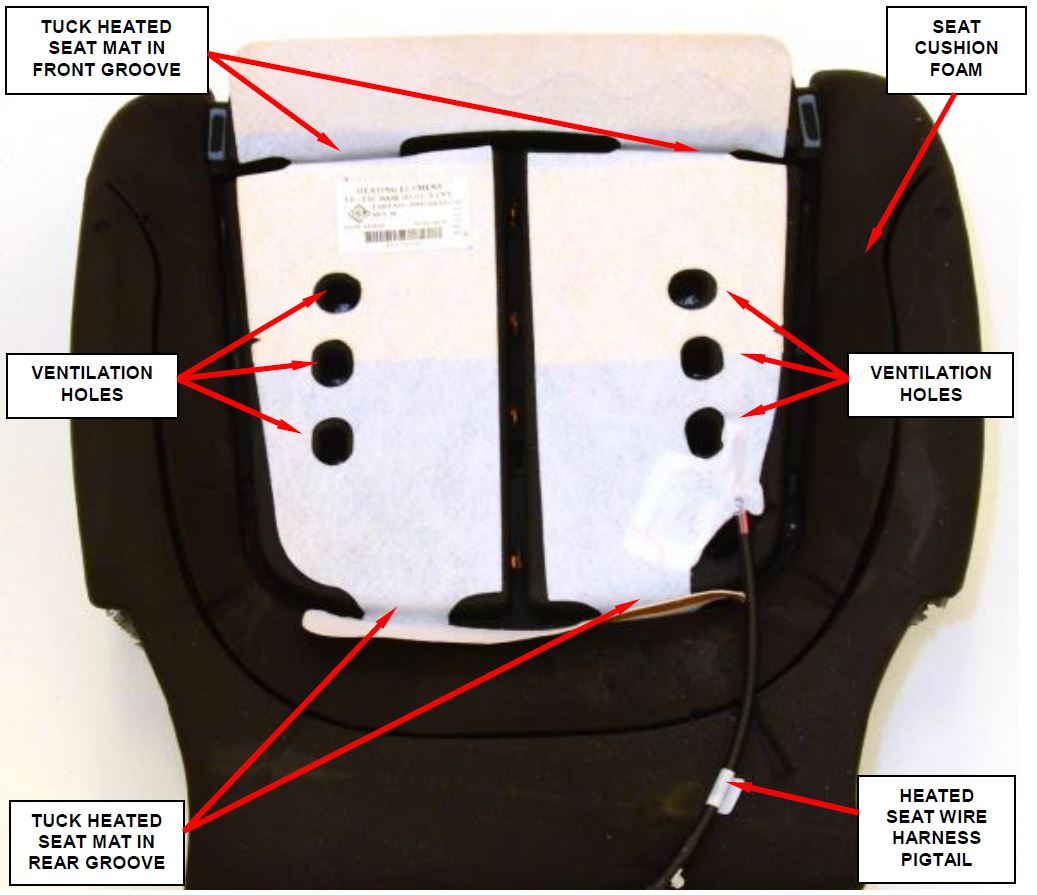
- If equipped with a heated seat, remove the right and left side adhesive backing strips from the NEW heated passenger seat mat and position the mat to the ventilation holes on the top side of the seat cushion foam. Press firmly to secure the heated seat mat to the seat cushion foam (Figure 15).
- Tuck the front of the passenger heated seat mat into the groove of the seat cushion as shown (Figure 15).
- Remove the front side adhesive backing strips from the heated seat mat. Press firmly to secure the passenger heated seat mat to the seat cushion foam (Figure 15).
- Tuck the rear of the passenger heated seat mat into the groove of the seat cushion as shown (Figure 15).
 Figure 15 – Heated Seat Mat
- Remove the rear side adhesive backing strips from the passenger heated seat mat. Press firmly to secure the heated seat mat to the seat cushion foam.
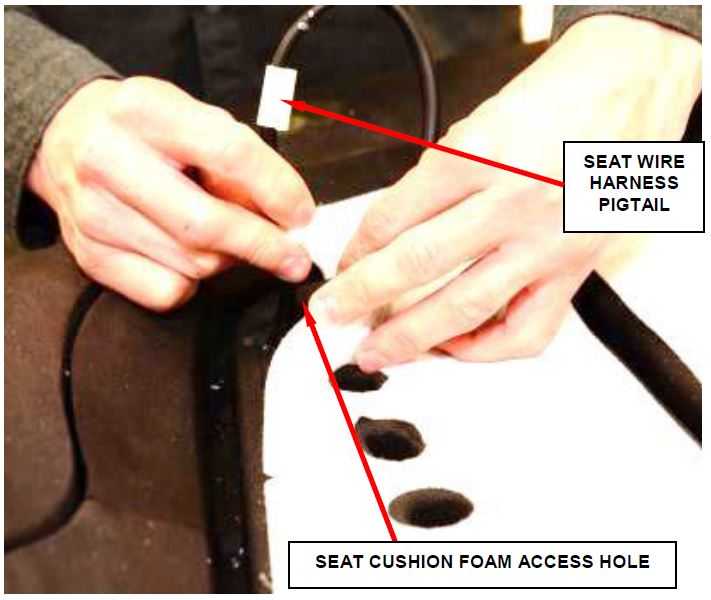
- Route the heated seat wire harness pigtail through the seat cushion foam (Figure 16).
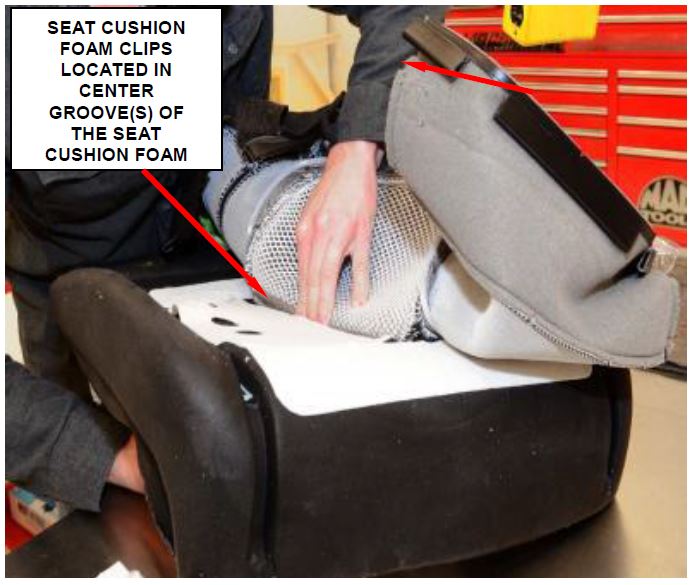
- Position the passenger seat cover onto the seat cushion foam and engage the center seat cover clips by snapping them into the seat cushion foam clips (Figure 17).
 Figure 16 – Heated Seat Wire Harness Pigtail
 Figure 17 – Seat Cover Clips
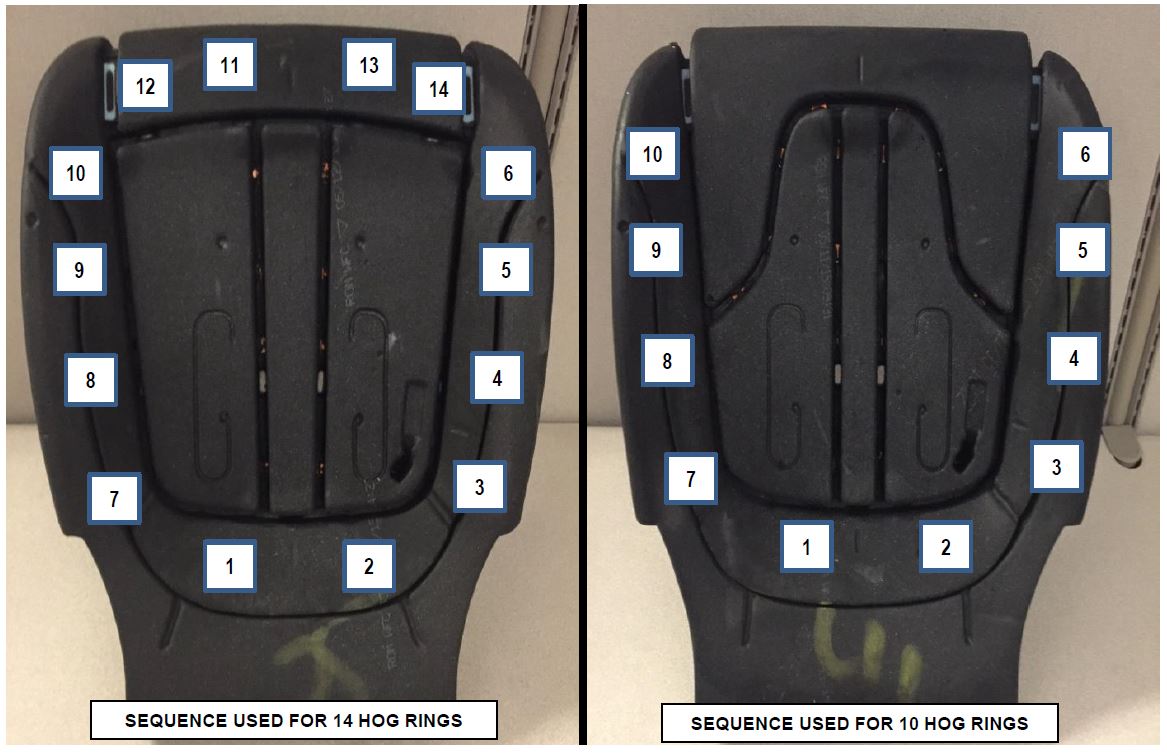
NOTE: Refer to the hog ring sequence diagram for correct installation sequence. Seat covers may require either ten or fourteen hog rings depending on trim sales code (Figure 18).
- Secure the passenger seat cover to the seat cushion foam using NEW hog rings following the correct hog ring sequence (Figure 18).
CAUTION: Verify that no hog rings have punctured or damaged the heated seat mat.
 Figure 18 – Hog Ring Installation Sequence
- Roll the passenger seat cover over the seat foam starting at the right front corner and right side of the seat cushion foam.
- Roll the passenger seat cover over the seat foam at the left front corner and left side of the seat cushion foam.
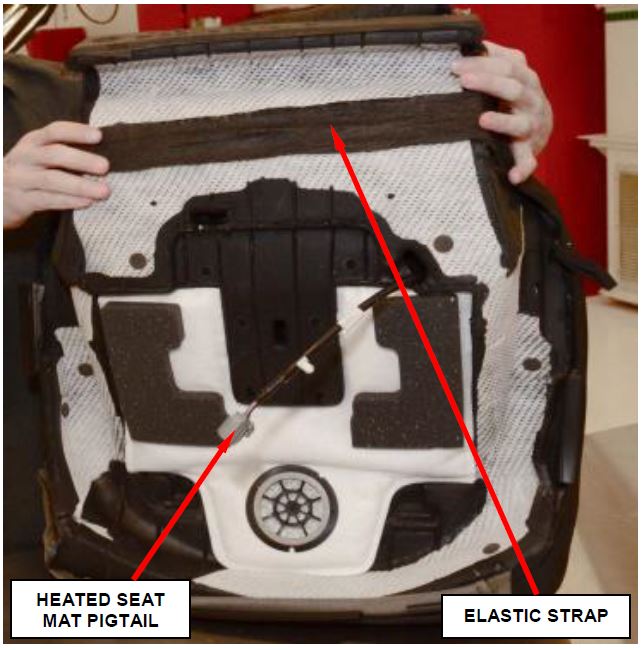
- At the rear side of the cushion stretch the elastic strap over the seat cushion foam laying the strap flat on the back side of the foam (Figure 19).
NOTE: Verify that the seat cover is not loose or baggy in any area.
 Figure 19 – Elastic Strap
NOTE: Verify that the welts are not wavy and align with the outer edge of the seat cushion.
- If equipped, route the heated seat wire harness pigtail and clip to the seat frame bracket.
- Connect the heated seat electrical connector (Figure 8).
- If equipped, align the seat cushion ventilation mat with the tabs on the seat cushion blower and snap into place, if equipped (Figure 11).
- Secure the clip retainers at the rear of the passenger seat cushion (Figure 8).
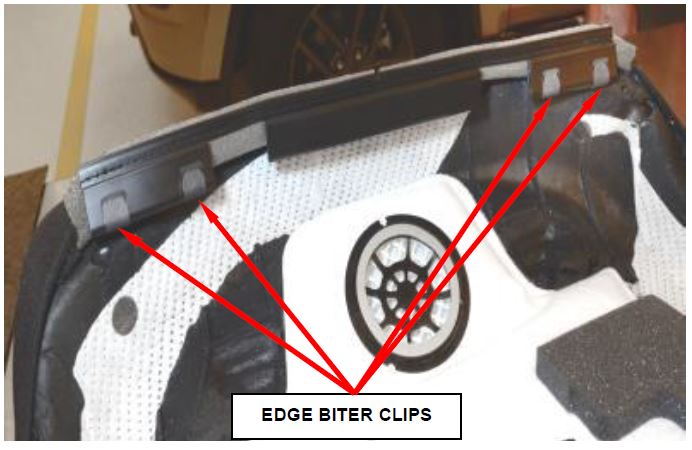
- Install four edge biter clips to the front outside clip retainers as shown (Figure 20).
NOTE: Edge biter clips may have been installed at the factory and will not require replacement if they are in the position shown in Figure 20.
 Figure 20 – Edge Biter Clips
- Secure the three clip retainers at the front of the passenger seat cushion (Figure 10).
- Secure the strap and both side clip retainers (Figure 9).
- Connect the electrical connector to the outboard side shield, if equipped (Figure 7).
- Connect the power seat harness retaining clip to the outboard side shield, if equipped (Figure 7).
- Install the passenger seat side shields.
- Install the lift handle and recliner handle, if equipped.
- Position the passenger front seat into the vehicle.
CAUTION: Do not use the adjuster release bar as a handle when removing or installing the front seat.
- Connect all the passenger seat electrical connectors to the body wire harness.
- Install the passenger seat front bolts and tighten to 44 ft. lbs. (60 N·m) (Figure 2).
NOTE: The passenger seat rear bolts are installed and tightened after the Supplemental Restraint System (SRS) Verification Test procedure is performed.
NOTE: The Occupant Classification System (OCS) is used only in the passenger side front seat of vehicles manufactured for domestic markets. Vehicles manufactured for export markets use the Occupant Detection Sensor (ODS) instead of the OCS on the passenger side front seat.
- If the CSWM was replaced, repeat Steps 2 through 60 to replace the driver side Seat Cushion Foam, Heater Mat (if equipped) and Ventilation Mat (if equipped).
- Do not connect the negative battery cable at this time. The Supplemental Restraint System (SRS) Verification Test procedure should be performed following service of any SRS component.
NOTE: During the following test, the negative battery cable remains disconnected and isolated during the next two steps of the Supplemental Restraint System (SRS) Verification Test.
NOTE: The wiTECH scan tool must be used to perform this recall. The wiTECH software is required to be at the latest release level before performing this procedure.
- Connect the wiTECH micro pod II to the vehicle data link connector located under the steering column.
- Check to be certain that nobody is in the vehicle, then connect the negative battery cable. If equipped with an Intelligent Battery Sensor (IBS), connect the IBS connector.
- Check to be certain that nobody is in the vehicle then turn the ignition switch to the “ON” position and exit the vehicle and close the doors.
- Install the airbag fuses in the power distribution center (Figure 3).
- Open the wiTECH Diagnostic application.
- Starting at the “Select Tool” screen, select the row/tool for the wiPOD device you are using, then select “Next”.
- Enter your “User id” and “Password”, then select “Finish”.
- Use the scan tool to erase the stored DTC data. If any problems remain, the stored DTC data will not erase. Refer to the appropriate diagnostic information to diagnose any stored DTC that will not erase. If the stored DTC information is successfully erased, go to Step 71.
- Turn the ignition switch to “Off” for about 15 seconds, and then back to “On”. Observe the airbag indicator in the instrument cluster. It should light from four to six seconds, and then go out. This indicates that the SRS is functioning normally and that the repairs are complete. If the airbag indicator fails to light, or lights and stays On, there is still an active SRS fault or malfunction. The airbag light may stay on prior to performing a PROXI alignment. If the airbag light stays on after the PROXI configuration is performed, refer to the appropriate diagnostic information to diagnose the problem.
- Move the passenger front seat to the full forward position.
- Install the driver and passenger seat rear bolts and tighten to 44 ft. lbs. (60 N·m) (Figure 1).
- If this Electronic Control Unit (ECU) is being replaced with a new unit, a diagnostic scan tool MUST be used to align the PROXI configuration data into the new ECU. Follow the routine outlined in the diagnostic scan tool for PROXI Configuration Alignment under Body Control Module (BCM) Miscellaneous Functions menu.
- Perform the EPS VERIFICATION TEST.
a. Turn the ignition off.
b. Remove all test equipment.
c. Connect all previously disconnected components and connectors.
d. Verify all accessories are turned off, the battery is fully charged and the charging system has a status of “charged”.
e. Verify that the ignition is on. With the scan tool, record and erase all Diagnostic Trouble Codes (DTCs) from all modules.
NOTE: Turn the steering wheel from stop to stop, holding at each stop position for One second.
f. Turn the ignition off and wait five minutes. Turn the ignition on and using the scan tool, read DTCs from all modules.
g. If there are no DTCs present after turning ignition on, road test the vehicle for at least five minutes.
h. Again, with the scan tool read DTCs. If any DTCs are present, refer to the Table of Contents in the applicable section for the Diagnostic procedure and troubleshoot the new or recurring symptom.
i. If there are no DTCs present, continue with Step 76.
NOTE: The re-zero function will not complete if any OCM faults are active. Ensure that all faults are cleared or are in stored status.
- Following successful completion of the SRS Verification Test procedure and PROXI configuration, perform the OCM System Verification Test procedure using a wiTECH scan tool. Click on the OCM Module icon then Miscellaneous Functions tab and follow the screen prompts.
- Verify all seat electrical and mechanical functions.
- Close the hood, remove the wiTECH VCI pod.
- Return the vehicle to the customer.
Completion Reporting and Reimbursement
Claims for vehicles that have been serviced must be submitted on the DealerCONNECT Claim Entry Screen located on the Service tab. Claims submitted will be used by FCA to record recall service completions and provide dealer payments.
Use one of the following labor operation numbers and time allowances:
| Labor Operation Number | Time Allowance | |
|---|---|---|
| Install Passenger Seat Cushion and OCM | 08-S0-91-82 | 1.3 hours |
| Install Passenger Seat Cushion, OCM, and Heater Mat | 08-S0-91-83 | 1.4 hours |
| Install Passenger Seat Cushion, OCM, Heater Mat and Ventilation Mat | 08-S0-91-84 | 1.4 hours |
| Install Driver and Passenger Seat Cushions, OCM, CSWM and Heater Mats
|
08-S0-91-85 | 2.1 hours |
| Install Driver and Passenger Seat Cushions, OCM, CSWM, Heater Mats and
Ventilation Mats |
08-S0-91-86 | 2.2 hours |
NOTE: See the Warranty Administration Manual, Recall Claim Processing Section, for complete recall claim processing instructions.
Dealer Notification
To view this notification on DealerCONNECT, select “Global Recall System” on the Service tab, then click on the description of this notification.
Owner Notification and Service Scheduling
All involved vehicle owners known to FCA are being notified of the service requirement by first class mail. They are requested to schedule appointments for this service with their dealers. A generic copy of the owner letter is attached.
Enclosed with each owner letter is an Owner Notification postcard to allow owners to update our records if applicable.
Vehicle Lists, Global Recall System, VIP and Dealer Follow Up
All involved vehicles have been entered into the DealerCONNECT Global Recall System (GRS) and Vehicle Information Plus (VIP) for dealer inquiry as needed.
GRS provides involved dealers with an updated VIN list of their incomplete vehicles. The owner’s name, address and phone number are listed if known. Completed vehicles are removed from GRS within several days of repair claim submission.
To use this system, click on the “Service” tab and then click on “Global Recall System.” Your dealer’s VIN list for each recall displayed can be sorted by: those vehicles that were unsold at recall launch, those with a phone number, city, zip code, or VIN sequence.
Dealers must perform this repair on all unsold vehicles before retail delivery. Dealers should also use the VIN list to follow up with all owners to schedule appointments for this repair.
Recall VIN lists may contain confidential, restricted owner name and address information that was obtained from the Department of Motor Vehicles of various states. Use of this information is permitted for this recall only and is strictly prohibited from all other use.
Additional Information
If you have any questions or need assistance in completing this action, please contact your Service and Parts District Manager.
Customer Services / Field Operations
FCA US LLC
OCCUPANT CLASSIFICATION MODULE
IMPORTANT SAFETY RECALL
S09 / NHTSA 16V-114
This notice applies to your vehicle (VIN: xxxxxxxxxxxxxxxxx).
This notice is sent to you in accordance with the National Traffic and Motor Vehicle Safety Act.
Dear: (Name)
FCA has decided that a defect, which relates to motor vehicle safety, exists in certain 2015 model year Chrysler 200 vehicles.
| The problem is… | The Occupant Classification Module (OCM) / Seat Cushion Foam (SCF) on your vehicle may have been serviced with a kit that may not have been calibrated correctly. The OCM and SCF are calibrated together during the manufacturing process as a matched set. An improperly calibrated OCM/SCF service kit has the potential to not deploy a passenger seat airbag at the proper stage for the passenger seat occupant.
This could increase the risk of passenger seat occupant injury during a crash. |
| What your dealer will do… | FCA will repair your vehicle free of charge. To do this, your dealer will replace the OCM/SCF with a matched set. The work will take about 1½ hours to complete. However, additional time may be necessary depending on service schedules. |
| What you must do to ensure your safety… | Simply contact your Chrysler, Jeep, Dodge or RAM dealer right away to schedule a service appointment. Ask the dealer to hold the parts for your vehicle or to order them before your appointment. Please bring this letter with you to your dealer. |
| If you need help… | If you have questions or concerns which your dealer is unable to resolve, please contact the FCA Group Recall Assistance Center at either fcarecalls.com or 1-800-853-1403. |
Please help us update our records by filling out the attached prepaid postcard if any of the conditions listed on the card apply to you or your vehicle. If you have further questions go to fcarecalls.com.
If you have already experienced this specific condition and have paid to have it repaired, you may visit www.fcarecallreimbursement.com to submit your reimbursement request online or you can mail your original receipts and proof of payment to the following address for reimbursement consideration: FCA Customer Assistance, P.O. Box 21-8004, Auburn Hills, MI 48321-8007, Attention: Recall Reimbursement. Once we receive and verify the required documents, reimbursement will be sent to you within 60 days. If you’ve had previous repairs and/or reimbursement you may still need to have the recall repair performed on your vehicle.
If your dealer fails or is unable to remedy this defect without charge and within a reasonable time, you may submit a written complaint to the Administrator, National Highway Traffic Safety Administration, 1200 New Jersey Ave., S.E., Washington, DC 20590, or you can call the toll-free Vehicle Safety Hotline at 1-888-327-4236 (TTY 1-800-424-9153), or go to safercar.gov.
We’re sorry for any inconvenience, but we are sincerely concerned about your safety. Thank you for your attention to this important matter.
Customer Services / Field Operations
FCA US LLC
Note to lessors receiving this recall: Federal regulation requires that you forward this recall notice to the lessee within 10 days.
 Loading...
 Loading...
