| “This site contains affiliate links for which OEMDTC may be compensated” |
NHTSA Campaign Number: 16V739
Manufacturer Chrysler (FCA US LLC)
Components ELECTRICAL SYSTEM
Potential Number of Units Affected 74,823
Alternator may Fail Resulting in Engine Stall/Fire
If the alternator fails, the vehicle may stall without warning, increasing the risk of a crash. There is also the possibility that the alternator may short circuit, increasing the risk of a fire.
Summary
Chrysler (FCA US LLC) is recalling certain model year 2011-2014 Dodge
 Charger Police vehicles, 2007-2013 RAM
 3500 Cab Chassis, 2008-2013 RAM
 4500 and 5500 Cab Chassis, and 2013 RAM
 2500 and 3500 vehicles.
The affected vehicles have a 220 amp alternator that may suddenly fail.
Remedy
Chrysler will notify owners, and dealers will replace the alternator with a revised alternator, free of charge.
The recall began on December 23, 2016.
Owners may contact Chrysler customer service at 1-800-853-1403.
Chrysler ’s number for this recall is S68.
Notes
Owners may also contact the National Highway Traffic Safety Administration Vehicle Safety Hotline at 1-888-327-4236 (TTY 1-800-424-9153), or go to www.safercar.gov.
Check if your Vehicle has a Recall
Revised (2) January 2017
Dealer Service Instructions for:
Safety Recall S68 / NHTSA 16V-739 Alternator
NOTE: Added ALL Models to inspect LOP 08-S6-81-81.
Models
| 2013 | (DJ) | RAM 2500 Pickup 2500 Pickup |
NOTE: This recall applies only to the above vehicles equipped with a Cummins Turbo Diesel engine (sales code ETK) and a 220 amp alternator (sales code BAJ) built from October 31,2012 through June 09,2013 (MDH 103108 through 060901).
| 2013 | (D2) | RAM 3500 Pickup 3500 Pickup |
NOTE: This recall applies only to the above vehicles equipped with a Cummins Turbo Diesel engine (sales code ETK) and a 220 amp alternator (sales code BAJ) built from February 07, 2013 through June 01, 2013 (MDH 020709 through 060113).
| 2007 – 2010 | (DC) | RAM 3500 Cab Chassis 3500 Cab Chassis |
NOTE: This recall applies only to the above vehicles equipped with a Cummins Turbo Diesel engine (sales code ETJ) and a 220 amp alternator (sales code BAJ) built from from September 08, 2006 through January 29, 2010 (MDH 090814 through 012907).
| 2011 – 2013 | (DD) | RAM 3500 Cab Chassis 3500 Cab Chassis |
NOTE: This recall applies only to the above vehicles equipped with a Cummins Turbo Diesel engine (sales code ETJ) and a 220 amp alternator (sales code BAJ) built from February 04, 2010 through June 07,2013 (MDH 020400 through 060703).
| 2008 – 2010 | (DN) | RAM 3500/4500 Cab Chassis 3500/4500 Cab Chassis |
NOTE: This recall applies only to the above vehicles equipped with a Cummins Turbo Diesel engine (sales code ETJ) and a 220 amp alternator (sales code BAJ) built from June 13, 2007 through February 19, 2010 (MDH 061306 through 021900).
| 2011 – 2013 | (DP) | RAM 3500/4500 Cab Chassis 3500/4500 Cab Chassis |
NOTE: This recall applies only to the above vehicles equipped with a Cummins Turbo Diesel engine (sales code ETJ or ETK) and a 220 amp alternator (sales code BAJ) built from February 03, 2010 through June 01,2013 (MDH 020309 through 060100).
| 2011 – 2014 | (LD) | Dodge Charger Charger |
NOTE: This recall applies only to the above vehicles equipped with a 3.6L engine (sales code ERB) or 5.7L engine (sales code EZH), a 220 amp alternator (sales code BAJ) and a police package (sales code AHB) built from November 15, 2010 through July 10, 2013 (MDH 111514 through 071020).
| IMPORTANT: Some of the involved vehicles may be in dealer used vehicle inventory. Dealers should complete this recall service on these vehicles before retail delivery. Dealers should also perform this recall on vehicles in for service. Involved vehicles can be determined by using the VIP inquiry process. |
Subject
The alternator on about 74,800 of the above vehicles may experience a rapid alternator failure due to diode thermal fatigue. Variability in the failure mode ranges from no output, reduced output, and/or a fully shorted to ground condition. Depending on the alternator failure mode and timing, the vehicle electrical system voltage may drop to critical levels, disabling systems such as Antilock Brake System (ABS), Electronic Stability Control (ESC), Electronic Control Module (ECM), and/or the Central Body Controller (CBC). The driver will have limited or no detection of the alternator failing, which can result in vehicle shutdown while driving and/or an underhood electrical fire.
Repair
The alternator part number must be inspected on all involved vehicles. Vehicles found with the suspect alternator will have it replaced with a revised alternator.
Parts Information
| Part Number | Description |
|---|---|
| CSKES681AA | Alternator Assembly (All RAM Trucks ) ) |
| CSKES682AA | Alternator Assembly (LD models equipped with
5.7L engine / sales code EZH) |
| CSKES683AA | Alternator Assembly (LD models equipped with
3.6L engine / sales code ERB) |
For 2013 Model Year Vehicles:
| Part Number | Description |
|---|---|
| 68163849AA | Antifreeze/Coolant (premix 50/50) (MS-12106)
(NOTE: one gallon can top off approximately 4 vehicles) |
For 2011 and 2012 Model Year Vehicles:
| Part Number | Description |
|---|---|
| 68048953AB | Antifreeze/Coolant (concentrate) (MS-9769)
(NOTE: one gallon can top off approximately 8 vehicles) |
Parts Return
No parts return required for this campaign.
Special Tools
No special tools are required to perform this service procedure.
Service Procedure
A. Inspect Alternator
- Open the hood.
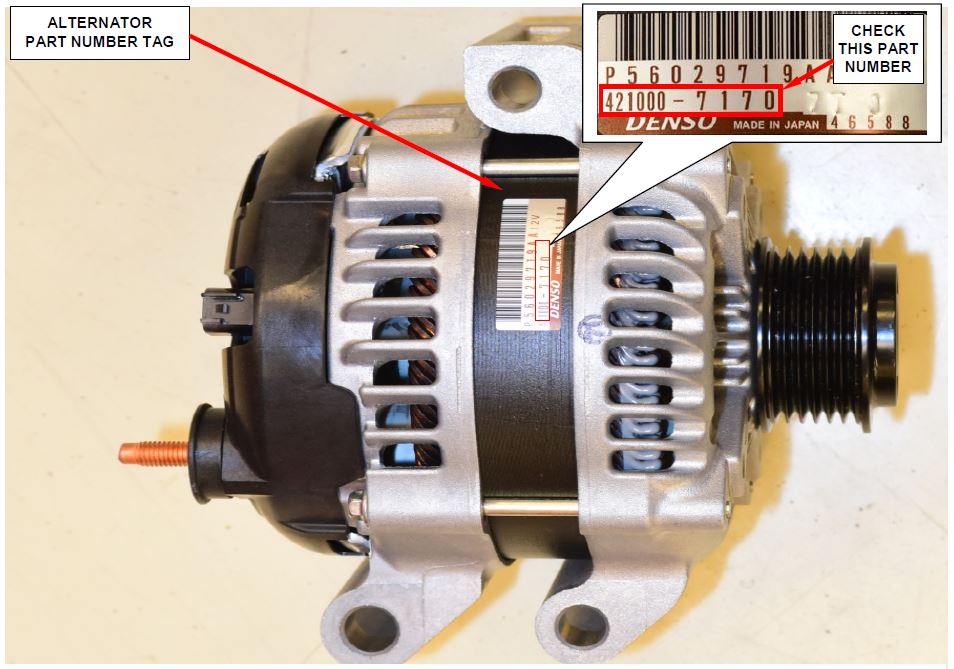
- Use the following procedure for all LD models to inspect the part number tag on the alternator (Figure 1):
- If the part number on the part number tag is 421000-7051, 421000-7031, or 421000-7170 no further action is required. Return the vehicle to the customer.
- If the part number on the part number tag is not 421000-7051, 421000-7031, or 421000-7170, replace the alternator assembly. Continue with Section C. (3.6L engine) or Section D. (5.7L engine).
- If the part number tag on the alternator is not legible, missing, or the vehicle has an aftermarket/remanufactured alternator, replace the alternator assembly.
Figure 1 – Alternator Part Number (LD Models)
(Removed From Vehicle for Photographic Purposes Only)
- Use the following procedure for all RAM trucks
 to inspect the part number tag on the alternator:
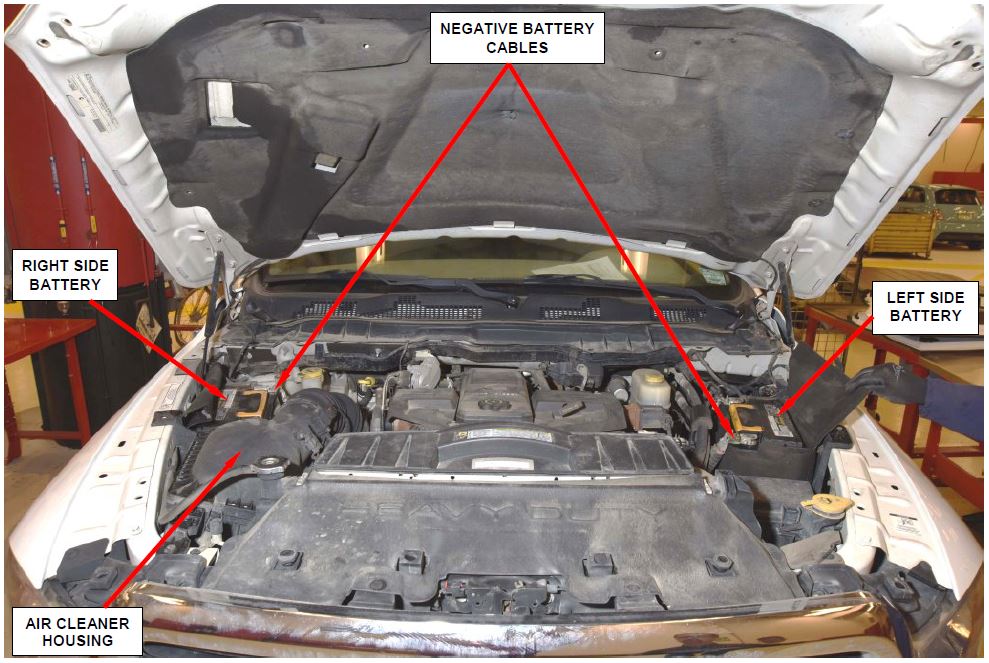
a. Disconnect both negative battery cables (Figure 2).
CAUTION: Disconnect both negative cables from both batteries before removing battery output wire (B+ wire) from alternator. Failure to do so can result in injury or damage to electrical system
Figure 2 – Negative Battery Cables
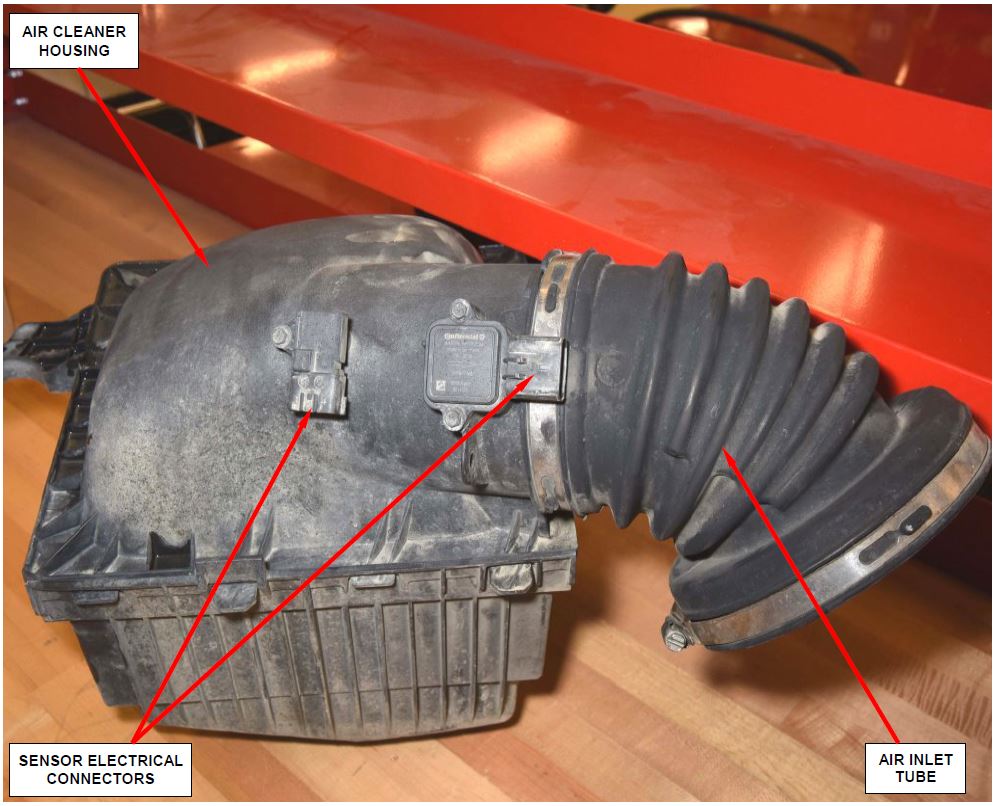
b. Disconnect the electrical connectors for the sensors on the air cleaner housing (Figure 3).
c. Remove and save the air cleaner housing and the air inlet tube (Figure 3).
Figure 3 – Air Cleaner Housing and Sensors
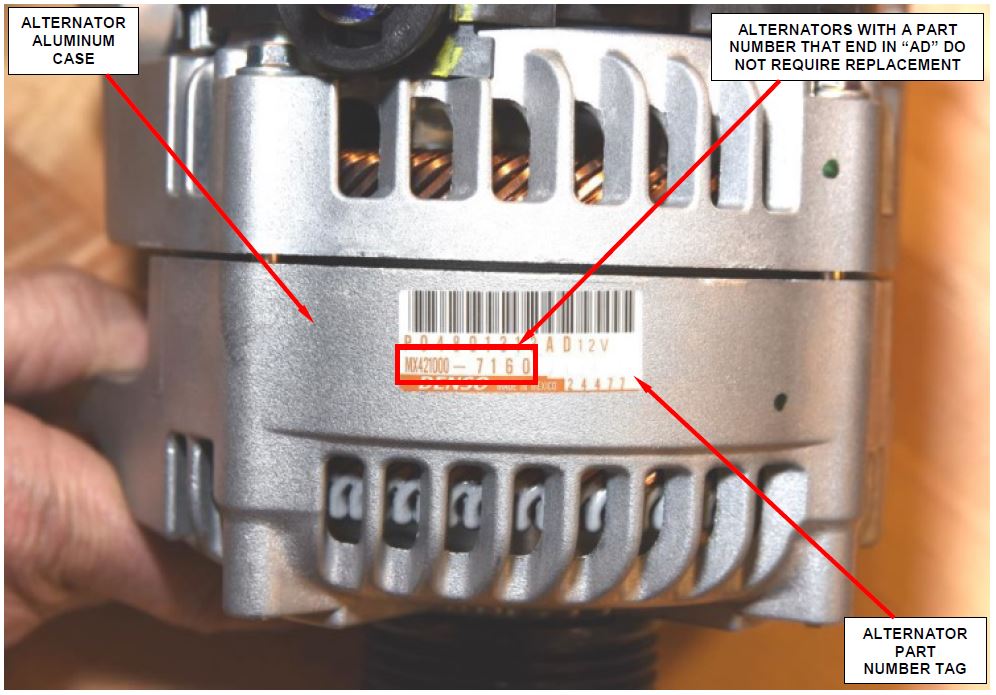
d. Inspect the part number on the alternator part tag (Figure 4):
- If the part number on the part number tag is TN421000-7160 or MX421000-7160 no further action is required. Continue with Step 4 of this procedure.
- If the part number on the part number tag is not TN421000-7160 or MX421000-7160 replace the alternator assembly. Continue with Section B. Replace Alternator (RAM
 Models).
 - If the part number tag on the alternator is not legible, missing, or the vehicle has an aftermarket/remanufactured alternator, replace the alternator assembly. Continue with Section B. Replace Alternator (RAM
 Models).
Figure 4 – Alternator Part Number (RAM Trucks )
)
(Removed From Vehicle for Photographic Purposes Only)
- Install the air cleaner housing and the air inlet tube (Figure 3).
- Connect the electrical connectors for the sensors on the air cleaner housing (Figure 3).
- Connect both negative battery cables (Figure 2).
- Close the hood and return the vehicle to the customer.
B. Replace Alternator (RAM Models)
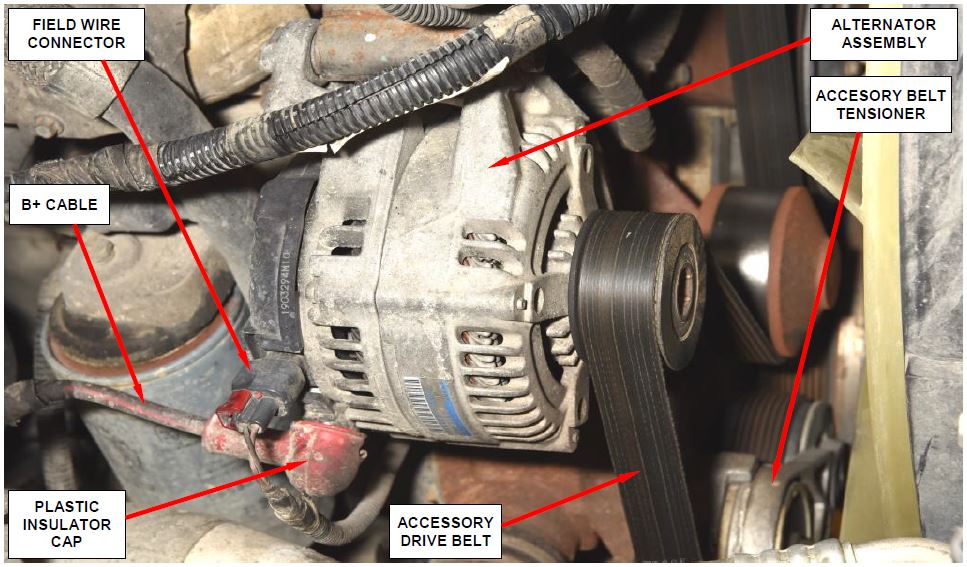
- Carefully release the tension on the accessory drive belt (Figure 5).
CAUTION: Do not let the tensioner arm snap back to the free-arm position, sever damage may occur to the tensioner.
- Disconnect field wire connector from the alternator (Figure 5).
- Unsnap plastic insulator cap from B+ output terminal (Figure 5).
- Remove and save the B+ cable retaining nut from the B+ stud.
- Disconnect the B+ cable from the alternator assembly (Figure 5).
Figure 5 – Alternator Wiring
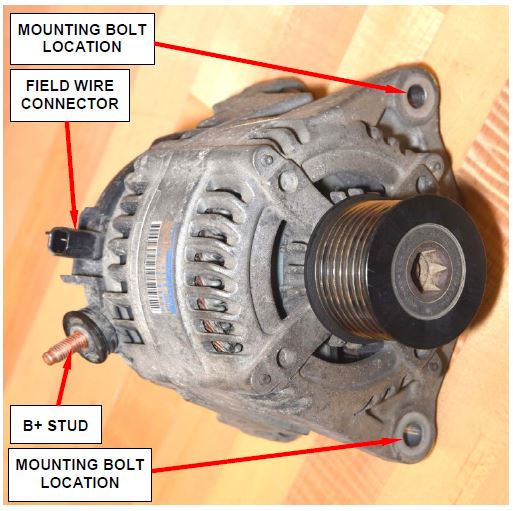
- Remove and save the alternator retaining bolts (Figure 6).
- Remove and discard the original alternator from the engine.
- Install the new alternator into position on the engine.
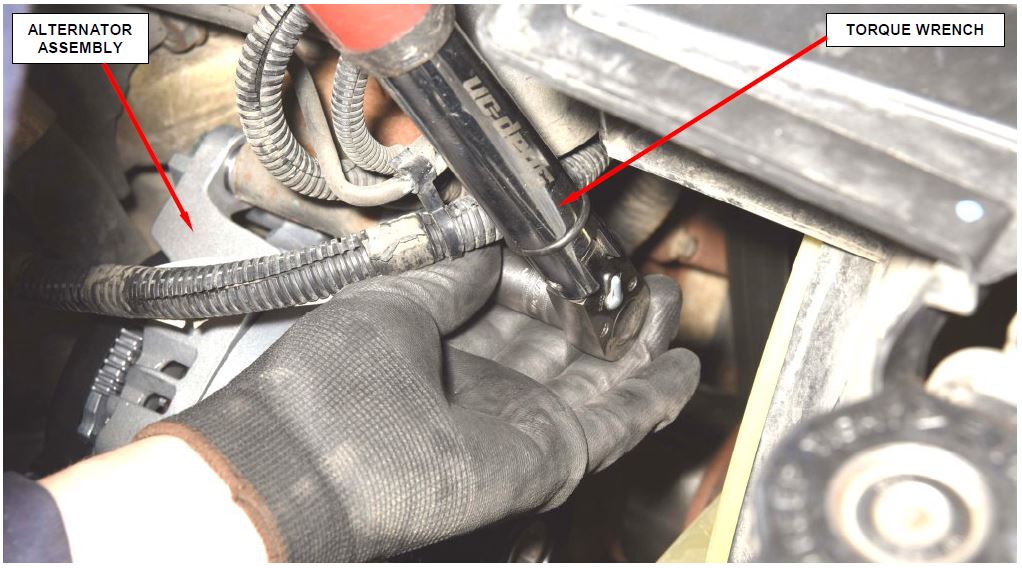
- Install the two alternator retaining bolts and tighten them to 35 ft. lbs. (48 N·m) (Figure 7).
Figure 6 – Mounting Bolt Location
Figure 7 – Tighten Mounting Bolts to Specifications
- Carefully install B+ terminal eyelet to alternator output stud.
- Install the B+ cable retaining nut. Tighten nut to 133 in. lbs. (15 N·m).
- Snap the plastic insulator cap onto B+ output terminal (Figure 5).
- Connect the field wire connector into the alternator (Figure 5).
- Carefully install the accessory drive belt (Figure 5).
CAUTION: When installing the accessory drive belt, be sure the belt is routed correctly. The water pump may rotate in the wrong direction if the belt is installed incorrectly. This will cause the engine to overheat. Refer to belt routing label located in engine compartment for proper accessory drive belt routing.
Also, never force an accessory drive belt over a pulley rim using a screwdriver. The synthetic fiber of the accessory drive belt could be damaged.
- Install the air cleaner housing and air inlet tube (Figure 4).
- Connect sensor electrical connectors located on the air cleaner housing (Figure 4).
- Install both negative battery cables (Figure 3).
- Connect the wiTECH scan tool and start a session.
- Using the wiTECH scan tool, verify that the new alternator is charging properly.
- Check for Diagnostic Trouble Codes (DTC’s).
- Clear all DTC’s.
- Remove the wiTECH scan tool from the vehicle.
- Return the vehicle to the customer.
C. Replace Alternator (LD Models with 3.6L Engine)
- Disconnect and isolate the negative battery cable.
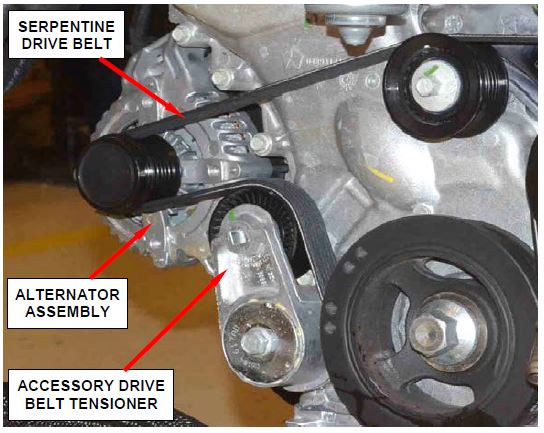
- Rotate the accessory drive belt tensioner counterclockwise until it contacts its stop and remove the accessory drive belt, then slowly rotate the tensioner into the free-arm position (Figure 8).
CAUTION: Do not let the tensioner arm snap back to the free-arm position, sever damage may occur to the tensioner.
Figure 8 – Accessory Drive Belt Tensioner
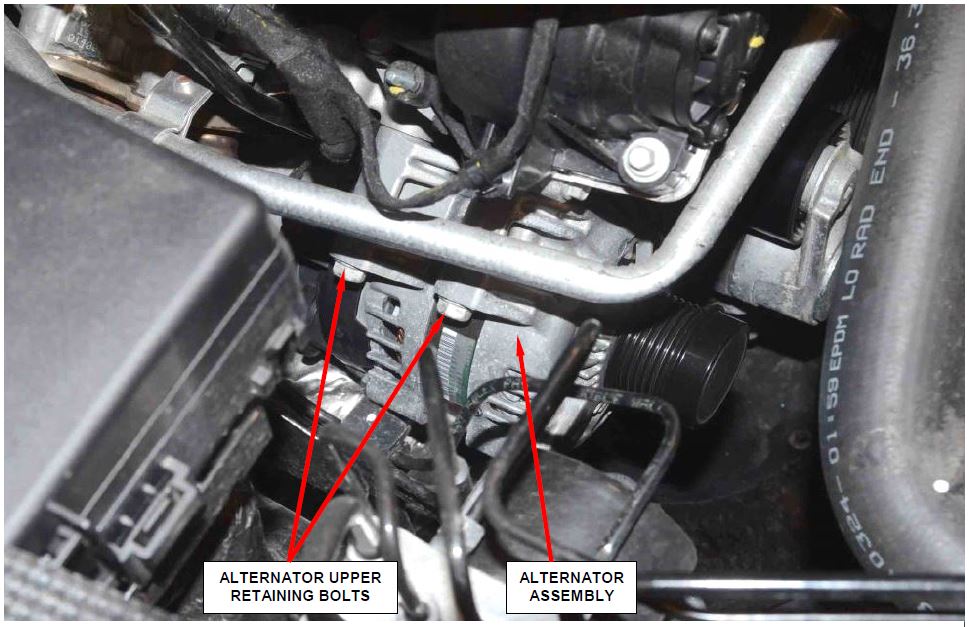
- Remove and save the alternator upper retaining bolts (Figure 9).
Figure 9 – Alternator Upper Retaining Bolt
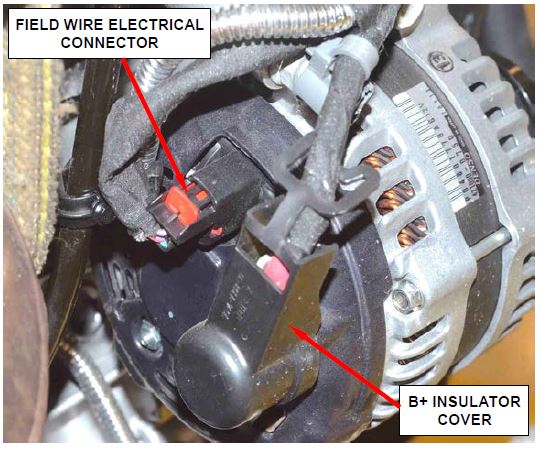
- Remove the insulator cover from the B+ output terminal at the rear of the alternator (Figure 10).
- Carefully remove and save the B+ terminal retaining nut at the rear of the alternator and remove the B+ terminal.
- Depress the field wire electrical connector tab at the rear of the alternator and disconnect the field wire electrical connector (Figure 10).
- Raise the vehicle on an appropriate hoist.
Figure 10 – Alternator Electrical Connections
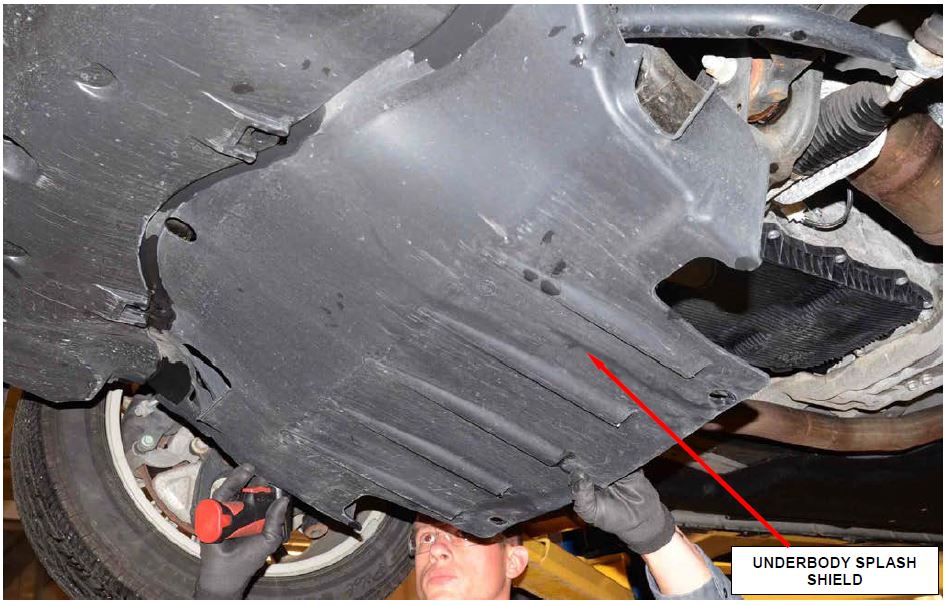
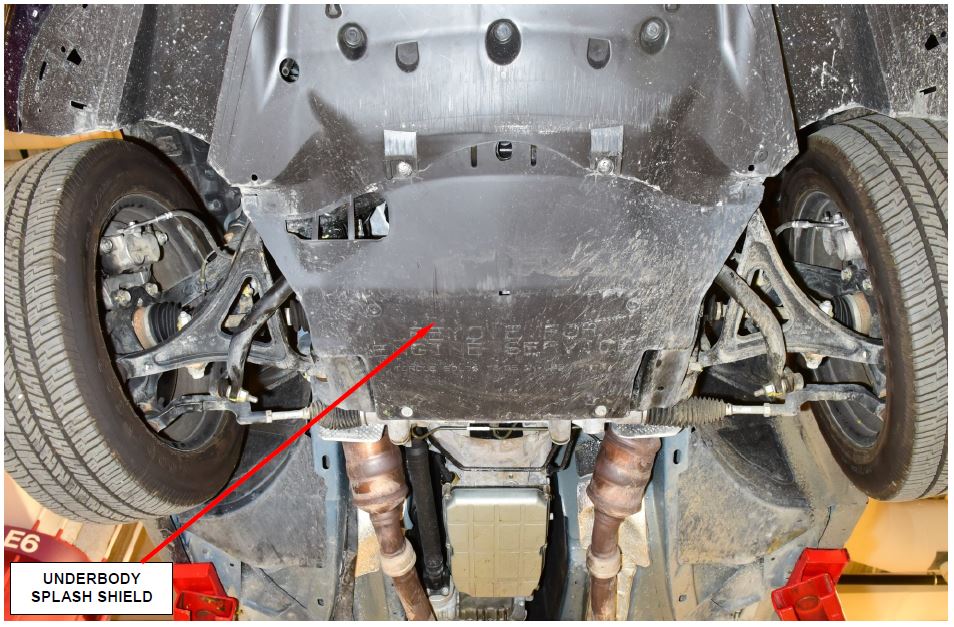
- Remove the underbody splash shield retainers and remove the underbody splash shield (Figure 11).
Figure 11 – Underbody Splash Shield
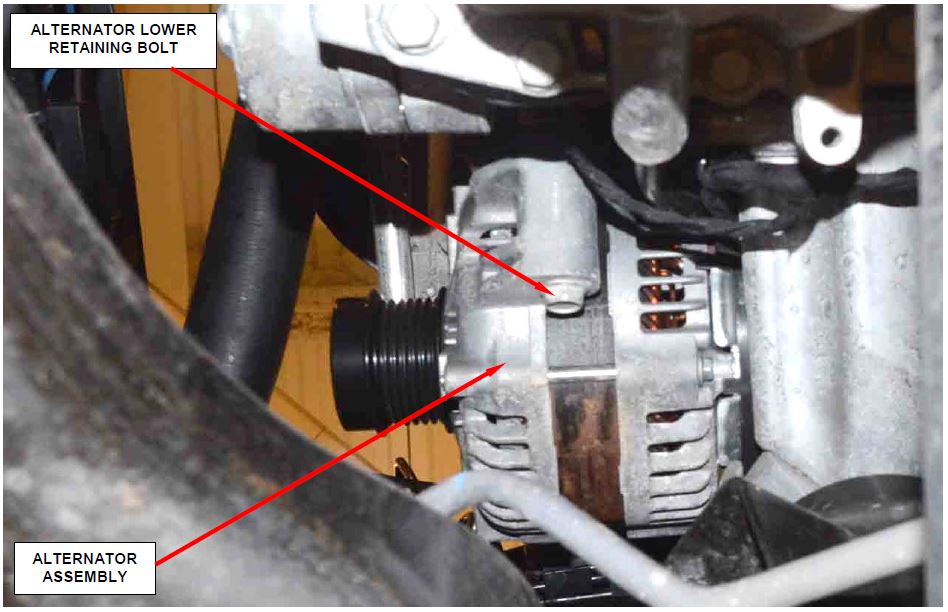
Figure 12 – Lower Alternator Retaining Bolt (viewed from under vehicle)
- Remove and save the alternator lower retaining bolt (Figure 12).
- For Rear Wheel Drive (RWD) vehicles, separate the alternator from the engine mounting bracket and remove the alternator from the engine compartment.
- For All Wheel Drive (AWD) vehicles, perform the following steps to remove the alternator assembly from the vehicle:
a. Lower the vehicle on the hoist.
b. Loosen the radiator cap on the coolant bottle.
c. Push the upper radiator hose aside and remove the alternator from the engine compartment.
d. Place the new alternator into position.
e. Tighten the radiator cap on the coolant bottle.
f. Raise the vehicle on the hoist.
- Position the new alternator to the engine and install the alternator lower retaining bolt finger tight.
- Lower the vehicle on the hoist.
- Install the alternator upper retaining bolts and tighten the bolts to 19 ft. lbs. (25 N·m).
- Snap the field wire electrical connector into the rear of the alternator assembly.
- Position the generator B+ terminal eyelet to the alternator output stud, install the retaining nut and tighten to 115 in. lbs. (13 N·m).
- Install the insulator cover onto the B+ output terminal.
- Raise the vehicle on the hoist.
- Tighten the lower alternator retaining bolt to 19 ft. lbs. (25 N·m).
- Position the underbody splash shield and install the underbody splash shield retainers.
- Lower the vehicle from the hoist.
- Rotate the accessory drive belt tensioner counterclockwise until it contacts the stop and install the accessory drive belt onto the pulleys and slowly release the tensioner.
CAUTION: When installing the accessory drive belt, be sure the belt is routed correctly. The water pump may rotate in the wrong direction if the belt is installed incorrectly. This will cause the engine to overheat. Refer to belt routing label located in engine compartment for proper accessory drive belt routing.
Also, never force an accessory drive belt over a pulley rim using a screwdriver. The synthetic fiber of the accessory drive belt could be damaged.
- Connect the negative battery cable and tighten the retaining nut to 115 in. lbs. (13 N·m).
- Connect the wiTECH scan tool and start a session.
- Using the wiTECH scan tool, verify that the new alternator is charging properly.
- Check for Diagnostic Trouble Codes (DTC’s).
- Clear all DTC’s.
- Remove the wiTECH scan tool from the vehicle.
- Return the vehicle to the customer.
D. Replace Alternator (LD Models with 5.7L Engine)
- Disconnect and isolate the negative battery cable
- Rotate the accessory drive belt tensioner clockwise until it contacts the stop and remove the accessory drive belt, then slowly rotate the tensioner into the free-arm position
CAUTION: Do not let the tensioner arm snap back to the free-arm position, sever damage may occur to the tensioner.
- Using an appropriate hoist, raise and support the vehicle.
- Remove and save the front underbody splash shield retainers and remove and save the underbody splash shield (Figure 13).
Figure 13 – Underbody Splash Shield
- Remove the transmission cooler tube retaining clamp at the right crossmember and position the transmission cooler tube aside.
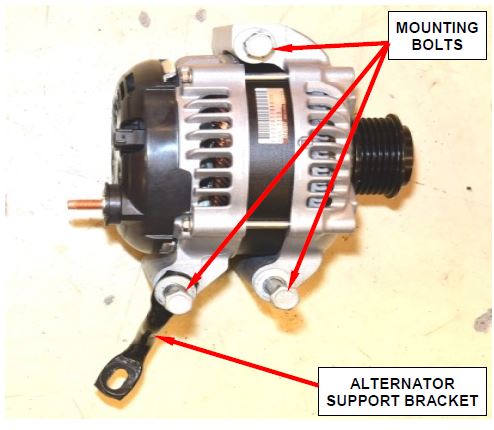
- Remove and save the alternator support bracket-to-engine mount retaining nut (Figure 14).
- Loosen the alternator support bracket retaining bolt completely.
Figure 14 – Alternator Support Bracket
- Loosen the remaining lower alternator retaining bolt completely (Figure xx).
- Lower the vehicle.
- Depress the field wire connector tab at the rear of the alternator and disconnect the field wire connector.
- Remove the insulator cover from B+ output terminal at the rear of the alternator.
- Remove the B+ terminal retaining nut at the rear of the alternator and remove the B+ terminal.
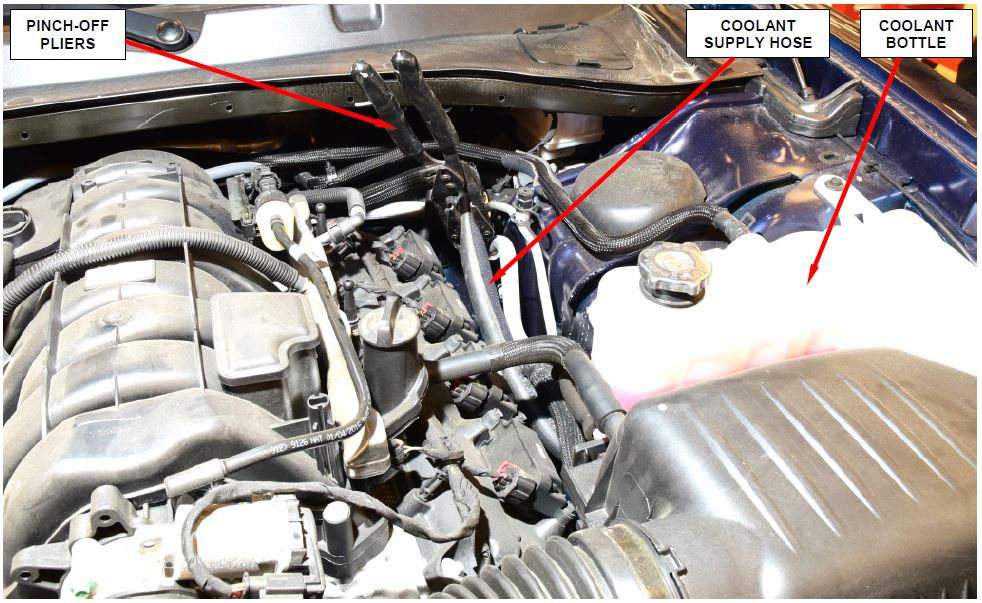
Figure 15 – Pinch-Off Coolant Bottle Coolant Supply Hose
- Pinch-off the coolant bottle coolant supply hose (Figure 15).
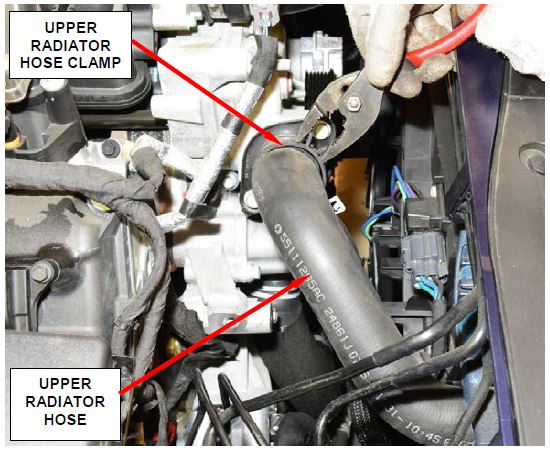
- Remove the upper radiator hose clamp at the thermostat housing (Figure 16).
- Disconnect the upper radiator hose from the thermostat housing hose fitting.
Figure 16 – Radiator Hose Clamp
- Remove the upper alternator retaining bolt and remove and discard the original alternator from the vehicle.
CAUTION: Use extreme care not to scratch the black anticorrosion coating on the brake tubes located at the antilock brake pump.
- Clean any spilled coolant from the vehicle.
- Transfer the mounting bolts and bracket to the new alternator.
- Place the new alternator into position and install the upper alternator retaining bolt finger tight.
- Install upper radiator hose and clamp.
- Raise and support the vehicle.
- Position the alternator support bracket to the engine mount, install the retaining nut finger tight.
- Position the alternator support bracket to the alternator and install the retaining bolt finger tight.
- Install the remaining alternator retaining bolt and tighten both lower retaining bolts to 54 N·m (40 ft. lbs.).
- Tighten the alternator support bracket to engine mount retaining nut to 28 N·m (21 ft. lbs.).
- Position transmission cooler line and install the transmission cooler line retainer clamp to the right crossmember.
- Position the underbody splash shield and install the retainers.
- Lower the vehicle.
- Tighten the alternator upper retaining bolt to 54 N·m (40 ft. lbs.).
- Position the alternator B+ terminal eyelet to the alternator output stud, install the retaining nut and tighten to 14 N·m (10 ft. lbs.).
- Install the insulator cover onto the B+ output terminal.
- Snap the field wire connector into the rear of the alternator.
- Rotate the accessory drive belt tensioner clockwise until it contacts the stop, install the accessory drive belt onto the pulleys and slowly release the tensioner.
CAUTION: When installing the accessory drive belt, be sure the belt is routed correctly. The water pump may rotate in the wrong direction if the belt is installed incorrectly. This will cause the engine to overheat. Refer to belt routing label located in engine compartment for proper accessory drive belt routing.
Also, never force an accessory drive belt over a pulley rim using a screwdriver. The synthetic fiber of the accessory drive belt could be damaged.
- Remove the hose pinch-off pliers.
- Fill the engine cooling system.
- Connect the negative battery cable and tighten the nut to 5 N·m (45 in. lbs.)
- Start the engine with the radiator cap removed from the hot bottle.
- Allow the engine to fully warm up and then add additional coolant as required.
- Install hot bottle radiator cap.
- Connect the wiTECH scan tool and start a session.
- Using the wiTECH scan tool, verify that the new alternator is charging properly.
- Check for Diagnostic Trouble Codes (DTC’s).
- Clear all DTC’s.
- Remove the wiTECH scan tool from the vehicle.
- Return the vehicle to the customer.
Completion Reporting and Reimbursement
Claims for vehicles that have been serviced must be submitted on the DealerCONNECT Claim Entry Screen located on the Service tab. Claims submitted will be used by FCA to record recall service completions and provide dealer payments.
Use the following labor operation numbers and time allowances:
| Labor Operation Number | Time Allowance | |
|---|---|---|
| Inspect alternator part number (ALL models) | 08-S6-81-81 | 0.2 hours |
| Inspect alternator part number and replace the alternator: | ||
| LD model with 3.6L engine | 08-S6-81-82 | 0.6 hours |
| LD model with 5.7L engine | 08-S6-81-83 | 1.1 hours |
Inspect alternator part number and replace alternator RAM trucks (with 6.7L Cummins diesel engine) (with 6.7L Cummins diesel engine)
| 08-S6-81-84 | 0.4 hours |
| Optional Equipment | ||
| LD models with All Wheel Drive (AWD) (with 3.6L engine) | 08-S6-81-60 | 0.2 hours |
Add the cost of the recall parts package plus applicable dealer allowance to your claim.
NOTE: See the Warranty Administration Manual, Recall Claim Processing Section, for complete recall claim processing instructions.
Dealer Notification
To view this notification on DealerCONNECT, select “Global Recall System” on the Service tab, then click on the description of this notification.
Owner Notification and Service Scheduling
All involved vehicle owners known to FCA are being notified of the service requirement by first class mail. They are requested to schedule appointments for this service with their dealers. A generic copy of the owner letter is attached.
Enclosed with each owner letter is an Owner Notification postcard to allow owners to update our records if applicable.
Vehicle Lists, Global Recall System, VIP and Dealer Follow Up
All involved vehicles have been entered into the DealerCONNECT Global Recall System (GRS) and Vehicle Information Plus (VIP) for dealer inquiry as needed.
GRS provides involved dealers with an updated VIN list of their incomplete vehicles. The owner’s name, address and phone number are listed if known. Completed vehicles are removed from GRS within several days of repair claim submission.
To use this system, click on the “Service” tab and then click on “Global Recall System.” Your dealer’s VIN list for each recall displayed can be sorted by: those vehicles that were unsold at recall launch, those with a phone number, city, zip code, or VIN sequence.
Dealers must perform this repair on all unsold vehicles before retail delivery. Dealers should also use the VIN list to follow up with all owners to schedule appointments for this repair.
Recall VIN lists may contain confidential, restricted owner name and address information that was obtained from the Department of Motor Vehicles of various states. Use of this information is permitted for this recall only and is strictly prohibited from all other use.
Additional Information
If you have any questions or need assistance in completing this action, please contact your Service and Parts District Manager.
Customer Services / Field Operations
FCA US LLC
This notice applies to your vehicle,
[Model Year and Model]
VIN XXXXXXXXXXXXXXXXX
S68/NHTSA 16V-739
LOGO
VEHICLE PICTURE
YOUR SCHEDULING OPTIONS
- RECOMMENDED OPTION
Call your authorized Chrysler / Dodge
 / Jeep
 / RAM
/ RAM dealership
- Call the FCA Recall Assistance Center at 1-800-853-1403. An agent can confirm part availability and help schedule an appointment
- Visit our Recall Website, recalls.mopar.com or scan below.
QR Code
You can find your nearest dealer and review all your scheduling options from this website. You will be asked to provide your Vehicle Identification Number (VIN) to protect and verify your identity. The last eight characters of your VIN are provided above.
DEALERSHIP INSTRUCTIONS
Please reference Safety Recall S68.
IMPORTANT SAFETY RECALL
ALTERNATOR
Dear [Name],
This notification is being sent to you in accordance with the National Traffic and Motor Vehicle Safety Act.
FCA has decided that a defect, which relates to motor vehicle safety, exists in certain [Model Year Make Model] vehicles.
It is extremely important to take steps now to repair your vehicle to ensure the safety of you and your passengers.
WHY DOES MY VEHICLE NEED REPAIRS?
The alternator on your vehicle[1] may experience a rapid failure due to diode thermal fatigue. Variability in the failure mode ranges from no output, reduced output, and/or a fully shorted to ground condition. Depending on the alternator failure mode and timing, the vehicle electrical system voltage may drop to critical levels, disabling systems such as Antilock Brake System (ABS), Electronic Stability Control (ESC), Electronic Control Module (ECM), and/or the Central Body Controller (CBC).
The driver will have limited or no detection of the alternator failing, which can result in vehicle shutdown while driving and/or an underhood electrical fire without warning.
HOW DO I RESOLVE THIS IMPORTANT SAFETY ISSUE
FCA will repair your vehicle [2] free of charge (parts and labor). To do this, your dealer will inspect the alternator and replace it if necessary. In addition, your dealer will require your vehicle for proper check-in, preparation, and check-out during your visit. Your time is important to us; please be aware that these steps may require more time. The estimated repair time is one hour. We recommend that you schedule a service appointment to minimize your inconvenience. Please bring this letter with you to your dealership.
TO SCHEDULE YOUR FREE REPAIR CALL 1-800-853-1403
OR YOUR CHRYSLER , DODGE
 , JEEP
 OR RAM
 DEALER TODAY
WHAT IF I ALREADY PAID TO HAVE THIS REPAIR COMPLETED?
If you have already experienced this specific condition and have paid to have it repaired, you may visit www.fcarecallreimbursement.com to submit your reimbursement request online. [3] Once we receive and verify the required documents, reimbursement will be sent to you within 60 days. If you have had previous repairs performed and/or already received reimbursement, you may still need to have the recall repair performed.
We apologize for any inconvenience, but are sincerely concerned about your safety. Thank you for your attention to this important matter.
Customer Assistance/Field Operations
Fiat Chrysler
 Automobiles US LLC
[1] If you no longer own this vehicle, please help us update our records. Call the FCA Recall Assistance Center at 1-800-853-1403 to update your information.
[2] If your dealer fails or is unable to remedy this defect without charge and within a reasonable time, you may submit a written complaint to the Administrator, National Highway Traffic Safety Administration, 1200 New Jersey Ave., S.E., Washington, DC 20590, or you can call the toll-free Vehicle Safety Hotline at 1-888-327-4236 (TTY 1-800-424-9153), or go to safercar.gov.
[3] You can also mail in your original receipts and proof of payment to the following address for reimbursement consideration: FCA Customer Assistance, P.O. Box 218004, Auburn Hills, MI 48321-8007, Attention: Recall Reimbursement.
Note to lessors receiving this recall notice: Federal regulation requires that you forward this recall notice to the lessee within 10 days.
 Loading...
 Loading...
 Loading...
